
Manual


GoldenEar Technology ► Invisa MPX Manual
Invisa
®
MPX Owner’s Manual
10
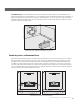
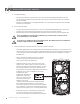
10. While holding in place, tighten the six lock arm screws with a screwdriver (Figure 7). This will rotate the
lock arms and secure the speaker to the wall/ceiling. DO NOT OVERTIGHTEN the lock arm screws as this
could damage the drywall. If you are using a power screwdriver or drill, set the torque to a value of no
more than 7 in.-lb (8dN-m).
11. Install the grille by placing it over the installed speaker and aligning the powerful miniature magnets.
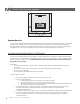
Setting the Invisa Speaker’s High Frequency EQ Control (HF EQ Switch)
We suggest starting with the HF EQ control (Figure 8) in the center position, in typical rooms with a balance
of refl ecting and absorbing surfaces. If, however, your listening room is overly “bright” due to many refl ective,
hard surfaces, select the “-” position to effectively compensate for this type of room acoustics issue. If, however,
your listening room is fi lled with heavy furniture and fabrics or you are sitting fairly far from the speakers, making
the sound “dull”, select the “+” position to compensate for this type of room acoustics issue.
Figure 8
LOCK ARM SCREWS.
TURN COUNTER-CLOCKWISE
TO TIGHTEN LOCK ARMS
AND SECURE SPEAKER
TO MOUNTING SURFACE
(6 PLACES).
LOCK ARM IN
OUT POSITION
Figure 7