
Owner's Manual
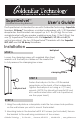

SuperSwivel
TM
Users Guide
GoldenEar Technology
'
SuperSwivel Manual
'
PART #: 1982AG01
'
06152015
3. Make sure to use appropriate mounting hardware that is suitable for
your wall construction and the weight of the speaker you intend to
install on the SuperSwivel. PLEASE NOTE: We do not provide mounting
screws or other hardware because we do not know what kind of wall
material is present in your particular installation.
4. CAUTION: If you are not comfortable performing these mounting
procedures we strongly suggest having a professional mount your
speakers (see your Dealer).
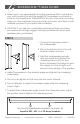
Step 4
4. Adjust the speaker to the desired angle and tighten the clamping
screw rmly.
5. Do not over-tighten as that may strip the screw threads.
6. Do not attempt to adjust the speaker angle while the clamping
screw is tight.
7. To adjust the loudspeaker angle, loosen the clamping screw, adjust
the position and re-tighten the clamping screw.
1. Connect the speaker wires to
the loudspeaker.
2. Place the ball pivot into the wall
bracket clamp as shown.
3. Hold the loudspeaker securely
with one hand and tighten the
clamping screw until you feel
friction between the ball pivot and
the clamp, but not so tight as to
prevent easy aiming of the speaker.
Use two (2) SuperSwivel
™
brackets, as shown, for
SuperSat 50C, 60C and 3D Array Sounbars.