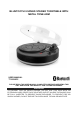
BLUETOOTH 3-SPEED STEREO TURNTABLE WITH METAL TONE ARM USER MANUAL TT-933BPC PLEASE READ THIS USER MANUAL COMPLETELY BEFORE OPERATING THIS UNIT AND RETAIN THIS BOOKLET FOR FUTURE REFERENCE WARNING TO PREVENT FIRE OR SHOCK HAZARD, DO NOT USE THIS PLUG WITH AN EXTENSION CORD, RECEPTACLE OR OTHER OUTLET UNLESS THE BLADES CAN BE FULLY INSERTED TO PREVENT BLADE EXPOSURE. TO PREVENT FIRE OR SHOCK HAZARD, DO NOT EXPOSE THIS APPLIANCE TO RAIN OR MOISTURE.
The Caution Marking is located at the bottom enclosure of the apparatus. The Rating plate is located at the back enclosure of the apparatus IMPORTANT SAFETY INSTRUCTIONS 1. 2. 3. 4. 5. 6. 7. 8. 9. 10. 11. 12. 13. 14. 15. 16. 17. 18. 19. Read these instructions. Keep these instructions. Heed all warnings. Follow all instructions. Do not use this apparatus near water. Clean only with dry cloth. Do not block any ventilation openings. Install in accordance with the manufacturer’s instructions.
home, consult your product dealer or local power company. For products intended to operate from battery power, or other sources, refer to the operating instruction. 20. Object and Liquid Entry - Never push objects of any kind into this product through openings as they may touch dangerous voltage points or short-out parts that could result in a fire or electric shock. Never spill liquid of any kind on the product. 21.
COMPLIANCE WITH FCC REGULATIONS FCC ID: RQU-TT-933BPC This device complies with Part 15 of the FCC Rules. Operation is subject to the following two conditions: (1) this device may not cause harmful interference, and (2) this device must accept any interference received, including interference that may cause undesired operation. NOTE : This equipment has been tested and found to comply with the limits for a Class B digital device, pursuant to Part 15 of the FCC Rules.
PROTECT YOUR FURNITURE This system is equipped with non-skid rubber ‘feet’ to prevent the product from moving when you operate the controls. These ‘feet’ are made from non-migrating rubber material specially formulated to avoid leaving any marks or stains on your furniture. However certain types of oil based furniture polishes, wood preservatives, or cleaning sprays may cause the rubber ‘feet’ to soften, and leave marks or a rubber residue on the furniture.
AC OPERATION 1. Connect the ac POWER CORD (#15) to an AC outlet. 2. Rotate the POWER/VOLUME ON/OFF SWITCH (#7) clockwise to turn on the system. The POWER INDICATOR (#6) will light up. ANTI-SHOCK LOCK DOWN SCREW The turntable on this unit features a built in Anti-Shock system, and the turntable is locked down when shipped from the factory. Turn the ANTI-SHOCK LOCK DOWN SCREW (#2), in a clockwise direction to release the turntable and activate the anti-shock feature before using the turntable.
pairing/Discoverable mode. 4. Turn on the Bluetooth function for the device you want to link to, and enable the search or scan function to find the TT-933BPC. 5. Select "TT-933BPC" from the device list when it appears on your device screen. If required, enter the pass code “0000” to pair (link) TT-933BPC with your device. 6. If you are pairing (linking) your computer to the speaker using Bluetooth, you may need to set the TT-933BPC as your computer’s default sound device. 7.
order to be able to listen to the record from the Turntable. (3). Turn Off the TT-933BPC when you finish listening. Don't forget to switch off the power on your external device as well. LINE OUT CONNECTION You can connect the TT-933BPC to an external Hi-Fi / AMPLIFIER system by connecting the LINE-OUT RCA JACKS (#7) to the auxiliary input jacks on your Hi-Fi / Amplifier system with RCA cables (not included). Note: The Volume control on the TT-933BPC will not adjust the volume when using the LINE-OUT jacks.
3. Select “Edit” and then click “Audio Properties“ towards the bottom of the menu to select “Audio properties” interface. 4. In the Sound Recording field, click the pull down menu to select “USB PnP Audio Device” as Default device of sound recording. 5. Click the Volume button under the Sound recording tab to open ”Recording Control“ interface; 6. Adjust the line in volume to a level without distortion.
RUNNING AUDACITY SOFTWARE Note: Please review the software license and distribution restrictions found on the software disc. Use of the Audacity software is subject to those conditions and restriction. For additional help with recording and editing music by using the Audacity software, please visit http://audacity.sourceforge.net/ 1. Run the Audacity from the Windows start menu or double click the Audacity icon on your computer desktop. 2. The Audacity main screen appears.
4. Adjust the input and output volume by sliding the Input and Output Volume bars. Output Volume Input Volume 5. Click the record button to start recording, left and right tracks will show on your computer screen. If you cannot see the sound waves appear on the Interface when recording, adjust the Input volume bar. 6. Use the Audacity control panel to record or listen the music you have recorded - Click button to start recording.
- Click the button to pause; - Click the button to stop. EXPORT THE MUSIC FILES TO WAV OR MP3 FORMAT Once you have finished recording, make sure you save your recorded music to the computer. 1. Click File menu and move down to “Export” to convert the file to WAV format or MP3 format. 2. Click on WAV or MP3 format you want to save the music as in pull down menu of “Save as type” field, and you will be asked for the file name of your recorded music NOTE: Audacity does not export MP3 files directly.
Fig.2 CARE AND MAINTENANCE 1. 2. 3. Avoid operating your unit under direct sunlight or in hot, humid or dusty places. Keep your unit away from heating appliances and sources of electrical noise such as fluorescent lamps or motors. Unplug the unit from the electrical power outlet immediately in case of malfunction. CLEANING THE UNIT To prevent fire or shock hazard, disconnect your unit from the AC power source when cleaning.
Wall outlet is not functioning. POWER Switch in the OFF position Unit is ON but there is low or no volume Sound is distorted. Plug another device into the same outlet to confirm the outlet is working.
your eligibility for warranty service and repair of the unit without cost. Also include a note with a description explaining how the unit is defective. A customer service representative may need to contact you regarding the status of your repair, so please include your name, address, phone number and email address to expedite the process. IF THE UNIT IS OUTSIDE THE WARRANTY PERIOD, please include a check for $50.00 to cover the cost of repair, handling and return postage.