GoldStar "--'----_--_ VCR OWNER'S MANUAL vllSl R-E21M Before connecting, Operating or adjusting this product, please read this instruction booklet carefully and completely.
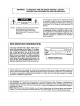
WARNING: TO PREVENT FIRE OR SHOCK HAZARD, DO NOT EXPOSE THIS APPLIANCE,TO RAIN OR MOISTURE. 1 The exclamation point within an equilateral triangle is intended to alert the user to the presence of important operating and maintenance (servicing) instructions in the literature accompanying the product. CAUTION: TO REDUCE THE RISK OF ELECTRIC SHOCK.
Congratulations on buying the WLtLWSJ V=deo Cassette these simple instructions before operating your VCR. Recorder (VCR). For your convenience, please read NOTES: * This Video Cassette Recorder is compatible with any video cassette bearing the _ mark. • _ is designed to expand your opportunities for in-home TV viewing and not for any usage which might violate the copyright laws.
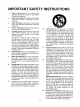
IMPORTANT SAFETY INSTRUCTIONS . Read Instructions-All the safety and op0rating instructions should be read before the product is operated. 2= Retain Instructions-The safety and operating instructions should be retained for future reference. 3_ Heed Warnings-All warnings on the product and in the operating instructions should be adhered to. 4o Follow Instructions-All operating instructions should be followed. 5.
14. Protective Attachment Plug-The product is equipped with an attachment plug having overload protection. This is a safety feature. See Instruction Manual for replacement or resetting of protective device. If replacement of the plug is required, be sure the service technician has used a replacement plug specified by the manufacturer that has the same overload protection as the original plug. 15.
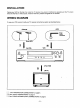
INSTALLATION Placing your VCR on the top of or under the -IV receiver may result in nnterferenceappearing on the TV screen when the VCR is on. If this occurs, move the VCR to a position alongside the TV receiver. WIRING DIAGRAM To use your VCR connect it with your TV receiver and antenna system as illustrated below. Antennas CATV From Cable Company "! (From ANT.
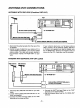
ANTENNANCR ANTENNAS CONNECTIONS WITH ONE LEAD (Combined VHF-UHF) VCR i " "= :-_-_ _A 75-ohm Comdal (round) Cable lilllllll !-! nnooooooo Ill ®'® _ III To "IN FROM ANT" 300-ohm Twin-lead Flat Cable ntenna Adaptor (300-ohm to 7S-ohm) (not aupplled) ,.,,,, i. 1. Disconnect the antenna leads from the rear of the "IV receiver. 2. Identify the type of cable from your antenna. If it is a round cable as illustrated, it is a 75-ohm coaxial antenna cable.
VCR/TV CONNECTIONS @.@ ] __J III @_@ IDDDQDDDDD 111 =o ODODDDDO0 DOgDDD =/ To "OUT TO TV" 75-ohm Com(lal Cable with Antenna Adaptor (accessory number 1,) "= OR \ Antenna Splitter (75-ohm to VHF/UHF 300ohm) (not supplied) "rJI TV Antenna Terminals i 3. Connect the wires marked "VHF" on the Splitter to the VHF terminals on the rear of your television. 1. Connect the 75-ohm Coaxial Cable with Antenna adaptor (accessory number 1) to "OUT TO TV" on the VCR.
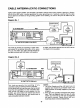
CABLE ANTENNA (CATV) CONNECTIONS "Note to CATV system installer: This reminder is provided to call the CA'I-V system installer's attention to Section 820-40 of the NEC which provides guidelines for proper grounding and, in particular, specifies that the cable ground shall be connected to the grounding system of the building, as close to the point of cable entry as practical". Diagram No. 1 IC°=°'ntenn°i i To "IN FROM ANT" c,=, VCR ] i r H, ] r ConverterJ OUT / |'%.
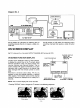
Diagram No. 3 Cable Antenna I o A VCR TO "IN FROM ANT" ! c o ter '"I ii ," rr--, '" i I • Cable Converter OUT I To "OUT TO TV" Use A position of A-B switch for watching and/or recording channels that do not require a cable converter box. i \ TV VHF ANT Use B position of A-B switch for watching and/or recording channels that require a cable converter box. ON SCREEN DISPLAY Set TV to channel 3 or 4 to match OUTPUT CHANNEL SET on back of VCR.
ON SCREEN MENU FEATURES You only need to press the MENU button on the remote cotrol. Each number buttons are indicated next to the feature displayed on the OSD menu. When you select a feature turn to the section in this manual and read the tull description accompanying the instruction there. SET UP MENU DISPLAY AUTO CHANNEL Your VCR allows remote control adjustment of several additional feature options. You can use the SET UP menus to select the functions that best fit your porsonal needs.
CHANNEL PRESETTING (By using the Remote Control) This VCR is equipped with a frequency synthesized tuner capable of receiving up to 181 channels (VHF channels 2~13, UHF channels 14~69 and CATV channels 1~125), but channel presetting is required as described below after "ANTENNNVCR CONNECTIONS" and "VCR/TV CONNECTIONS" are made as described on pages 6 and 7. AUTO CHANNEL SETTING The automatic programming feature makes it easy and convenient to program the TV station into the tuner's memory.
TO ADD OR ERASE CHANNELS CHANNEL MEMORY 3. Press "1" button to select "TV" or "CATV". If your VCR is connected to a home antenna system, select "TV", select "CATV" when your VCR is connected to a cable antenna. Switching is performed between "TV" and "CATV" on the TV screen every time "1" button is pressed. PUSH SELECTION FROM This feature allows you to manually add or remove channels from the channel scan. To do so, please refer to the procedure below: TO ERASE A CHANNEL(S) NUMBER 1.
SET YOUR TELEVISION TO THE VCR CHANNEL NOTES: • If the range is short, try new batteries. cAn object between the VCR and remote control may block the invisible light beam and operation will not be possible. 1. Set your TV to Channel 3 unless Channel 3 is one of the TV stations in your area. If Channel 3 is used in your area, set your "IV to Channel 4. The RF Channel Select Switch is located on the Rear Control Panel. Slide the switch of CH3 or CH4 to match the channel selector on your IV.
MAKING A SAMPLE RECORDING 1. Insert the Cassette so the transparent window is up and the arrow toward the Cassette Loading Door until the VCR mechanism starts to pull the cassette into the opening. NOTES: 1. When the cassette is loaded, the power is turned on automatically. 2. Be sure to check that the erase prevention tab is not missing. If it is removed, the VCR goes into playback mode automatically. 5. Now, press "REC/ITR" button once, on the VCR or on the remote control.
IDENTIFICATION AND OPERATION OF CONTROLS Now that you have experienced the simple operation of your VCR, let's get familiar with the complete operation of your VCR and all its capabilities. [ REAR [ AUDIO IN When this "AUDIO IN" jack, receive audio signals from a Video Camera or another VCR, the "INPUT VSELECT" button must be in the "AN" position. If you select AN, "AV" indicator appears on the screen. "VHF/UHF OUTPUT" 75-ohm round Cable Connector connects to this output.
I FRONT I CASSE'n'E LOADING DOOR When a cassette is inserted, loading will be completed automatically and Tape-In indicator will light. "POWER" ON/OFF BU'R'ON Press to turn the power on. The indicator will illuminate. To turn the unit off, press the button again. If a timer reservation has been made when the power is switched OFF, the VCR will go into a timer recording standby status. (The °'TIMER " indicators will go ON.) NOTES: 1. Power is turned on automatically when the cassette is loaded.
"REW" REWIND/ "VISUAL SEARCH" REVERSE SEARCH Press "REW" button during Stop or Fast forward mode and fast rewinding starts. "REW" indication appears on the screen. Press the button during playback of tape. The tape is played back in the rewind direction approximately 15 times faster than the normal speed (EP recorded tape), 9 times faster than the normal speed (LP recorded tape) or 5 times faster than the normal speed (SP recorded tape) to confirm the recorded contents.
REMOTE CONTROL The remote control is used for most of the operations and features of the VCR. Before proceeding, batteries into the remote and get familiar with the buttons on the remote. install Aim the remote control at the receiver on the front panel of the VCR. NOTES: 1. If the range is short, try new batteries. 2.
OSD (On Screen Display) FUNCTION BU'FrONS MENU BU'rFON Used to enter the On-Screen Programming mode. CLEAR BU1 rON Used to go backward and correct the programmed information. DISPLAY Bu'n'ON Press to display the VCR operation mode, tape counter, channel number, date and clock. Press this button once again to remove the on-screen display. Press this button twice to remove the clock display (the display switches by pressing the "CLOCK/ COUNT" button when tape is inserted).
INPUT SELECT BUTTON ('I'U/AV) TUNER: (TU) To record signals coming from the built-in tuner (Video and Audio), AUDIONIDEO: (AV) To record signals coming from the VIDEO IN and AUDIO IN terminals. NOTE: This VCR can be used as an Audio deck when Input Select button is in AV position. TRACKING "VCR/TV" SELECTOR Selects the program for viewing on your TV. The "VCR" position (the "VCR" indicator is on) supplies a signal to your TV on Channel 3 or 4 depending on the RF Channel Select Switch setting.
CLOCK SETTING (By using the Remote Control) _Things to know before starting w • The clock uses the 12-hour system. (Be sure to set AM and PM correctly.) • When the VCR and "IV are turned on for the first time, the clock will read ..... . If the clock display disappears, press the DISPLAY button to recall it. • The buttons for setting the clock are on the remote control.
Set the hour by pressing two number buttons on the remote control and two more for the minute (for example, 0 2 15 for 2:15). The display prompts you to select AM or PM. CLOCK SET TIME 02:15,_-!-_ - A I P." /I TO END PUSH MENU O Press "1" for AM or "2" for PM (for example, 2 for PM). The display flashes and prompts you to set the date. CLOCK SET TIME 02:15 PM MONTI-_A)f/YEAR DATE _;4 --I.
RECORDING WHILE YOU ARE AWAY Be sure that the clock is set to the correct time. (Refer to "CLOCK SEI-IING" on page 21 .) 3. Press "POWER" ON/OFF button to OFF. The TIMER indicator will appear on the VCR display. 1. insert the cassette. NOTE: Before starting check that the erase prevention tab is not missing. If it is removed, recording will not start. NOTES: 1. If the erase prevention tab is removed, the cassette is ejected automatically and the "TAPE-IN" indicator will flash.
PROGRAM TIMER SETTING (You must use the Remote Control) This VCR can be programmed to record up to 8 programs within a period of 1 year. For unattended recording, the timer needs to know the channels to be recorded and the times to start and to end. _Things to know before starting • If you try to set the program timer before setting the clock, "CLOCK SET" mode appears on the TV screen. Set the time and date before proceeding. • The buttons for programming the timer are on the remote control.
_1 Press MENU to return to first screen as shown. Press "2" to enter a NORMAL program, "3" to enter a DAILY program, or "4" to enter a WEEKLY program. Normal event ... for recording up to 8 programs on a single day or over the days within a period of 1 year. I I Weekly event ... for recording up to 8 programs on a certain day of every week. Daily event ... for recording up to 8 programs at the same time(s) Monday through Friday.
O Press two digits for the channel to be recorded (for example, "0" "4" for channel 4). The display will prompt you to select a recording speed. NORMAL PROGRAM PROGRAM 1 X t / ,o4 ,. S_ .--_-1 LP-J-;_ EP _,-J_--_ /1\ /'IN /I TO END PUSH MENU _) Press a digit from "1" to "3" on the remote control to select the recording speed you want program ("1" for SP, "2" for LP, "3" for EP mode). (for example, "1" for SP). The display will then prompt you to enter the recording start time.
_]_)Press four digits, two for the start month and two more for the start date, (for example, "0" "9" "0" "2" to begin recording on September 2). The year and day of the week are displayed automatically. NORMAL PROGRAM PROGRAM 1 CH 04 SPEED SP START TIME 06:00 PM STOP TIME 07:30 PM START DATE 09/02/93 THU TO END PUSH MENU NOTES: To change an incorrect entry, or an undesired entry, proceed as follows; 1. Press "CLEAR" button repeatedly until the digit to be changed flashes. 2. Enter the correct number.
ERASING A TIMER PROGRAM NORMALPROGRAM 1. Press "MENU" button on the remote control to display the menu. 2. Press "5" to erase a program. (Program Review). 3. Press "5" again if you want to review the next program information. 4. Press "CLEAR" button when the program information you want to erase is displayed. 5. When you are finished, press "MENU" button again.
INSTANT TIMER RECORDING (ITR) Instant Timer Recording allows you to make simplified timer recording without using the program timer. • FOR ITR RECORDING 1. Be sure that the clock is set to the correct time. (Refer to "CLOCK SETI'ING".) 2. Insert the cassette (one with the erase prevention tab intact) into the cassette loading door. 3. Press "INPUT SELECT" button so as to select Channel Number Display. 4. Press "CHANNEL" Select Buttons to select the channel to be recorded. 5.
RECORDING ONE PROGRAM WHILE VIEWING ANOTHER 1. Insert the cassette (one with erase prevention tab intact) into cassette loading door. 2. Press "TAPE SPEED" button to select the desired speed. 3. Press "INPUT SELECT" button so as to select Channel Number Display. 4. Press Channel Select Button ( • or • ) to select channel to be recorded and set the television to Channel 3 or 4 depending on which channel is selected on the RF CHANNEL Select Switch on the rear of the VCR. 5.
VHS INDEX SEARCH SYSTEM (VISS) The VHS INDEX SEARCH SYSTEM enables you to locate the beginning of any recording made on this VCR. Whenever a recording is begun, an invisible INDEX mark is recorded on the tape. This feature makes use of VISS signals to search out a specified tape segment and begin playback automatically. 1 ! I _Y "FF" Button "REW" Button • MARKING VlSS SIGNALS Automatic marking during recording ....
VISUAL SEARCH (F-SEARCH AND R-SEARCH) When you press "FF(I_,)" (Forward SEARCH) or "REW(4< )" (Reverse SEARCH) button during playback, the tape will be played back at a speed about 15 times faster than the normal playback speed (EP recorded tape), 9 times faster than the normal playback speed (LP recorded tape), or 5 times faster than the normal playback speed (SP recorded tape), and you can easily locate a certain spot on the tape. - PICTURE SEARCH.
PAUSE/STILL When "PAUSE/STILL" button is pressed during recording. "RECP" will appear and the VCR will stop recording. This feature can be used for eliminating unwanted station breaks or program material while recording a TV program or when using a camera from one scene to another. To start again press "PAUSE/STILL" button, and "P" indication will go off and the VCR will continue recording. When "PAUSE/STILL" button is pressed during playback, a still picture can be seen.
USING THE COUNTER MEMORY FEATURE The tape counter on this VCR indicates the tape travel time in hours, minutes, and seconds during recording and playback. The memory feature allows you to return to a specific spot on the cassette after recording or playing. The memory works with the Counter to return to a particular spot on the cassette. The memory is designed to stop when the counter reaches "0:00:00" during rewind (REW). This feature is especially helpful when editing a recording. ,, 1.
AUTO-REWIND In the record, playback or fast forward mode the VCR automatically VCR will stop at the beginning of the tape. rewinds the tape at the end of tape. The AUTO MEMORY POWER SHUT-OFF During rewind, press "POWER" button once: Rewind complete _ Auto Power off. Press "POWER" button again to release "AUTO MEMORY POWER SHUT-OFF" function. If the cassette has reached the end and goes into auto-rewind, the power will also off and eject the tape.
OPERATING HINTS .... oAfter you have finished using the VCR, _ewJna, eject and remove the cassette. Place the cassette in its protective sleeve to protect it from dust. It is not necessary to rewind the cassette before removing it, but if you do, it will be ready to play or record the next time you use it. • Be sure the VCR "CHANNEL" selector is on the correct channel you wish to record.
TROUBLESHOOTING Your Video Cassette Recorder is a highly sophisticated instrument. It has been carefully checked and adjusted at the factory under the most rigid quality control and inspection systems. However, should problems develop, check the following points and take necessary corrective measures. INSERTING OR REMOVING THE CASSETTE Check Point & Correction Symptom Cassette cannot Compartment. be inserted into Cassette • Load cassette in direction indicated cassette.
CLOCK Check Point & Correction Symptom " on the screen. "Clock displays" • Reset time according been interrupted. to instructions. Power has VCR does not start at preset record starting time. • Set up recording time according to instructions. • Be sure the "AM-PM" display is correct. • Press "POWER" ON/OFF button off. VCR does not start at preset record starting time. The tape is ejected in the timer mode. • The cassette has had the erase prevention tab removed.
SPECIFICATIONS Video input Video output Audio input Audio output Tape speed Fast forward/Rewind Power requirements Power consumption Dimensions Weight 1Vp-p, 75 ohms unbalanced 1Vp-p, 75 ohms unbalanced 0.308 Vrms 0.308 Vrms time 33.35 mm/sec (SP), 16.67 mm/sec (LP), 11.12 mm/sec (EP) Less than 6 minutes with T-160 cassette 120V AC. 60 Hz 29W 360(W)× 88(H) × 335(D) mm Approx. 4.
Cut off here These are simplified instructions for recording and playback with the VHS Video Cassette Recorder. It is recommended that you first thoroughly read the instructions in the owners manual before referring to this sheet. This may be kept handy by placing it near the VCR. _Select Olnsert a cassette. channel to be f _ rn off power. _Select lllll llll IIII _Press channel to be recorded. "REC/ITR" button once, and recording starts. ITurn on I-V. _Select the desired speed.
Olnsert a cassette. Olnsert a cassette. f IIIII IIIII IIIII {}Turn off power. Recording will start automatically at the time yo_ selected. OTurn on -IV and select "CH3" or "CH4". ;}Select the channel to be recorded. have puny •"J,Press "MENU" button. :®®®: L_O®,_Oj : _,(])Use these buttons to_ L I "- iPress "MENU" once again, button Program timer. / ®®® ®®® ®®® S REC/ITR button 1 press 2 presses 3 presses T _1. Select program mode. ("2" Normal program, "3" Daily program, "4'-Weekly program..
WARRANTY For 90 days from the date of purchase, Sears will repair any defect in material or workmanship in this video cassette recorder, free of charge. For one year from the date of purchase, Sears will supply, at no charge, replacement for defective parts. The above warranty coverage applies only to video cassette recorders which are used for private household purposes. TO OBTAIN WARRANTY SERVICE, SIMPLY THE VIDEO CASSETTE RECORDER TO THE SEARS SERVICE CENTER/DEPARTMENT UNITED STATES.