
Instructions


13
User manual
3 Intended Use
We do not permit using the device in other ways like described in chapter
“Description and Function“ and „Safety Instructions“.
These timers are ONLY intended for connection to German socket outlets
with earthing contact. Otherwise a correct connection with the protective con-
ductor and thus a safe protection against electric shock cannot be guaran-
teed. Not attending to these regulations and safety instructions might cause
fatal accidents, injuries, and damages to persons and property.
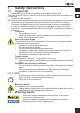
IP20 This product is protected against medium sized foreign objects, but
not against water ingress.
IP44 This product is protected against splash and contact with foreign
objects of Ø1 mm.
4 Connecting
Plug the time switch into a well reachable mains socket.
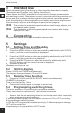
5 Settings
5.1 Setting Time and Weekday
1. Press the CLOCK button and hold it.
2. Press the WEEK button so often as needed by additionally hold CLOCK
button, until the correct weekday is displayed.
3. Press the HOUR button so often as needed by additionally hold CLOCK
button, until the correct hour is displayed.
4. Press the MINUTE button so often as needed by additionally hold
CLOCK button, until the correct minute is displayed.
5. Release all buttons.
Weekday and time are set.
5.2 12/24 h display
Press CLOCK and TIMER simultaneously.
The display changes between 12 and 24 h mode.
5.3 Summer time function
1. Press the CLOCK and ON/AUTO/OFF button simultaneously.
SUMMER is displayed.
Time is put forward by 1 hour.
2. Press both buttons again to change to winter time.
5.4 Programming switching times
There are maximum 10 switching time programs settable.
These can be set to a minimum of 1 per minute increments.
• Assure, that the set switching times do not overlap each other, especially
when programming week settings.
If switching times overlap, the time switch carries out ON or OFF according
the programmed switching times.
Is ON and OFF programmed simultaneously by 2 different program settings,
OFF will be carried out.
Programming is only available in AUTO mode.