DE EN FR IT Betriebsanleitung User‘s Manual Mode d‘emploi Istruzioni per l‘uso TV-Tischhalterung TV desk mount Support de TV Supporto da TV 63496 Goobay ScreenScope 63497 Goobay ScreenScope
Betriebsanleitung Betriebsanleitung.............................................. USER’S MANUAL........................................................ Mode d‘emploi........................................................ Istruzioni per l‘uso............................................. 2 16 28 42 Betriebsanleitung Inhalt 1 Sicherheitshinweise...................................................................... 1.1 Allgemeines....................................................................... 1.
1 Sicherheitshinweise 1.1 Allgemeines • • • • • Lesen Sie die beiliegende Produktdokumentation vollständig und sorgfältig vor Benutzung. Diese ist Bestandteil des Produkts. Beachten Sie die Sicherheitshinweise in Produktdokumentation, auf Produkt und Zubehör, sowie auf der Verpackung. Benutzen Sie Produkt, Produktteile und Zubehör nur in einwandfreiem Zustand. Bewahren Sie die Produktdokumentation für andere potentielle Benutzer und zum Nachlesen auf.
Betriebsanleitung Sachschaden durch inkompatible Produktkombinationen Inkompatible Produktkombinationen erfüllen nicht die gewünschte Funktion, können Qualitätsverluste oder Sachschaden zur Folge haben. >> Technische Daten aller verwendeter Produkte vergleichen. Diese müssen übereinstimmen oder im angegebenen Bereich liegen. Sachschaden durch ungeeignete Umgebungsbedingungen Falsche Umgebungsbedingungen können Sachen beschädigen.
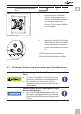
Warnung vor Gefahren, die bei Missachtung der Hinweise zu Sachschäden führen können. 2 Beschreibung und Funktion Ihre TV-Tischhalterung dient der Montage Ihres Flachbildschirms an stabilen, horizontalen Arbeitsflächen. Sie ist vertikal neigbar und horizontal schwenkbar. Modell 63497 bietet eine größere Variabilität in der Tiefeneinstellung. 2.
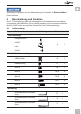
Betriebsanleitung 2.2 benötigtes Werkzeug Werkzeug Abbildung Schraubendreher Kreuzschlitz-Schraubendreher zweite Person Tab. 3: benötigtes Werkzeug 3 Bestimmungsgemäßer Gebrauch Dieses Produkt dient dazu, Flachbildschirme mit spezifischen Bildschirmdiagonalen, Gewichten und Befestigungspunkten, die in Kapitel „technische Daten“ zusammengefasst sind, an eine horizontale Arbeitsfläche zu montieren. Eine andere als in Kapitel „Beschreibung und Funktion“ beschriebene Verwendung ist nicht gestattet.
4.2 Tischmontage Verletzungsgefahr durch ungeeignete Umgebungsbedingungen >> Nicht an Stellen mit direkter Sonneneinstrahlung bzw. starkem Licht montieren. Dies fördert das Ermüden der Augen. Sachschaden durch ungeeignete Umgebungsbedingungen >> >> >> Um Quell- und Ausgabegeräte sowie um Schwenk- und Neigbereich ausreichend Platz für gute Belüftung und Beweglichkeit lassen. Nur an ausreichend stabilen und dicken Unterlagen montieren. Schutzmaßnahmen gegen Druckstellen vornehmen. Tab.
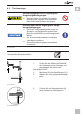
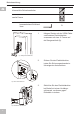
Betriebsanleitung 4.3 Einstellen der Stangeneinheit Innensechskant-Schlüssel 5mm F 1. Lösen Sie die Innensechskant Schraube etwas durch Drehen gegen den Uhrzeigersinn. 2. Stellen Sie die gewünschte Höhe ein. Richten Sie sich hierzu nach der Größe Ihres Flachbildschirms. Fig. 3: Einstellen der Stangeneinheit 3. Fixieren Sie die Innensechskant Schraube der VESA-Plattenhalterung durch Drehen im Uhrzeigersinn. F Fig.
Innensechskant-Schlüssel 3mm D 1. Lehnen Sie den Flachbild schirm vertikal gegen eine weiche, großflächige Unterla ge oder eine Wand und sichern Sie ihn gegen Kratzer und Umkippen. Fig. 5: Flachbildschirmmontage 1 2. Montieren Sie die VESA-Platte (B) mit den zu Ihrem Flachbild schirm passenden Schrauben an der Flachbildschirmrücksei te. Die Montage ist nur mit flachen Flachbildschirmrückseiten möglich. Fig.
Betriebsanleitung Kreuzschlitz-Schraubendreher zweite Person Innensechskant-Schlüssel 3mm D 1. Hängen Sie den mit der VESA-Platte verbundenen Flachbildschirm zusammen mit einer 2. Person auf dei Stangeneinheit (A). Fig. 7: Einhängen des Flachbildschirms 2. Sichern Sie den Flachbildschirm, indem Sie Sicherungsschraube im Uhrzeigersinn fest anziehen. Fig. 8: Sichern des Flachbildschirms 3.
4.6 Gerätekabel verlegen Verletzungsgefahr durch bewegliche Produktteile >> >> Gliedmaßen während des Gebrauchs nicht zwischen Scherteile halten. Während des Gebrauchs auf die Beweglichkeit des Produktes achten. Dieses kann sich von der Wand weg oder auf sie zu bewegen und seitlich ausschwenken. Tab. 8: Gerätekabel verlegen 1. Wählen Sie ausreichend lange Kabel, um die Beweglichkeit des Flachbildschirms zu gewährleisten. 2.
Betriebsanleitung 6 Gewährleistung und Haftung • Der Hersteller gewährt auf ein neues Produkt 2 Jahre gesetzliche Gewährleistung. • Da der Hersteller keinen Einfluss auf die Installation des Produktes hat, deckt die Gewährleistung nur das Produkt selbst ab. • Falls ein Fehler oder Defekt an Ihrem Gerät festgestellt werden sollte, wenden Sie sich bitte an Ihren Fachhändler und zeigen Sie ggf. Ihre Quittung oder Rechnung als Kaufnachweis vor.
8 Problembehebung Problem Hilfe Welche Unterlagen sind geeignet? >> >> >> Massivholzplatten, sowie Arbeitsplatten und Metallplatten mit einer Stärke von 10-40 mm Die TVTischhhalterung lässt sich schwer ausrichten. >> >> Gelenke etwas lockern. Die maximale Schwenkbarkeit kann bedingt durch die TV Größe kleiner sein, als angegeben. andere Fragen >> Händler kontaktieren. Tab.
Betriebsanleitung MIS-F 400x200 / 400x400 / 600x200 / 600x400 / 800x400mm Tab. 12: Informationen zum VESA-Standard 11 Entsorgungshinweise Dieses Produkt gehört nicht in den Hausmüll. Bitte geben Sie Ihr Gerät am Ende seiner Lebensdauer an die dafür eingerichteten, öffentlichen Sammelstellen oder an die Verkaufsstelle kostenlos zurück. Einzelheiten zur Entsorgung regelt das jeweilige Landesrecht. Wertstoffe werden dem Recyclingkreislauf zugeführt, um daraus neue Rohstoffe zu gewinnen.
User‘s Manual Betriebsanleitung.............................................. USER’S MANUAL........................................................ Mode d‘emploi........................................................ Istruzioni per l‘uso............................................. 2 16 28 42 USER’S MANUAL Content 1 2 3 4 5 6 7 8 9 10 11 16 Safety Instructions........................................................................ 1.1 General Notes...................................................
1 Safety Instructions 1.1 General Notes • • • • • Read the including product documentation completely and carefully before use. It is part of the product. Attend to the safety instructions in product documentation, on product and accessories, such as on the package. Use product, product parts and accessories only in perfect condition. Keep the product documentation for other potential users and for later requests.
User‘s Manual >> Do not modify or alter either the product or the accessories! Risk of material damage by inappropriate ambient conditions Incorrect ambient conditions can damage things. >> Avoid extreme conditions, such as extreme heat, coldness, humidity or direct exposure to the sun, as well as vibrations and mechanical pressure. >> Keep enough space around product and to the whole system to ensure proper ventilation and mobility. >> Mount only to sufficiently stable and thick surfaces.
2 Description and Function Your TV desk mount is made for mounting your flat screen to stable and horizontal work surfaces. It is tiltable and swivelable. Model 63497 has a greater variability in the depth setting. 2.
User‘s Manual 2.2 Required Tools Tool Figure Screwdriver Phillips screwdriver Second person Tab. 15: Required Tools 3 Intended Use This product is made for mounting flat screens with specific screen sizes, weights and mounting points, which are summarized in chapter “Specifications“, on a horizontal work surfaces. Another use than described in chapter “Description and Function“ is not permitted.
4.2 Desk Mounting Risk of injury due to inappropriate ambient conditions >> Do not install the product to places with direct sunlight or bright light. This contributes to eye fatigue. Risk of material damage by inappropriate ambient conditions >> >> >> Keep enough space around product and to the whole system to ensure proper ventilation and mobility. Mount only to sufficiently thick and stable surfaces. Protect against pressure points. Tab. 17: Wall mounting Phillips screwdriver 1.
User‘s Manual 4.3 Adjusting the pole assembly Allen key 5mm F 1. Loosen the Allen screw a few by turning it counterclockwise. 2. Adjust the preferred height. In this case act by the size of your flat screen. Fig. 14: Adjusting the pole assembly 3. Fix the Allen screw with the VESA Plate holder by turning it clockwise. F Fig. 15: Fixing the VESA Plate 4.
1. Lean the flat screen vertically on a soft, large surface or a wall and protect it of scratches and overturning. Fig. 16: Flat screen mounting 1 2. Attach the VESA Plate (B) with the screws on the flat screens back side. Installing is only possible with flat flat screen backs. Fig. 17: Flat screen mounting 2 4.
User‘s Manual Allen key 3mm D 1. Attach VESA Plate with flat screen together with a second person to the pole assembly (A). Fig. 18: Attaching the flat screen 2. Fix the flat screen by tighten the locking screw clockwise. Fig. 19: Fixing the flat screen 3. Lock the flat screen with a padlock, if necessary. Fig. 20: Locking the flat screen 4.6 Laying the cables Risk of injury by moving product parts >> >> Tab.
1. Select sufficiently long cables to ensure the mobility of the flat screen. 2. Pin the cables into the cable guides as shown. Fig.21: Laying the cables End of installing. To remove, proceed in reversed order. 5 Aligning the flat screen Risk of injury by moving product parts >> >> Do not hold limbs between shear parts during use. Mind the mobility of the product during use. This may move away from the wall or towards it and swivel sideways. Tab.
User‘s Manual improper installation, operation or maintenance, not described in the manual. Do not alter or modify the product or its accessories. Any use other than described in this user`s manual is not permitted and causes loss of warranty, loss of guarantee, and non-liability. We reserve our right for misprints and changes of the device, packing, or user`s manual. • • • 7 Maintenance, Care, Storage and Transport • • • The product must be maintained only by professional workshops.
Tilting angle +/-15 ° Swivel angle of each swivel arm +/-90 ° Rotation angle 360 ° Wall distance 100-447 mm Dimensions 63496: 100 x 448 x 100 63497: 100 x 448 x 447 mm Weight 63496: 2,20 63497: 2,40 kg Tab. 23: Specifications 10 Information for VESA standard To harmonize attachment options of monitors, TV devices and their stands and wall brackets in a user-friendly manner, VESA (Video Electronic Standard Assoziation) defined 3 standards for the applications mentioned above.
Mode d‘emploi Betriebsanleitung.............................................. USER’S MANUAL........................................................ Mode d‘emploi........................................................ Istruzioni per l‘uso............................................. 2 16 28 42 Mode d‘emploi Contenu 1 Consignes de sécurité........................................................................ 1.1 Notes général..........................................................................
1 Consignes de sécurité 1.1 • • • • • Notes général Lisez attentivement toute la documentation du produit fournie avant utilisation. Elle fait partie du produit. Consultez les consignes de sécurité de la documentation du produit, sur le produit et les accessoires, comme l‘emballage. N‘utilisez le produit, les pièces du produit et les accessoires que s‘ils sont en parfait état. Conservez la documentation du produit pour d‘autres utilisateurs potentiels et pour une utilisation ultérieure.
Mode d‘emploi Risque d‘intervention personnelle et de mauvaise utilisation Les interventions personnelles et les mauvaises utilisations cachent des risques difficiles à prévoir et peuvent entraîner une fin de garantie. >> Ne modifiez ni le produit ni les accessoires! Risque de dommage du matériau par combinaison inappropriée du produit La combinaison du produit incompatible ne répond pas aux fonctions requises, elle peut entraîner une perte de qualité ou un dommage matériel.
Mises en garde contre les dangers pouvant entraîner des blessures graves ou la mort en cas de non respect. Mises en garde contre les dangers pouvant entraîner des blessures en cas de non respect. Mises en garde contre les dangers pouvant entraîner un dommage matériel en cas de non respect. 2 Description et fonction Votre support de télévision est faite pour monter votre écran plat pour les surfaces de travail stable et horizontale. Il est inclinable et pivotant.
Mode d‘emploi M5x14 M-D 4 Clé Allen 3mm D 1 Clé Allen 4mm E 1 Clé Allen 5mm F 1 Outils Tab. 26: Contenu de la livraison 2.2 Outils requis Tool Figure Cruciforme Tournevis cruciforme Seconde personne Tab. 27: Outils requis 3 Utilisation prévue Ce produit est destiné au montage des écrans plats de tailles d‘écrans, de poids et de points de montage spécifiques sur un base horizontal, résumés dans le chapitre „Spécifications“.
Vérifiez l‘intégralité et l‘intégrité >> Vérifiez le contenu de l‘emballage en le comparant à la livraison concer nant l‘intégralité et l‘intégrité. Assurer la compatibilité Risque de dommage du matériau par combinaison inappropriée du produit >> Les spécifications de tous les produits utilisés doivent correspondre ou être comprises dans la gamme spécifiée. Tab. 28: Assurer la compatibilité 4.
Mode d‘emploi 4. Fixez l‘Assemblée des Pôle (A) en serrant. Fig. 24: Fixer l’Assemblée Pole 4.3 Réglage de l‘ensemble des pôles Clé Allen 5mm F 1. Desserrer la vis Allen quelques en tournant dans le sens antihoraire. 2. Réglez la hauteur préférée. Dans ce cas agir par la taille de votre écran plat. Fig. 25: Réglage de l‘ensemble des pôles 3.
Risque de dommage matériel causé par une procédure inappropriée >> Serrez les vis modérément pour éviter d‘endommager le filetage. >> Ne positionnez JAMAIS l‘écran devant durant l‘installation! N‘endommagez pas l‘écran plat en utilisant des vis trop longues. >> Tab. 30: Montage de l‘écran plat Clé Allen 3mm D 1. Penchez l‘écran plat verticalement sur une grande surface molle ou un mur et le protéger des égratignures et de s‘écrouler. Fig.
Mode d‘emploi 4.5 Raccrocher, fixer et verrouiller de l‘écran plat Risque de blessures par trébuchement ou par chute >> >> Placez, transportez et installez le produit, les pièces et les accessoires en toute sécurité. Laissez uniquement un spécialiste effectuer les opérations de démontage, d‘entretien et de réparation.
2. Fixer l‘écran plat de serrer la vis de blocage dans le sens horaire. Fig. 30: Fixer l‘écran plat 3. Verrouiller l‘écran plat avec un cadenas, si nécessaire. Fig. 31: Verrouiller l‘écran plat 4.6 Poser les câbles Risque de blessure par le mouvement produit des pièces >> >> Ne tenez pas membres de cisaillement entre les parties lors de l‘utilisation. Attention à la mobilité du produit au cours de l‘utilisation.
Mode d‘emploi 5 Alignez le moniteur à écran plat Risque de blessure par le mouvement produit des pièces >> >> Ne tenez pas membres de cisaillement entre les parties lors de l‘utilisation. Attention à la mobilité du produit au cours de l‘utilisation. Cela peut se rapprocher ou s‘éloigner du mur et pivoter latéralement. Tab.
7 Entretien, maintenance, stockage et transport • • • • • • • • • Le produit ne doit être maintenu que par des ateliers professionnels. Protégez les angles contre la saleté et graissez-les régulièrement avec de l‘huile légère pour machine. Utilisez un linge sec pour nettoyer votre produit. Faites attention à éviter les éraflures. Utilisez un chiffon légèrement humide pour les taches tenaces. Attention aux câbles sous tension ! N‘utilisez aucun produit de nettoyage.
Mode d‘emploi 9 Spécifications Taille Spécification Unité TV Taille 13-27 “ / Pouce VESA 75x75 / 100x100 mm Charger max. 15 kg Angle d'inclinaison +/-15 ° Angle de pivotement chaque bras pivotant +/-90 ° Angle de rotation 360 ° Distance du mur 100-447 mm Dimensions 63496: 100 x 448 x 100 63497: 100 x 448 x 447 mm Poids 63496: 2,20 63497: 2,40 kg Tab.
concernant la mise au rebut sont règlementés par les lois d‘État et fédérales concernées. Les éléments recyclables sont intégrés dans le cycle de recyclage des déchets afin d’en retirer de nouvelles matières premières. Les matériaux recyclables suivants sont recueillis dans les points de recueils locaux: • Déchets de verre, plastique, déchets métalliques, plaques métalliques, etc. Ce type de recyclage des équipements usagés contribue de façon significative à la protection de notre environnement.
Istruzioni per l‘uso Betriebsanleitung.............................................. USER’S MANUAL........................................................ Mode d‘emploi........................................................ Istruzioni per l‘uso............................................. 2 16 28 42 Istruzioni per l‘uso Contenuto 1 Istruzioni per la sicurezza................................................................... 1.1 Note Generali...........................................................
1 Istruzioni per la sicurezza 1.1 • • • • • Note Generali Leggere in modo completo ed accurato la documentazione del prodotto prima dell‘uso Fa parte del prodotto. Osservare le istruzioni di sicurezza riportate nella documentazione del prodotto, sul prodotto e sugli accessori, come ad esempio sulla confezione. Utilizzare il prodotto, le parti del prodotto e gli accessori solo se sono in perfette condizioni.
Istruzioni per l‘uso >> Non modificare o alterare né il prodotto né gli accessori! Rischio di danni materiali causati da combinazioni inappropriate di prodotti La combinazione di prodotti incompatibili non soddisfa le funzioni necessarie, può causare la perdita di qualità o danni materiali. >> Le specifiche di tutti i prodotti utilizzati devono corrispondere o essere comprese nell‘intervallo specificato.
Avvisi relativi a pericoli che possono tradursi in lesioni in caso di inosservanza. Avvisi relativi a pericoli che possono tradursi in danni materiali in caso di inosservanza. 2 Descrizione e Funzione Il tuo supporto da scrivania TV è fatta per il montaggio del vostro schermo piatto per le superfici di lavoro stabili e orizzontale. É ‚inclinabile e orientabile. Modello 63497 ha una maggiore variabilità nella impostazione della profondità. 2.
Istruzioni per l‘uso Chiave a brugola 4mm E 1 Chiave a brugola 5mm F 1 Tab. 38: Scopo della consegna 2.2 Strumenti necessari Strumento Figura Cacciavite Cacciavite a croce Seconda persona Tab. 39: Strumenti necessari 3 Scopo d‘utilizzo Questo prodotto è realizzato per l’installazione su una scrivania orizzontale di schermi piatti con dimensioni, pesi e punti d’installazione specifici, che sono riassunti nel capitolo „Specifiche“.
Garantire la compatibilità Rischio di danni materiali causati da combinazioni inappropriate di prodotti >> Le specifiche di tutti i prodotti utilizzati devono corrispondere o essere comprese nell‘intervallo specificato. Tab. 40: Garantire la compatibilità 4.2 Montaggio a schermo piatto Rischio di lesioni provocate da condizioni ambientali inappropriate >> Non installare il prodotto in luoghi esposti alla luce diretta del sole o artificiale. Questo contribuisce all’affaticamento della vista.
Istruzioni per l‘uso 4.3 Adeguare il pole di montaggio Chiave a brugola 5mm F 1. Allentare la vite a brugola pochi ruotandolo in senso antiorario. 2. Regolare l‘altezza preferita. In questo caso agire dalle dimensioni del vostro schermo piatto. Fig. 36: Adeguare il pole di montaggio 3. Fissare la vite a brugola della piastra VESA ruotandola in senso orario. F Fig. 37: Fissare la piastra VESA 4.
Chiave a brugola 3mm D 1. Appoggiare lo schermo piatto in verticale su una superficie morbida e di grandi dimensioni, oppure ad un muro, e proteggerlo da graffi e ribaltamento. Fig. 38: Montare lo schermo piatto 1 2. Attaccare la Piastra VESA (B) con le viti sugli schermi piatti posteriori laterali. L‘installazione è possibile solo con piatti spalle a schermo piatto. Fig. 39: Montare lo schermo piatto 2 4.
Istruzioni per l‘uso Cacciavite a croce Seconda persona Chiave a brugola 3mm D 1. Montare il VESA Piastra con schermo piatto insieme ad una seconda persona su gli pole di montaggio (A). Fig. 40: Montare il schermo piatto 2. Fissare lo schermo piatto da serrare la vite di bloccaggio in senso orario. Fig. 41: Fissare lo schermo piatto 3. Bloccare lo schermo piatto con un lucchetto, se necessario. Fig.
4.6 Posare i cavi Pericolo di lesioni spostando parti del prodotto >> >> Non tenere membra tra le parti di taglio durante l‘uso. Mente la mobilità del prodotto durante l‘uso. Questo può allontanarsi dalla parete o verso di esso e ruotarlo lateralmente. Tab. 44: Posare i cavi 1. Seleziona cavi sufficiente mente lunghi per garantire la mobilità dello schermo piatto. 2. Introdurre i cavi nei passacavi come passacavo mostrato. Fig.
Istruzioni per l‘uso 6 Garanzia e responsabilità • • • • • • • Il produttore garantisce per 2 anni i dispositivi nuovi. Poiché il produttore non ha alcuna influenza sull’installazione, la garanzia si applica solo al prodotto stesso. In caso di guasto o danni rilevati sul dispositivo, contattare il rivenditore e presentare lo scontrino o la fattura quale prova di acquisto, se necessario. Il rivenditore riparerà il guasto sul posto, oppure invierà il dispositivo al fabbricante.
8 Risoluzione dei problemi Problema Soluzione Quali superfici sono adatti? >> >> >> Lastre di legno massiccio, Piastre di lavoro e Lastre di metallo con uno spessore di 10-40 mm Il supporto TV è difficile da allineare. >> >> Allentare il giunto un po‚ Il massimo grado di ruotare a causa il formato TV potrebbe essere inferiore rispetto a quanto indicato. Altre domande >> Rivolgersi al rivenditore. Tab.
Istruzioni per l‘uso Classe VESA Distanza fori per il fissaggio dei monitor MIS-D 75 x 75 / 100 x 100 mm MIS-E 200 x 100 / 200 x 100 mm MIS-F 400 x 200 / 400 x 400 / 600 x 200 / 600 x 400 / 800 x 400 mm Tab. 48: Informazioni sullo standard VESA 11 Istruzioni sullo smaltimento Questo prodotto non deve essere smaltito con i rifiuti domestici. Al termine della vita utile del dispositivo lo consegni nei punti di raccolta pubblici per questo scopo, oppure presso il punto vendita.
DE EN FR IT Betriebsanleitung User‘s Manual Mode d‘emploi Istruzioni per l‘uso TV-Tischhalterung TV desk mount Support de TV Supporto da TV 63496 63497 Revision 2013-05-28 Version 1 Goobay ® Pillmannstraße 12 38112 Braunschweig Germany Made in China. Hotline: +49 (0180) 5005882 E-Mail: info@goobay.de Web: www.goobay.de *(0,14 € pro Minute aus dem deutschen Festnetz. Maximal 0,42 € pro Minute aus dem Mobilfunknetz.