Cupola Product Manual In addition to the assembly instructions in this manual, an installation video is available. To view our installation video: 1. VISIT gooddirections.com/install 2. SCAN Open your cell phone camera and hold it above the QR code below. Then follow the instructions on your phone to view the video.
Table of Contents Please read and understand this entire manual before attempting to assemble, operate, or install the product. Table of Contents………………………………………….……...............................…….2 Important Packaging Information……………….………………………………………….2 Package Contents…………………………………….………………………………..…………..3 Assembly Instruction………………………….….…..…………………………………….…...3 Topping Off Your Cupola.…………….………..………………………………………….…...5 Care & Maintenance……..………………….………..………..………………………….…...6 Warranty………………….……..
Package Contents & Installation Instructions Part A B C D E F Description Roof Mid-Section (Windowed or Louvered) Base (Shiplap or Smooth) Screws Cupola Seal 3” Lag Bolts Quantity 1 1 1 25 1 8 Required (Not Included) : Waterproof caulk, (4) 2 x 4” boards, (2) 1 x 3” boards, Pencil, Tape Measure, Utility Knife, Saw, Drill, Level 1. Determine your Roof Pitch. E As seen below, nail (2) 1 x 3” boards together so they pivot. Straddle the roof with each board as shown.
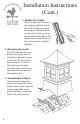
Installation Instructions (Cont.) 3. Position the Cupola. Place the base on the roof in your desired position. Caulk the 2 x 4” boards (as shown to the right) and place them on the roof so they are snug against the inside walls of the cupola base. Screw them into the roof using the included lag bolts. 4. Mounting the Cupola Pre-drill holes into the base (seen to the right) prior to installation. Ensure the base is level. Secure the cupola base to the 2 x 4” boards.
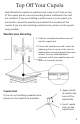
Top Off Your Cupola Good Directions cupolas are weathervane ready. A 3/4” hole on top of the cupola and an internal mounting bracket underneath the roof are standard. If you are installing a weathervane in your cupola, you will need to mount the weathervane before final assembly of the cupola. If you are not mounting a weathervane, please use the cupola seal provided. Weathervane Mounting 1. Slide the completed weathervane rod into the cupola roof. 2.
Care and Maintenance Thank you for purchasing a Good Directions Cupola. Our expertly crafted cupolas are designed and manufactured to be low maintenance. Roofs • Wooden roofs should be shingled or covered with metal prior to installation. • Polished copper roofs will patina naturally over time. If you would like to maintain the polished copper finish, you may spray the roof with a metal-specific clear lacquer. Wood Cupolas • Wood cupolas should be primed and painted to protect the wood from the elements.
LIMITED WARRANTY, DISCLAIMER AND LIMITATION OF REMEDIES Good Directions, Inc. warrants its wooden cupolas and/or cupolas with wooden components to be free from defects in material and workmanship for one (1) year from the date of original purchase, provided that the applicable product was (i) used in accordance with Good Directions, Inc. recommended usages, and (ii) purchased directly from Good Directions, Inc. or from an Authorized Good Directions, Inc. Dealer. Good Directions, Inc.
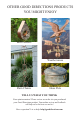
OTHER GOOD DIRECTIONS PRODUCTS YOU MIGHT ENJOY Bird Feeders Full Size Weathervane Weathervanes Assembly Instructions Watch our Assembly Video at www.gooddirections.com or scan Rain Chains Hose Pots TELL US WHAT YOU THINK Your opinion matters! Please review us on the site you purchased your Good Directions product. Your online review and feedback will help us be the best we can be! Have a question? Let us help. help@gooddirections.