
Installation Instructions

Attention Installing Personnel
As a professional installer, you have an obligation to know the
product better than the customer. This includes all safety pre-
cautions and related items.
Prior to actual installation, thoroughly familiarize yourself with
this Instruction Manual. Pay special attention to all safety warn-
ings. Often during installation or repair, it is possible to place
yourself in a position which is more hazardous than when the
unit is in operation.
Remember, it is your responsibility to install the product safely
and to know it well enough to be able to instruct a customer in
its safe use.
Safety is a matter of common sense...a matter of thinking be-
fore acting. Most dealers have a list of specific good safety
practices...follow them.
The precautions listed in this Installation Manual are intended
as supplemental to existing practices. However, if there is a
direct conflict between existing practices and the content of
this manual, the precautions listed here take precedence.
Description
This anchor bracket is for use with condensers and heat pumps.
The anchor bracket can be installed without accessing the
inside of the unit. Consult the product specifications applicable
to your model.
NOTE: Please contact your distributor or our website for the appli-
cable product specifications referred to in this manual.
WARNING
HIGH VOLTAGE!
DISCONNECT ALL POWER BEFORE SERVICING OR INSTALLING
THIS UNIT.
MULTIPLE POWER SOURCES MAY BE PRESENT. FAILURE
TO DO SO MAY CAUSE PROPERTY DAMAGE, PERSONAL INJURY OR
DEATH.
ABK-21
ANCHOR BRACKET KIT INSTRUCTIONS
Kit Contents
• Installation Instructions x 5
• Anchor Bracket x 20
Installation Instructions
1. Disconnect all electrical power.
2. Insert an anchor bracket in each of the four (4) slots on
the underside of the basepan, one on each side.
NOTE: These slots are the same slots utilized by the hold
down bracket during shipment.
3. When the anchor bracket is engaged in the slots, pull the
bracket outwards and swing down to lock the bracket in
place.
4. Attach the anchor brackets to the pad, using either ¼”
diameter Tapcon
®
concrete screws or similar self-tapping
concrete screws. The minimum screw length should be 1-
¼”. Two screws are required for each bracket. Follow
manufacturer’s instructions for installing screws.
5. Reconnect the electrical power.
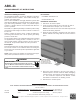
Install bracket through slot
in base, pull outwards
and swing down to lock.
Use 1/4” Tapcon® type
concrete screws to secure.
Visit our website at
www.daikincomfort.com, www.goodmanmfg.com or www.amana-hac.com for information on:
• Products • Warranties • Customer Services
• Parts • Contractor Programs and Training • Financing Options
© 2011, 2013 Goodman Manufacturing Company, L.P.
IO-772A
12/2013
is a registered trademark of Maytag Corporation or its related companies and is used under license. All rights reserved.
NOTE: SPECIFICATIONS AND PERFORMANCE DATA LISTED HEREIN ARE SUBJECT TO CHANGE WITHOUT NOTICE