
ARUF Installation Manual


15
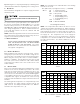
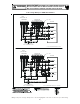
13 Achieving 1.4% Low Leakage Rate
Ensure all t he gasket s remain int act on all surf aces as shipped
wit h t he unit . These surf aces are areas bet ween t he upper t ie
plat e and bl ower access panel, blower access and coil access
panel s, and bet ween t he coil access and f ilt er access panels.
Ensure upon inst allat ion, t hat t he plast ic breaker cover is sit -
t ing f lush on t he blower access panel and all access panels are
flush wit h each ot her and t he cabinet . Wit h t hese require-
ment s sat isf ied, t he unit achieves less t han 1. 4% airf low leak-
age when t est ed in accordance wit h ASHRAE St andard 193.
14 Start-Up Procedure
HIGH VOLTAGE!
Disconnect ALL power before servicing or
installing this unit. Multiple power sources may
be present. Failure to do so may cause property
damage, personal injury or death.
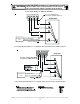
• Prior t o st art -up, ensure t hat all elect rical wires are
properly sized and all connect ions are properly t ight -
ened.
• All panels must be in place and secured. For Air Tight
applicat ion, gasket must be posit ioned at prescribed
locat ions t o achieve 1. 4% leakage.
• Tubing must be leak f ree.
• Condensat e line must be t rapped and pit ched t o al-
low for drainage.
• Low volt age wiring is properly connect ed.
• Auxiliary drain is inst alled when necessary and pit ched
t o allow f or drainage.
• Unit is prot ect ed f rom vehicular or ot her physical dam-
age.
• Ret urn air is not obt ained from, nor are t here any re-
t urn air duct j oint s t hat are unsealed in, areas where
t here may be obj ect ionable odors, f lammable vapors or
product s of combust ion such as carbon monoxide (CO),
which may cause serious personal inj ury or deat h.
15 Regular Maintenance
The only it em required t o be maint ained on a regular basis by
t he user is t he circulat ing air f ilt er(s). Filt er should be cleaned
or replaced regularly, t ypically once per mont h. A cert if ied
service t echnician must perf orm all ot her services.
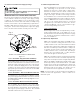
IMPORTANT NOTE: If t humb screws are used t o access t he
filt er, ensure t he washer inst alled on t he screw behind t he
access panel remains in place af t er re-inst allat ion.