
Service Manual


SERVICING
39
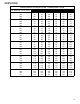
S-114 NON-CONDENSABLES
Check for non-condensables.
1. Shut down the system and allow the pressures to equalize
for a minimum of 15 minutes.
2. Take a pressure reading.
3. Compare this pressure to the temperature of the coldest
coil since this is where most of the refrigerant will be. If the
pressure indicates a higher temperature than that of the
coil temperature, non-condensables are present.
To remove the non-condensables.
1. Remove the refrigerant charge.
2. Replace and/or install liquid line drier
3. Evacuate and recharge.
S-115 COMPRESSOR BURNOUT
When a compressor burns out, high temperature develops caus-
ing the refrigerant, oil and motor insulation to decompose form-
ing acids and sludge.
If a compressor is suspected of being burned-out, attach a
refrigerant hose to the liquid line dill valve and properly remove
and dispose of the refrigerant.
V
IOLATION OF EPA REGULATIONS MAY RESULT
IN FINES OR OTHER PENALITIES.
NOTICE
Now determine if a burn out has actually occurred. Confirm by
analyzing an oil sample using a Sporlan Acid Test Kit, AK-3 or
its equivalent.
Remove the compressor and obtain an oil sample from the
suction stub. If the oil is not acidic, either a burnout has not
occurred or the burnout is so mild that a complete clean-up is
not necessary.
If acid level is unacceptable, the system must be cleaned by
using the clean-up drier method.
CAUTION
DO NOT ALLOW THE SLUDGE OR OIL TO CONTACT
THE SKIN, SEVERE BURNS MAY RESULT.
NOTE: The Flushing Method using R-11 refrigerant is no longer
approved by Goodman
®
Manufacturing Company, L.P.
Suction Line Drier Clean-Up Method
The POE oils used with R410A refrigerant is an excellent sol-
vent. In the case of a burnout, the POE oils will remove any
burnout residue left in the system. If not captured by the refrig-
erant filter, they will collect in the compressor or other system
components, causing a failure of the replacement compressor
and/or spread contaminants throughout the system, damag-
ing additional components.
Use AMANA
®
brand part number RF000127 suction line filter
drier kit. This drier should be installed as close to the com-
pressor suction fitting as possible. The filter must be acces-
sible and be rechecked for a pressure drop after the system
has operated for a time. It may be necessary to use new tub-
ing and form as required.
NOTE: At least twelve (12) inches of the suction line immedi-
ately out of the compressor stub must be discarded due to
burned residue and contaminates.
1. Remove compressor discharge line strainer.
2. Remove the liquid line drier and expansion valve.
3 Purge all remaining components with dry nitrogen or car-
bon dioxide until clean.
4. Install new components
including liquid line drier.
5. Braze all joints, leak test, evacuate, and recharge system.
6. Start up the unit and record the pressure drop across the
drier.
7. Continue to run the system for a minimum of twelve (12)
hours and recheck the pressure drop across the drier. Pres-
sure drop should not exceed 6 PSIG.
8. Continue to run the system for several days, repeatedly
checking pressure drop across the suction line drier. If the
pressure drop never exceeds the 6 PSIG, the drier has
trapped the contaminants. Remove the suction line drier
from the system.
9. If the pressure drop becomes greater, then it must be re-
placed and steps 5 through 9 repeated until it does not
exceed 6 PSIG.
NOTICE: Regardless, the cause for burnout must be deter-
mined and corrected before the new compressor is started.
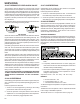
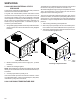
S-122 REVERSING VALVE REPLACEMENT
Remove the refrigerant charge from the system.
When brazing a reversing valve into the system, it is of ex-
treme importance that the temperature of the valve does not
exceed 250°F. at any time.
Wrap the reversing valve with a large rag saturated with water.
"Re-wet" the rag and thoroughly cool the valve after each braz-
ing operation of the four joints involved. The wet rag around the
reversing valve will eliminate conduction of heat to the valve
body when brazing the line connection.
The use of a wet rag sometimes can be a nuisance. There are
commercial grades of heat absorbing paste that may be sub-
stituted.
After the valve has been installed, leak test, evacuate and re-
charge.