
GSXH5 Installation Manual


5
Leak test the system using dry nitrogen and soapy
water to identify leaks. If you prefer to use an electronic
leak detector, charge the system to 10 PSIG with the
appropriate system refrigerant (see Serial Data Plate
for refrigerant identication). Do not use an alternative
refrigerant. Using dry nitrogen nish charging the system
to 450 PSIG. Apply the leak detector to all suspect areas.
When leaks are discovered, repair the leaks, and repeat
the pressure test. If leaks have been eliminated proceed to
system evacuation.
Condensing unit liquid and suction valves are closed to
contain the charge within the unit. The unit is shipped with
the valve stems closed and caps installed.
CAUTION
The Deep Vacuum Method requires a vacuum pump
rated for 500 microns or less. This method is an eective
and ecient way of assuring the system is free of non-
condensable air and moisture. As an alternative, the Triple
Evacuation Method is detailed in the Service Manual for
this product model.
It is recommended to remove the Schrader Cores from the
service valves using a core-removal tool to expedite the
evacuation procedure.
1. Connect the vacuum pump, micron gauge, and
vacuum rated hoses to both service valves.
Evacuation must use both service valves to eliminate
system mechanical seals.
2. Evacuate the system to less than 500 microns.
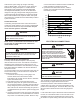
3. Isolate the pump from the system and hold vacuum
for 10 minutes (minimum). Typically, pressure will rise
slowly during this period. If the pressure rises to less
than 1000 microns and remains steady, the system is
considered leak-free; proceed to system charging and
startup.
4. If pressure rises above 1000 microns but holds steady
below 2000 microns, non-condensable air or moisture
may remain or a small leak is present. Return to step
2: If the same result is achieved check for leaks and
repair. Repeat the evacuation procedure.
5. If pressure rises above 2000 microns, a leak is
present. Check for leaks and repair. Repeat the
evacuation procedure.
5000
4500
4000
3500
3000
2500
2000
1500
1000
500
0 1 2 3 4 5 6 7 8 9
10
MINUTES
V
ACUUM
IN
MICRONS
NO LEAKS
NO
NOTICE
The condensing unit rating plate lists pertinent electrical
data necessary for proper electrical service and
overcurrent protection. Wires should be sized to limit
voltage drop to 2% (max.) from the main breaker or fuse
panel to the condensing unit. Consult the NEC, CEC, and
all local codes to determine the correct wire gauge and
length.
Local codes often require a disconnect switch located near
the unit; do not install the switch on the unit. Refer to the
installation instructions supplied with the indoor furnace/
air handler for specic wiring connections and indoor unit