Model.
ADR10 Digital DigitalTV TV Receiver GDR10 receiver Contents What's in the box? ...................................................................... 3 How to connect the receiver to your digital hi-fi sound system ........................................................................................ 16 How to connect headphones to the receiver .......................... 17 What the on-screen symbols mean .......................................... 18 How to turn the receiver on for the first time .....
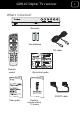
ADR10 Digital TV Recei GDR10 Digital TV receiver ADR10 Set Top Boxver 3 What's in the box? Receiver Two batteries RF cable Model. GDR10 Remote control Quick-start guide Model.
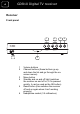
GDR10 Digital TV receiver 4 Receiver Front panel 1 6 2 3 5 1 2 3 4 5 6 Volume buttons Channel buttons (these buttons go up and down the list and go through the onscreen menus) Menu button Standby and on and off light (switches the receiver on and off or, if it is pressed quickly, it can be used as the OK button) Reset button (this switches the receiver off and on again when it isn’t working properly) Headphone socket (3.
GDR10 Di gital TV receiver 5 Back panel 1 2 3 4 5 6 9 1 2 3 4 5 6 7 8 9 ‘RF IN’ socket (to your TV aerial) ‘RF OUT’ socket (to your TV or VCR) SCART out socket (to your TV) SCART out socket (to your VCR) Digital-audio out socket Audio out socket Mains cable Socket for factory use only Video out socket 7 8
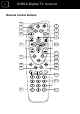
ADR10 Digital DigitalTV TV Receiver GDR10 receiver Remote control buttons 2 1 3 4 5 6 7 9 8 10 11 12 13 14 15 16 17 18 19 20 21 22
ADR10 Digital TV Receiver GDR10 Digital TV receiver ADR10 Set Top Box 7 Number Button name on diagram 1 2 3 4 5 6 7 8 9 What the button does Goes to the first channel in your list (usually BBC 1) Switches your TV on or off (if you have set up this feature) Switches the receiver on and off (onto standby) Switches between TV and radio Switches between the channel you’re watching and the channel you were previously watching Mutes the receiver volume (it can also mute your TV if you have set up this
ADR10 Digital DigitalTV TV Receiver GDR10 receiver 8 Number Button name on diagram 10 What the button does Goes up and down the channel list 11 16 Selects options on the on-screen menu (This button also shows the channel list if you press it while watching TV.) Enters and exits the TV electronic programme guide (EPG) Gives programme information on the TV screen This button also shows your favourite channels list when you are on the channel list screen.
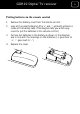
ADR10 Digital TV Receiver GDR10 Digital TV receiver ADR10 Set Top Box 9 Putting batteries in the remote control 1 Remove the battery cover from the remote control. 2 Look at the polarity diagram (the ‘+’ and ‘-’ symbols) printed on inside of the battery case. (This diagram tells you which way round to put the batteries in the remote control.) 3 Put two AA batteries in the battery as shown in the diagram and in line with the markings on the batteries (‘+’ goes next to ‘+’, ‘–’ goes next to ‘–’).
ADR10 Digital DigitalTV TV Receiver GDR10 receiver Using the remote control The remote control ‘talks’ to the receiver using an infrared link between the sensor on the remote control and the sensor on the front of the receiver. (Infrared light is an invisible beam of light that is often found on objects that ‘talk to’ other objects, such as TV remotes and TVs.
GDR10 Digital TV receiver How to use the remote control 1 Point the sensor end of the remote control towards the sensor in the centre of the receiver’s front panel. 2 Press the button you want to use, for example the standby button, or the guide button.
ADR10 Digital DigitalTV TV Receiver GDR10 receiver 12 How to connect the receiver to your TV 1 Put your receiver on a firm, level surface with at least a 10-centimetre gap around all the sides. Make sure it is close to the TV you are going to connect it to. 2 Turn off the plug socket your TV is plugged into or pull the TV’s plug out of the socket. 3 Take the aerial lead out of the TV and connect it to the ‘RF IN’ socket on the back panel of the receiver.
GDR10 Di g ital TV receiver Connection 1 (If your TV has a SCART socket) 1 Plug the SCART cable (which came with the receiver) into the SCART ‘out’ socket (you will find the socket on the back panel of the receiver labelled ‘TV’). 2 Connect the other end to the SCART socket on your TV. Connecting your receiver in this way will give you a high-quality picture on your TV. 3 Plug your receiver into a wall socket and switch it on. A green light should come on. 4 Switch on your TV.
GDR10 Di g ital TV receiver 14 Connection 2 (If your TV does not have a SCART socket) 1 Disconnect your TV from its power supply. 2 Take the aerial lead out of the TV and connect it to the ‘RF IN’ socket on the receiver’s back panel. 3 Connect the RF cable (that was supplied with the receiver) between the ‘RF OUT’ socket on the receiver and the aerial socket on the TV. 4 Plug your receiver in a wall socket and switch it on. A green light should come on. 5 Switch on your TV.
GDR10 Di g ital TV receiver 15 Connection 3 (If you want to connect using an AV cable) Plug an AV cable (this is not supplied with your receiver, but you can get one from an electrical shop) into the ‘L’, ‘R’ and ‘VIDEO’ sockets (on the back panel of the receiver) and connect it to the ‘AV line in’ sockets on your TV. To see the picture on your TV you will need to choose the ‘AV’ channel on your TV. If you have difficulty doing this, please read the TV’s instruction manual.
GDR10 Di g ital TV receiver 16 How to connect the receiver to your digital hi-fi sound system 1 Connect a coaxial cable to the ‘digital audio’ socket in the back of the receiver. 2 Connect to the digital audio socket on your hi-fi system.
GDR10 Di g ital TV receiver How to connect headphones to the receiver 1 Connect a 3.5 millimetre plug (this is usually the same width as a normal headphones plug) from your headphones to the headphone socket on the front panel of the receiver. You can change the volume on the receiver using the remote control (see page 6) or the in-line volume control on your headphones (see the diagram below).
GDR10 Di g ital TV receiver 18 What the on-screen symbols mean You may see these symbols on your screen. These symbols usually show which remote control buttons can be used on, or apply to, that screen. For example, if the programme you are watching has subtitles available, when you select a TV channel or press the information screen the symbol will be shown. Subtitles available This symbol is shown when subtitles are available on the TV channel you are watching.
GDR10 Di g ital TV receiver Audio description on This symbol is also shown for a short time at the top of your screen if you switch AD on. Audio description off This symbol is shown for a short time at the top of your screen if you switch AD off. Reminder This symbol is shown if you have set a reminder for a programme that is to start in the next few minutes (see page 37).
ADR10 Digital DigitalTV TV Receiver GDR10 receiver 20 How to turn the receiver on for the first time When you have connected your receiver to the TV, it is then ready to use. 1 Switch on the TV. 2 Set the TV to the input channel you have connected the receiver to (AV1, for example). 3 Switch on the receiver at the mains. 4 The standby light will turn green, which shows that the receiver is ready to use. 5 Your TV will show the ‘welcome’ screen (as shown below).
ADR10 Digital TV Receiver GDR10 Digital TV receiver ADR10 Set Top Box 21 6 After a few seconds, the screen will change to the TV format screen. 7 Make sure that you have connected your TV aerial to your TV. 8 Select the format you want (either ’16:9’ or ‘4:3’), using the left and right arrow buttons on the remote control. 9 If you select the ‘4:3’ format, you will see the screen on the following page which lets you select an aspect ratio for your TV.
ADR10 Digital DigitalTV TV Receiver GDR10 receiver 10 The aspect ratio options are ‘letterbox’, ‘compromise’ and ‘cut out’. Use the arrow buttons on your remote control to choose the one that best matches your TV. 11 When you have made your selection, press ‘OK’ on your remote control. 12 Your receiver will now start to tune in to your new digital TV and radio channels. You will see the screen on the following page when your receiver is tuning in.
ADR10 Digital TV Receiver GDR10 Digital TV receiver ADR10 Set Top Box 13 When all the available TV and radio channels have been tuned in, an ‘installation completed’ message will appear on the screen. 14 You will now be able to watch TV. 15 If the receiver does not find any channels, read the help and advice page on page 73.
ADR10 Digital DigitalTV TV Receiver GDR10 receiver 24 How to turn the receiver off If you usually watch television every day, you should leave the receiver on standby when you’re not watching it. You should only switch it off at the mains if you are away or you do not want to use the receiver for a long time (a month, for example). Your receiver will automatically search for new channels when you switch to standby (see the section on over-air downloads on page 25).
GDR10 Di g ital TV receiver Important information about over-air downloads Whenever you put the receiver on standby (this means you switch the receiver off with the remote), the receiver will search for any available over-air downloads (OADs). These are updates for the receiver. When the receiver is searching for or downloading an OAD, the standby light (also the on and off light) indicator will flash. While it is flashing, you must not unplug the receiver from the plug socket.
ADR10 Digital DigitalTV TV Receiver GDR10 receiver 26 How to turn the receiver back on from standby 1 Switch on your TV. 2 Press the receiver remote control button labelled ‘stb’. 3 The receiver standby light will turn green and the TV picture will come on. How to tune in TV and radio stations If this is the first time you have switched on the receiver, see the first time installation section on page 20.
ADR10 Digital TV Receiver GDR10 Digital TV receiver ADR10 Set Top Box 27 Important information about searching for new channels The receiver gives you two ways to search for new TV and radio channels. 1 Automatic channel search when the receiver is on standby • As new channels and features become available, your receiver will automatically search for them. This will only happen when you put the receiver on standby.
ADR10 Digital DigitalTV TV Receiver GDR10 receiver 28 The channel select display The banner in the lower part of the screen shows: 1 the channel number; 2 the channel name; 3 the current time; and 4 the information on the programme you’re watching. The programme information tells you: 5 • the programme name. • the time the programme begins and ends; and • if audio description or subtitles is available for that programme. For more information on the symbols, see page 18.
GDR10 Di g ital TV receiver You can also see the signal strength and the signal quality on the right-hand side of the screen. How to choose a TV channel using your remote control There are several ways that you can choose a TV channel. 1 Press numbers 0 to 9 (You can choose up to three digits, for example, 111 or 999. If the channel number you enter is not available, your TV will not change channel.) 2 Press ‘P+’ or ‘P-‘. 3 Press ‘OK’. (This will show the channel list.
ADR10 Digital DigitalTV TV Receiver GDR10 receiver How to use the channel list The channel list displays all your available channels.
ADR10 Digital TV Receiver GDR10 Digital TV receiver ADR10 Set Top Box How to choose your favourite channels You can create lists of your favourite channels, from the ‘Favourite lists’ menu (see page 41). You can then choose any list you want (including the channel list) using the remote control.
ADR10 Digital DigitalTV TV Receiver GDR10 receiver How to select TV or radio What do you want to do? Press this button Select the radio (when you are Press ‘tv/radio’ watching TV) Select the TV (when you are listening Press ‘tv/radio’ to the radio) The on-screen help pages The help pages give advice on and help with many of the features of the receiver.
ADR10 Digital TV Receiver GDR10 Digital TV receiver ADR10 Set Top Box The information screen The information screen gives a summary of the programme you’re currently watching and future programmes. The information screen For a list of on-screen symbols, see page 18.
ADR10 Digital DigitalTV TV Receiver GDR10 receiver 34 Subtitles Subtitles give you an on-screen text version of the conversation or narrative on the TV channel you’re watching. When you choose subtitles, your TV will show the subtitles for the channel you are watching at the bottom of the screen over the picture. What do you want to do? Turn on subtitles Turn off subtitles Press this button.
GDR10 Di g ital TV receiver How to use audio description Audio description is a spoken narration that describes all important information on a programme, such as body language, facial expressions, scenery, action, costumes or anything that helps to express the plot of the story, event or image. Audio description is not always available but you can check, in the following way, when it will be available. The availability of audio description is shown by a beep, which can be heard in three different pitches.
ADR10 Digital DigitalTV TV Receiver GDR10 receiver What do you want to do? Switch on audio description (AD) Switch off audio description If you want to check if AD is available for your next programme Press this button Press ‘AD’. (You will hear a high-pitched beep if AD is available for your current programme and a medium-pitched beep if it is not.) Press ‘AD’. (You will hear a low-pitched beep.) Press ‘info’. (You will hear a high-pitched beep when AD is available.) You can also press ‘guide’.
ADR10 Digital TV Receiver GDR10 Digital TV receiver ADR10 Set Top Box How to use the TV programme guide The TV guide shows programme information for the next eight days.
ADR10 Digital DigitalTV TV Receiver GDR10 receiver 38 The TV guide gives the following information. • The panel at the top of the screen shows the current channel number and name. • The panel on the right shows a short description of the programme you’re currently watching. • The left-hand side of the screen shows the programme schedule (the TV programmes that will be broadcast for the rest of the day on the date shown at the top of the panel).
ADR10 Digital TV Receiver GDR10 Digital TV receiver ADR10 Set Top Box What do you want to do? Go to the TV guide Change the channel Move up or down the programme schedule Press this button Press ‘guide’ Press ‘P+’ or ‘P-’ Press or (Your TV will show the programme schedule, with a description of the programme you’ve chosen.) See the programme schedule for the Press or day before or the next day Set a reminder Press ‘OK’.
ADR10 Digital DigitalTV TV Receiver GDR10 receiver The menu screens The menus let you select and change many of your receiver’s features. The main menu This is the menu that appears when you select the ‘menu’ button on the remote control or the receiver. Main-menu screen The table below gives you information on how to move around the menus.
ADR10 Digital TV Receiver GDR10 Digital TV receiver ADR10 Set Top Box What do you want to do? Select a menu setting Go back to the previous screen Exit the menu system to go back to the last programme Press this button Press or once you’re on the menu screen Press ‘back’ Press ‘exit’ when you’re on the menu screen The favourite lists menu This menu lets you create, change and delete your own favourite channel lists.
ADR10 Digital DigitalTV TV Receiver GDR10 receiver 42 How to create a favourite list This menu lets you create your own (favourite) channel list. 1 Select the ‘Create a favourite list’ option from the favourite list menu (see page 41) by pressing the ‘OK’ button. 2 You will see a new screen (1). Create a favourite list screen (1) You have a choice of two titles for your favourite channels list, either ‘FAV1’ or ‘FAV2’. You cannot change the names of these lists.
ADR10 Digital TV Receiver GDR10 Digital TV receiver ADR10 Set Top Box 43 Create a favourite list’ screen (2) The tick symbol on the left-hand side of the channel description means that the channel is selected to be in your favourite channels list. When you first set up your favourite channels, all your available channels will be ticked automatically. You can create your favourite list in two ways. 1 You can create a favourite list by removing each channel from the screen 2 list that you do not want.
ADR10 Digital DigitalTV TV Receiver GDR10 receiver Create a favourite list’ screen (3) What do you want to do? Press this button Delete a channel from your favourite Press the green button while channels list selecting the channel you don’t want. (The tick symbol will disappear and the green button label changes to ‘Add’. See screen (3) above.
ADR10 Digital TV Receiver GDR10 Digital TV receiver ADR10 Set Top Box What do you want to do? Unlock a channel Press this button Press the red button while selecting the channel you want to unlock Remember, you can only lock a channel if you have set up parental controls (see page 66). Save the favourite list and return to Press the ‘back’ button and press the favourite lists menu ‘OK’. You will now see a ‘Do you want to save changes?’ prompt. to say ‘Yes’, then Press or press ‘OK’.
ADR10 Digital DigitalTV TV Receiver GDR10 receiver 46 2 You can remove all channels from the screen (2) list by pressing the blue button, and then add the channels you want by pressing the green button. This method is best when you only want a few channels on your favourite list.
ADR10 Digital TV Receiver GDR10 Digital TV receiver ADR10 Set Top Box What do you want to do? Save the favourite list and return to the favourite lists menu Save the favourite list and return to the main menu. Press this button Press the ‘back’ button and press ‘OK’ You will now see a ‘Do you want to save changes?’ prompt. Press or to say ‘Yes’, then press ‘OK’.
GDR10 Di g ital TV receiver 48 For the FAV1 and FAV2 channel lists, you can choose channels to add or delete from your lists, or change their parental status (this means whether a channel is locked or unlocked). You cannot delete any channels from the TV and radio channel list. You can only lock or unlock individual channels. 1 Select the ‘Modify a favourite list’ option from the favourite lists menu (see page 41) by pressing the ‘OK’ button. 2 You will now see screen (1) above.
ADR10 Digital TV Receiver GDR10 Digital TV receiver ADR10 Set Top Box 49 7 To lock or unlock a channel, select the channel and press the red button. 8 If you want to add all available channels to the list, or delete all available channels from the list, press the blue button to skip a channel or add them all. 9 You will now see screen (3) below. Changing a favourite channel list screen (3) 10 To add all available channels to the list, press the green button.
GDR10 Di g ital TV receiver 50 Changing the TV/radio screen (4) 13 To lock or unlock a channel, select the channel and press the red button. 14 You now need to save the changes that you have made. To do this, press the ‘back’ or ‘exit’ button. 15 You will now see a box on the screen that says ‘Do you want to save changes?’ 16 Press or to say ‘Yes’, then press ‘OK’. 17 If you don’t want to save your changes, press ‘No’ then press ‘OK’.
GDR10 Di g ital TV receiver How to delete a favourite list This menu lets you delete the favourite channel lists that you have created. Delete a favourite list screen 1 Select the ‘Delete a favourite list’ option from the favourite lists menu (see page 41) by pressing the ‘OK’ button. 2 You will now see the ‘Delete a favourite list’ screen. 3 Select the list you want to delete (either FAV1 or FAV2), using the or buttons, and then press ‘OK’.
ADR10 Digital DigitalTV TV Receiver GDR10 receiver The configuration menu This menu lets you select and change many of your receiver’s features and settings (see page 40 to select the configuration menu).
ADR10 Digital TV Receiver GDR10 Digital TV receiver ADR10 Set Top Box 53 The channel installation menu This menu has the following features. • Automatic channel installation – this automatically scans and installs all available digital TV and radio channels. • Signal information – the signal information screen gives information about the channel you’re watching, including signal frequency, signal quality and signal level. This could affect your picture quality.
ADR10 Digital DigitalTV TV Receiver GDR10 receiver 54 The auto channel-installation screen (1) The auto channel-installation screen (2) 1 Select the ‘channel auto-installation’ option from the channel installation menu (see page 53) and press the ‘OK’ button. 2 You will now see screen (1) above.
GDR10 Di g ital TV receiver 3 To set your receiver to automatically install all channels, press the ‘OK’ button. You will now see screen (2). 4 To search for new channels or add a channel from screen 1 press or and you will now see screen (3) below. 5 To search for all new channels, press the ‘OK’ button. 6 You will now see screen (2) again. 7 To add a single channel, from screen (3) select ‘Manual’ on the installation mode option by pressing the arrow buttons and press the ‘OK’ button.
ADR10 Digital DigitalTV TV Receiver GDR10 receiver The manual channel-installation screen (4) 10 When the channel installation is complete, your TV will go to the first available channel in the list.
ADR10 Digital TV Receiver GDR10 Digital TV receiver ADR10 Set Top Box Signal information The signal information screen gives information about the channel you’re watching, including signal frequency, signal quality and signal level. This could affect your picture quality.
ADR10 Digital DigitalTV TV Receiver GDR10 receiver The TV configuration menu This menu lets you change selected TV configuration (setting) for your receiver. The TV configuration screen What do you want to do? Change the TV format Change the aspect ratios (these are only available for 4:3 TV format) Change the TV output signal Press this button. Select the screen type you want by using the or button (You can change between 4:3 compromise and 16:9 widescreen types.
ADR10 Digital TV Receiver GDR10 Digital TV receiver ADR10 Set Top Box 59 Aspect ratios You can choose from: • letterbox; • compromise; or • cut out. Choose the one that best matches your TV. TV output signal This option enables you to set the TV output signed format. The choices are: • CVBS – Composite Video Blanking and Syncs. This is a signal that contains the picture information (luminance and chrominance) plus all the synchronisation signals.
GDR10 Di g ital TV receiver 60 The languages menu This menu lets you change the language for your TV, the information display, the audio description and the subtitles screen. The languages menu screen To change the language on your TV, follow these instructions. 1 Select the languages menu by pressing the ‘OK’ button. 2 Choose the language you want for the TV, information display, audio descriptions and subtitles using the or arrow.
ADR10 Digital TV Receiver GDR10 Digital TV receiver ADR10 Set Top Box The system parameters menu This menu gives you the receiver system parameters (settings) and lets you change some of the system settings (see page 52 to select the system parameters screen). The system parameters screen For example you may need to do this because you need to reset the receiver.
ADR10 Digital DigitalTV TV Receiver GDR10 receiver System information The system information screen shows information about the receiver.
GDR10 Di g ital TV receiver Factory settings The factory settings menu lets you change the receiver’s settings back to the original factory settings (see page 61 to select the factory setting screen). 1 Using the or 2 Press the ‘OK’ button. 3 Using the 4 Press the ‘OK’ button. The receiver will reset and the welcome screen will be displayed. 5 You will need to install channels as described on page 26. or buttons, selecting ‘Factory settings’. buttons, select ‘Yes’.
ADR10 Digital DigitalTV TV Receiver GDR10 receiver The audio description menu This menu lets you change the volume level of the audio description service compared to the TV volume (see page 52 to select the audio description screen). You can choose from 25% lower than the TV volume to 25% higher than the TV volume. You can also turn the key beep on or off using this menu. When the key beep is turned on, you will be able to hear a quiet beep every time a remote control button is pressed.
ADR10 Digital TV Receiver GDR10 Digital TV receiver ADR10 Set Top Box The RF modulator configuration menu This menu lets you choose the RF frequency and channel number for connection option 2 (see page 12). The RF modulator configuration display To Select the channel number for your video or DVD player Confirm the menu option Which button do I press: Press the or button Press ‘OK’ You now need to go to your TV instruction manual, and scan the TV until the welcome screen appears (see page 20).
ADR10 Digital DigitalTV TV Receiver GDR10 receiver 66 The parental control menu This menu gives you control of the following features, so you can control when and if certain channels are watched. • Receiver lock – this lets you set a pin code which you or anybody using the receiver must enter correctly before they can use the receiver. • Menu lock – this lets you set a pin code which you or anybody using the receiver must enter correctly before they can change anything on a menu.
ADR10 Digital TV Receiver GDR10 Digital TV receiver ADR10 Set Top Box The parental control display (2) The factory setting for the parental control PIN (personal identification number) is 0000. You should change this PIN. When you do, remember the code or keep it written down somewhere safe.
ADR10 Digital DigitalTV TV Receiver GDR10 receiver How to reset the parental control PIN To reset the parental control PIN, press the blue, green, red and yellow buttons twice, quickly, one after the other. (So, press the blue button twice, then the green button twice, and so on.
ADR10 Digital TV Receiver GDR10 Digital TV receiver ADR10 Set Top Box 69 Safety information • Place cables where you won’t walk on them. Do not put anything on or against them. • Do not use the receiver in damp or very warm and wet conditions. • Do not let the receiver get wet. • Do not drip or splash anything on the receiver. • Do not put anything with water in it (such as a vase) on top of the receiver. • Do not put candles (or anything else with a flame) on top of the receiver.
GDR10 Di g ital TV receiver 70 Servicing • There are no parts in the receiver which you can repair yourself. • If your receiver doesn’t work or you think it is broken, take it to a local electrical shop. • Always talk to staff in the shop where you bought the receiver if you have any questions about how to set it up or how it works or about safety information. Throwing your receiver away • You should not throw electrical products away with your household waste.
ADR10 Digital TV Receiver GDR10 Digital TV receiver ADR10 Set Top Box 71 Electrical safety Read the electrical-safety pages in this guide carefully before you connect the receiver to the mains supply. Make sure your electricity supply is the same voltage as the voltage printed on the label on the bottom of the main unit of your receiver. The receiver needs a 230-volt (V) 50-hertz (Hz) mains supply. Do not use any other supply. The receiver comes with a moulded plug.
ADR10 Digital DigitalTV TV Receiver GDR10 receiver You must always use the same fuse value as your receiver’s power-lead plug if you replace it. The plug should be approved to British Standards (BS1363/A). Fit a 3-amp fuse.
ADR10 Digital TV Receiver GDR10 Digital TV receiver ADR10 Set Top Box Help and advice The problem you’re having What might be causing the problem The standby light is not on. The power lead is either unplugged or the fuse in the power-lead plug has blown. You cannot get a This could be because: signal on your • the aerial is not connected; receiver • the aerial is damaged or pointing in the wrong direction; or • you are not in an area that can receive a digital signal.
ADR10 Digital DigitalTV TV Receiver GDR10 receiver If you have difficulties using your receiver and none of the suggestions above work, try switching your receiver off and then back on again.
ADR10 Digital TV Receiver GDR10 Digital TV receiver ADR10 Set Top Box 75 Product specification Plain English Campaign’s Crystal Mark does not apply to this page. Product specification General Unit size: 230 x 135.5 x 37 millimetres (width x depth x height) Box size: 254 x 77.2 x 220.4 millimetres (W x D x H) Unit weight: 0.
GDR10 Di g ital TV receiver 76 Frequency band 470 to 862 MHeg) (UHF: only for UK) 16:9/4:3 screen aspect-ratio with pan and scan and letterbox Full seven-day EPG day and week event functions EPG picture in graphics Subtitles Teletext FLOF internal Parental lock Last-channel memory Has access to all Freeview digital TV channels and radio stations RF loop through and RF modulator output Easy one-touch automatic set-up and tuning Full digital text Now and next electronic programme guide Favourites function O