
User's Manual
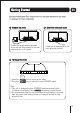


Bluetooth connection
Press the button to enter Bluetooth mode (operate your Bluetooth device to pair
with the speaker).
LCD will displace "pairing" after when you enter Bluetooth mode, it will keep flashing until
successfully paired.
LCD will display "paired" after successful pairing, press ENTER button to play music.
Press the and buttons to move to the previous or next tracks.
Press the ENTER button to Play/Pause music playing.
NOTE: The Bluetooth name is "GCR1888DABBT".
You will need to re-pair again if your Bluetooth device is not within the available distance.
You can press and hold the ENTER button to search and pair another Bluetooth device.
<
<
<
<
Playing your FM radio
Press the button to select the FM mode.
Press the and buttons to tune the radio.
Press and hold the and buttons to tune the radio automatically to the next station.
Press and hold the ENTER button to adjust the FM radio received sensitivity.
In the FM mode, storing and recalling a station preset is the same as the functions in
DAB mode.
<
<
<
<
<
<
<
<
AUX connection
The radio has an auxiliary input. This can be used to connect an external devices such
as MP3 players and other audio devices by using the included 3.5mm cable.
Press the button to select the AUX mode.
Connect the 3.5mm cable to your radio and to your external device.
Press the VOL- and VOL+ buttons to adjust volume level.
Clock setting
The radio clock can be set manually as below;
Press and hold the button to enter standby mode.
Press and hold the MENU button to enter clock settings.
Press and buttons to select 12H or 24H, then press the ENTER button to confirm.
Press the and buttons to adjust the Hours, then press the ENTER button to confirm.
Press the and buttons to adjust Minutes, then press the ENTER button to confirm.
Press the and buttons to select Year, then press the ENTER button to confirm.
Press the and buttons to select Month, then press the ENTER button to confirm.
Press the and buttons to select Day, then press the ENTER button to confirm.
<
<
<
<
<
<
<
<
<
<
<
<
<
<
<
<
<
<
<
<
<
<
<
<
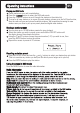
Operating Instructions
05
12
1
2
3
1
2
3
4
5
1
2
3
4
6
7
8
5
1
2
3
5
4
/MODE
/MODE
/MODE
/MODE