
User's Guide


Table Of Contents
- About this guide
- Android basics
- Starting Android for the first time
- Getting to know the Home screen
- Using the touchscreen
- Using the phone’s buttons
- Using a trackball
- Working with menus
- Monitoring your phone’s status
- Managing notifications
- Using the onscreen keyboard
- Entering text by speaking
- Editing text
- Opening and switching applications
- Locking your screen
- Customizing the Home screen
- Connecting quickly with your contacts
- Optimizing battery life
- Managing how applications use memory
- Managing downloads
- Connecting to networks and devices
- Placing and receiving calls
- Searching by text and voice
- Contacts
- Accounts
- Gmail
- Gmail version and availability
- Gmail is different
- Opening Gmail and your Inbox
- Reading your messages
- Composing and sending a message
- Replying to or forwarding a message
- Working with Priority Inbox
- Working with conversations in batches
- Starring a message
- Labeling a conversation
- Viewing conversations by label
- Synchronizing your conversations by label
- Reporting spam
- Searching for messages
- Archiving conversations
- Appending a signature to your messages
- Using keyboard shortcuts
- Changing Gmail settings
- Calendar
- Viewing your calendar and events
- Working in Agenda view
- Working in Day view
- Working in Week view
- Working in Month view
- Viewing event details
- Creating an event
- Editing an event
- Deleting an event
- Setting an event reminder
- Responding to an event reminder
- Synchronizing and displaying calendars
- Changing Calendar settings
- Google Voice
- Google Talk
- Messaging
- Browser
- Maps, Navigation, Places, and Latitude
- Opening Maps
- Viewing My Location and location services
- Searching, exploring, and starring places
- Using the Places feature in the Launcher
- Changing map layers
- Getting directions
- Navigating with Google Maps Navigation (Beta)
- Previewing and changing views of your route
- Finding your friends with Google Latitude
- Camera
- Gallery
- YouTube
- Music
- News & Weather
- Clock
- Car Home
- Calculator
- Tags
- Market
- Opening Android Market and finding applications
- Downloading and installing applications
- Managing your downloads
- View your downloaded applications
- Set whether an application is updated automatically
- Respond to a notification that application updates are available
- Set whether you’re notified about updated applications
- Uninstall an application
- Request a refund for an application
- Rate or comment on an application
- Flag inappropriate applications
- Settings
- Opening Settings
- Wireless & networks
- Call settings
- Sound settings
- Display settings
- Location & security settings
- Use wireless networks
- Use GPS satellites
- Set up screen lock
- Set unlock pattern
- Change unlock pattern
- Use visible pattern
- Use tactile feedback
- Set unlock PIN
- Change unlock PIN
- Set unlock password
- Change unlock password
- Turn off screen lock
- Set up SIM card lock
- Visible passwords
- Select device administrators
- Use secure credentials
- Install from SD card
- Install from USB storage
- Set password
- Clear storage
- Applications settings
- Accounts & sync settings
- Privacy settings
- Storage settings
- Language & keyboard settings
- Voice input & output settings
- Accessibility settings
- Dock settings
- Date & time settings
- About phone
Connecting to networks and devices 58
AUG-2.3.4-105 Android User’s Guide
Connecting to mobile networks
When you assemble your phone with a SIM card from your wireless service provider (if
necessary—CDMA phones don’t use a SIM), your phone is configured to use your
provider’s mobile networks for voice calls and for transmitting data. (Refer to your
phone’s owner’s guide and your carrier for more information.)
Your phone is configured to work with many mobile carriers’ networks. If your phone
does not connect to a network, contact your carrier for assistance. For GSM phones,
you may need to obtain the details of its access point name (APN) or other details; see
“Edit or create a new GSM access point” on page 60.
Different locations may have different mobile networks available. You may need to
configure your phone to use the fastest (4G) networks. You can also configure your
phone to use only a slower 2G network for data to extend the life of your battery
between charges. You can even configure your phone to access a different set of
networks entirely, or to behave in special ways when roaming.
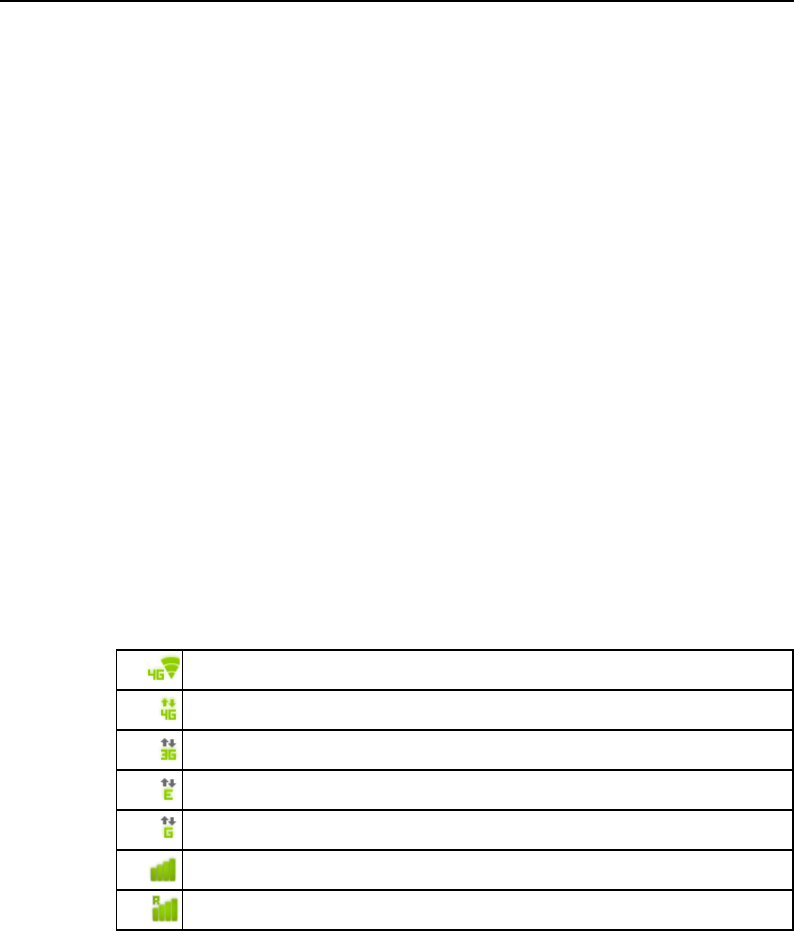
The icons in the Status bar indicate which kind of data network you’re connected to
and the voice and data network signal strength.
Network status icons turn green if you have a Google Account added to your phone
and the phone is connected to Google services, for syncing your Gmail, Calendar
events, contacts, for backing up your settings, and so on. If you don’t have a Google
Account or if, for example, you’re connected to a Wi-Fi network that is not connected
to the Internet, the network icons are white.
When you’re connected to slower networks, you may want to postpone using your
phone for data-intensive tasks until you are connected to a faster network again, or
find a Wi-Fi network to connect to. See “Connecting to Wi-Fi networks” on page 61.
Connected to a WiMAX-based 4G network
Connected to a 4G network
Connected to a 3G network (UMTS or HSDPA)
Connected to a network with speeds between 3G and 2G (EDGE)
Connected to a 2G network (GPRS)
The more bars are lit, the stronger the wireless signal
Connected to another wireless service provider’s network (roaming)