Google Search Appliance Getting Started Guide March 2014 © 2014 Google 1
Getting Started Guide This document is a quick-start guide for getting the Google Search Appliance (GSA) up and running. About this document The recommendations and information in this document were gathered through our work with a variety of clients and environments in the field. We thank our customers and partners for sharing their experiences and insights. What’s covered This guide walks the first-time GSA administrator through installation, getting content crawled and serving search results.
Contents About this document Chapter 1 Introduction Deployment scenario and architecture Configuration worksheet—information you will need Chapter 2 Install, Configure, Crawl, and Search Installing the GSA Configuring crawl Configuring crawler access Checking crawler progress Using search for the first time Troubleshooting common crawl problems Contacting Google for Work Support Chapter 3 Using Additional Features KeyMatch Search reports Other features Chapter 4 Essential Administration Keeping your GSA up-
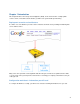
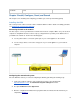
Chapter 1 Introduction This chapter introduces the Google Search Appliance (GSA), shows how it works in a simple public search scenario, and outlines the information you will need to get the GSA up and running. Deployment scenario and architecture A common use of the GSA is to provide search for intranets and web sites by crawling and indexing web servers and file shares. Many of the same powerful search algorithms that drive Google.
Configuration Description GSA host name The hostname you will use for the GSA, for example, search.mycompany.com GSA IP address The IP address for your GSA, for example, 192.168.100.25 GSA subnet The subnet mask for your GSA, for example, 255.255.255.0 Router IP address The IP address of the default gateway or router, for example, 192.168.100.1 DNS server(s) The IP addresses for your DNS server, for example, 8.8.8.
passwords secret Chapter 2 Install, Configure, Crawl, and Search This chapter covers installing and configuring your GSA to get search up and running quickly. Installing the GSA This section provides a brief overview of how to install the GSA. For all the details of installing your GSA, see Installing the Google Search Appliance. Connecting the GSA to the network The first step is to connect your GSA to the network and a notebook computer.
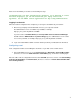
At the end of the wizard you should see the following message. Congratulations! You have configured the appliance. If no warnings or errors have been displayed, you can now disconnect your laptop and use the appliance. Use the Admin Console application for day-to-day administration. Logging in to the GSA When the network configuration has completed, you can log in to the GSA from your network: 1. Disconnect your laptop from the GSA and connect to your corporate network.
2. Click Save (Previous to Version 7.2: Save URLs to Crawl). Version 7.2 Version 7.
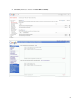
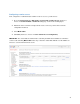
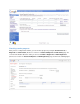
Configuring crawler access Next, configure the credentials that the crawler needs for access to your file shares: 1. Go to the Content Sources > Web Crawl > Secure Crawl > Crawler Access (Previous to Version 7.2: Crawl and Index > Crawler Access) page, shown in the following figure. 2. Add the file share usernames and passwords used to connect to your file shares from the configuration worksheet. 3. Check Make Public. 4. Click Save (Previous to Version 7.2: Save Crawler Access Configuration).
Version 7 Checking crawler progress After you have configured the crawler, you can check its progress by using the Content Sources > Diagnostics > Crawl Status (Previous to Version 7.2: Status and Reports > Crawl Status) page. For even more information about the crawl, you can use the Index > Diagnostics > Index Diagnostics (Previous to Version 7.2: Status and Reports > Crawl Diagnostics) page, shown in the following figure. Version 7.
Version 7.0 Using search for the first time A few minutes after the crawler has started to find content, you can search for it by connecting to the GSA search front end, shown in the following figure. The URL for the search front end is simply the hostname of the GSA: http://gsahosts.yourdomain.
Troubleshooting common crawl problems If you encounter problems with the crawl, check Monitoring and Troubleshooting Crawls in Administering Crawl for information about how to troubleshoot for common problems. For information about how many URLs have been crawled and how many errors were encountered, go to the Index > Diagnostics > Index Diagnostics (Previous to Version 7.2: Status and Reports > Crawl Diagnostics) page. To see all URLs, make sure that you select the default_collection.
Version 7.0 If the GSA is accessible from the Internet, you can just check Enable SSH for Remote Support. If your GSA is behind a firewall but has access to the Internet, you must initiate a Support Call: 1. Click on the button Test to see if you GSA can connect to the support call server. 2. If this is successful, click on Initiate Call when you want support to access your GSA. 3. After support has resolved your issue, you can end the support call.
Chapter 3 Using Additional Features This chapter introduces two very easy core features that can help you get more value from your search appliance: ● ● KeyMatch Search reports KeyMatch KeyMatch enables you to promote specific documents in the search results, highlighting them to ensure that users can always find them. To create KeyMatches, use the KeyMatch tab of the Search > Search Features > Front Ends > KeyMatch (Previous to Version 7.
Version 7.0 After configuring the KeyMatch, we search for "spain" in the GSA. This result is highlighted and appears at the top of the search results, as shown in the following figure. For more information about KeyMatches, see KeyMatch in the Admin Console Help.
Search reports Search reports help you see what your users are searching for and how successful they are at finding results. Creating a search report is very easy and you can use the results to help identify KeyMatches, for example. To create a report: 1. Go to the Reports > Search Reports (Previous to version 7.2: Status and Reports > Search Reports) page, shown in the following figures. 2. Select the default_collection. 3. Provide a name and timeframe for the search report. 4. Click Generate Report.
Version 7.0 Give the server some time to generate the report and then refresh your browser to view it. The following figure shows a search report.
Version 7.2 Version 7.
also top keywords and queries used to search. Other features There are many more easy-to-use GSA features that you can use to improve the search experience by expanding the content available to search and providing powerful navigation that allows users to narrow their results. For information about these features, see the Introduction in Creating the Search Experience.
Chapter 4 Essential Administration This chapter describes essential tasks for administering your GSA. Keeping your GSA up-to-date Keeping your GSA up-to-date will ensure you have access to the latest features and fixes. To keep the GSA software up-to-date, access the Google for Work Support Portal. Here you will find the latest GSA software, which you can use to update your search appliance. Each software version has release notes containing additional information or instructions for the version.