
Instructions / Assembly


Select
‘H’
‘F’ Length of Number Use Basement
Stringer at Least Stringer of Steps Door Model
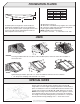
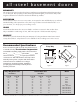
ST-1 48” to 55” 51” 69” 6 CD-1
ST-2 56” to 64” 59” 80” 7 CD-2
10
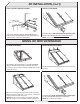
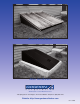
Complete your basement with the
GORDON STAIR STRINGER
H
F
Fig. 1
F
Fig. 2
Gordon now makes it easy and economical to add stairs to your new or existing bulkhead. Along with the Gordon
Steel Basement Door, the Gordon Stair Stringers eliminate the need for expensive and complicated step construction.
Made of 14 gauge galvanized steel and prepunched for easy tread installation. The rise of the step is 8
1
/2”.
1. First measure the
‘H’ dimension, then the ‘F’
dimension. If new areaway, build to specifications
below for model desired.
2. Second, select the ri
ght size Gordon Stair Stringer:
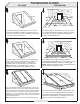
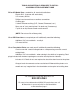
How to Install GORDON STAIR STRINGERS
• Now you can have the convenience and added security of keyed access with your
Gordon Steel Basement door.
• The Gordon Cellalock can be used with all sizes and models of Gordon Celladoors
including all past manufactured doors.
• You can access the basement from outside by using the key or exit from the inside by
flicking the lock switch.
• The shipping carton comes with complete installation instructions including a list of
tools required and a template for positioning.
• Consult your local dealers for pricing and availability.
GORDON
cellalock
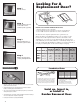
STEP 1 Set level on convenient eye level tread cut-out (fig.
1). Move GORDON STAIR STRINGER in and out/up and
down so that top angle is as straight as possible to outer
wall.
STEP 2 SECURE GORDON STAIR STRINGER with either
masonry nails or screw anchors and lag bolts use at least 6
nails or bolts.
(NOTE: If anchoring into concrete block be sure nail or lag
screw and anchor are not in hollow part of block. If so use
appropriate size toggle bolts.)
STEP 3 CUT STEPS from 2” x 10” lumber. The cut s
ize will
be 2” less than the width between the walls supporting the
GORDON STAIR STRINGER.
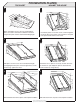
STEP 4 SECURE SECOND STRINGER by placing it
against wall and inserting a stair tread in bottom cut
out and another at eye level cut out. Move second
stringer in and out up and down until stair treads are
level. Secure second stringer as in Step 2.
STEP 5 SECURE STAIR TREAD (fig.2) by driving an
8d nail straight down into the tread through the hole
provided in the GORDON STAIR STRINGER.
Be sure thi
s angle is as tight as
possible to wall.