
Instructions / Assembly


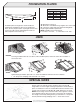


CATCH
ROD
DOOR HEADER
DOOR HEADER
HEADER ANGLE
CENTER HOLE
BOLT HEADS
BOLT HEAD
CATCH
SLIDE
DO NOT ALLOW CATCH ROD TO
RUB ON THE HEADER AREA
NOTED HERE
BEND CATCH ROD
AT THIS POINT
IN DIRECTION
OF ARROWS
HEADER
5
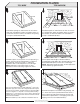
RD INSTALLATION
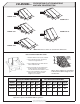
STEP 1–ASSEMBLE FRAME STEP 2– ATTACH DOOR TO FOUNDATION
STEP 3–SLIDE ON DOOR PANELS STEP 4–INSTALL CATCH RODS
STEP 5–ALIGN AND ADJUST DOOR PANELS STEP 6–DRILL AND ATTACH FRAME
Use
1
/4” bolts and nuts from hardware package. Bolt heads must
face the outside of the door frame.
NOTE: The sill bends towards the house
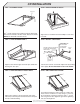
Align the door with the upper and lower pins, slide door bushing
onto door pins.
Adjust frame and doors by moving them from side to side until
you find the point at which the door will open and close without
binding.
Attach header angle to door header, bolting at center hole
only. Fasten header angle to house using all 3 holes. Drill
and attach 2 remaining holes in header angle to foundation
using plastic rawlplugs and screws provided.
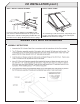
Install catch rods into catch slides. Adjust rods by bending
them slightly–Do not allow them to rub on the header.
Using prepunched holes in side rails and sill as a guide,
drill holes into the foundati
on 1
3
/4
” deep-using a
1
/4
”
masonry bit. Install plastic rawl plugs and fasten with 1
1
/2
”
screws until snug. Check door alignment again; over-
tightening will cause misalignment.