
Instructions / Assembly


HINGE
PLATE
INSERT
HERE
TORSION
SPRING
INSERT
HERE
6
RD INSTALLATION (conʼt)
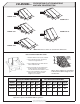
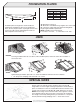
STEP 7–INSTALL TORSION SPRINGS STEP 8–CAULK FRAME
Insert torsion springs by sliding the spring under the hinge
plate–point faces downward and inserts into spring clip. If new
cement–allow to set before inserting springs.
To avoid leakage, caulk around frame and promptly paint
the door using alkyd based outdoor metal enamel
paint.
NOTE: Do not cement over flanges.
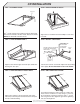
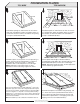
ASSEMBLE RD MODEL ATTACH EXTENSION HEADER
BOLT EXTENSION AND DOOR HEADER CAULK FRAME
Assemble door by repeating Step 1, however do not repeat
Step 2. Instead fasten frame at the sill-using the center hole.
Leave space at top of frame for extension header which should
overlap door frame.
Drill a 1/4” hole through the extension header and the door header.
Bolt the two headers together with
1
/4
” nuts and bolts. The extension
header should be fastened in three places.
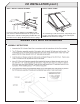
NOTE: When using extension header, discard header angle that
came with your door. 3-
1
/4
” nuts and bolts required for attachment.
Line the extension header up with the door frame fasten it to
the house
To avoid leakage Caulk around frame and promptly paint
the door using alkyd based outdoor enamel paint.
NOTE: Do not cement over flanges.
MODEL RD WITH EXTENSIONS