Electric oven GB IE MT Dear Customer! Congratulations on your purchase. See for yourself: our products read reliability. These ample instructions have been compiled in order to help you learn how to handle the appliance. They will show you step by step what your appliance is capable of, so please read them carefully before you attempt to use your cooker for the first time. Safety warnings are listed on page 2. The first thing to do is to check if your appliance has arrived undamaged.
WARNING! Cooling fan Push-pull knob can be pulled out and pushed back only when in non-operating, i.e. starting position. (certain models only) The appliance is equipped with a built-in cooling fan, cooling the casing and the control panel of the appliance. The cooling fan is put in operation by selecting any of the oven operation modes. Control Lamps Illuminated dials (certain models only) The dial above the active knob is illuminated when the oven is switched on.
Prior first use Oven Tips for the use of oven Take all the accessories out of the oven and clean it with warm water and your usual mild detergent. Never use aggressive cleaners as they might cause scratches! During the first heating the oven might produce a somewhat unpleasant smell of a new product. This is normal, just ventilate the place thoroughly! Program timer (certain models only) • If possible use dark, silicone coated or enamel baking pans, because of their excellent thermal conductivity.
Oven guide levels Lower heater and ventilator Both the lower heater and hot air ventilator are in operation. This mode is most appropriate for baking pizza. It may also be used for baking moist or heavy cake at two levels, fruit cake or cheese souffle. Baking pans and accessories (oven grid, grease receptacle, baking tray, etc.) may be inserted into the oven in 5 guiding levels. Appropriate levels are indicated in the tables that follow.
Grease filter (depending on the model). Inserted grease filter at the rear panel of the oven protects the fan, the heater and the oven from accidental staining with grease. For roasting meat we recommend the use of grease. Remove the filter when baking pastry. Grease filter might cause unsuccessful baking of some kinds of pastry. Pastry is too light below Use dark baking pan next time, or place the pan one level lower, or switch on the lower heater a while before the completion.
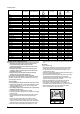
Pastry Baking Table Type of pastry Sweet pastry Raisin cake Ring cake Tree cake (tart form) Cheese cake (tart form) Fruit cake Fruit cake with icing Sponge cake* Flake cake Fruit cake, mix dough Cherrycake Jelly roll* Fruit flan Plait bun Cristmass cake Apple pie Puff paste Salted pastry Bacon roll Pizza* Bread Rolls* Cookies Caraway roll Biscuits Danish pastry Flaky pastry Cream puff Deep frozen pastry Apple pie, cheese pie Cheese cake Pizza Chips for oven* Potato fries for oven Guide level (from down up
Roasting Table Type of meat Beef Beef loin Beef loin Roastbeef, rare Roastbeef, well done Pork Pork roast with skin Flank Flank Pork loin Meat roll Pork cutlet Minced meat roast Veal Veal roll Veal knuckle Lamb Lamb prime ribs Mutton bladebone Venison Hare ribs Hare bladebone Boar ham Poultry Chicken, entire Hen Duck Goose Turkey Fish Fish, entire Fish souffle Weight (in grams) Guide level (from bottom up) Temp. (°C) Roasting time (in min.) Temp. (°C) Roasting time (in min.
Grill table Type of meat for grill Meat and sausages 2 beefsteaks, rare 2 beefsteaks, medium 2 beefsteaks, well done 2 pork scrag fillets 2 pork chops 2 veal staeks 4 lamb cutlets 4 grill sausages 2 slices of meat cheese 1 chicken, halved Fish Salmon fillets Fish in aluminium foil Toast 4 slices of white bread 2 slices of wholemeal Toast sandwich Meat/poultry Duck* Chicken* Pork roast Pork scrag Pork knuckle Roastbeef/beef fillet Weight (in grams) Guide level (from bottom up) Temp. (°C) Temp.
Cleaning and maintenance Never clean the appliance with pressurized hot steam cleaner! Before cleaning switch the cooker off and let it cool down completely. Front side of the casing For cleaning of frontal part of the cooker use the usual cleaning agents and follow the manufacturer's instructions. Never use any aggressive cleaning agents or dish cleaning accessories which might cause scratches.
Removing oven door with a single axe hinge (differ according to different models) Open the door completely and turn the removable locks backwards (see fig). Then close the door slowly and let the locks fit to the notches. At an angle of about 15° lift the door slightly up and pull the door from the hinge supports (fig. 2). For reinserting the door repeat the procedure backwards.
Oven light bulb The bulb for replacement should meet the following specifications: E 14, 230 V, 25 W, 300°C. Unscrew the glass cover by turning it in the clockwise direction and replace the bulb. Screw the glass cover back in place. In case of side light remove the glass cover by inserting the screw into the slot and move in the direction of the arrow. (see Fig.) Remember that the bulb is regarded as consumption material and is not covered by the warranty.
Electric connection Electric connection may be carried out by qualified service personnel only! Wrong connection may permanently damage parts of the appliance and render your warranty void! Mains voltage of the user (230 V) must be verified with the measuring device! • Before attempting the connection, check whether the voltage indicated on the rating plate corresponds to the actual mains voltage.
Connection Colour code • Using the screwdriver open the connector cover at the rear of the appliance. Release two locks located at either side of the connector bottom. • Mains lead must be led through the relief safety device, protecting the mains lead cable from disconnection. • Tighten the relief device securely and close the connector cover. L1, L2, L3 = exterior live wires, usually coloured black, black, brown. N = neutral The colour is usually blue.
After sale service Repairs If you find your cooker malfunctioning and requiring repair, contact our nearest service center and quote the code and the type or model of the appliance. Attached is the list of service centers with addresses and phone numbers. Important! Before contacting the service center, check if you can repair the malfunction, using the instructions from the Troubleshooting guide section.