
Instructions / Assembly

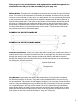

2. Fall Zones - A fall zone, covered with a protective surfacing material, is essential
under and around equipment where a child might fall. This area should be free of other
equipment and obstacles onto which a child might fall. Stationary climbing equipment
and slides should have a fall zone extending a Minimum of 6’ in all directions from the
perimeter of the equipment.
Swings should have a fall zone extending a minimum of 6’ from the outer edge of the
support structure on each side. The fall zone in front and back of the swing should
extend out a minimum distance of twice the height of the swing as measured from the
ground to the top of the swing support structure.
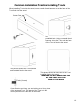
LEVELING YOUR FORT DURING ASSEMBLY
• Complete the steps which will be the basic frame of the fort. {i.e. four corner posts with
base (sand box boards) and deck supports}
• Position in the most level area chosen for the play set, keeping in mind the location
and size of the swing beam, ladder, slides, etc. that extend off the fort.
• Once the frame is in the nal position, check for vertical and horizontal levelness to
determine which side(s) will need to be dug into the ground to level the play set.
• With a shovel, score the ground around the outside edges of the sandbox boards on
the ‘high’ side of the fort. This is the area that will be dug in. Make sure to score deep
enough; the scored lines will be your digging template.
• Push the frame off and away from the scored area, far enough to dig and remove dirt
to reach the appropriate depth.
• Dig a channel along the scored line(s) for the base of the fort (corner post and
sandbox boards) to rest into. Dig the channel(s) to the same level depth. The bottom
of the channel(s) should be level to each other so your frame doesn’t teeter or rock
because the channel(s) are uneven.
• Once you have removed enough grass and dirt, slide/push the frame into the
channel(s). Place a level on the vertical and horizontal boards of the frame to determine
if enough soil, or too much, was removed.
• Repeat this process until the basic frame is plumb and level and in its nal position
before completing the rest of the assembly.
• Measure to make sure fort is square.
Important: if you require a channel depth of more than 6”, then we
recommend you have your play set area professionally graded before
completing assembly.
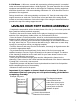
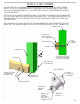
Example Play area:
= Area to be scored and
channeled for levelness
The diagonal measure-
ments should be the
same from corner post to
corner post. If not, adjust
corner posts so that the
distance is equal.
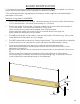
Side View of
Playset Frame
(Grade is the
Slanted Line)
7