도큐멘트1 03.10.
CAUTION RISK OF ELECTRIC SHOCK DO NOT OPEN CAUTION: TO REDUCE THE RISK OF ELECTRIC SHOCK, DO NOT REMOVE COVER (OR BACK). NO USER-SERVICEABLE PARTS INSIDE. REFER SERVICING TO QUALIFIED SERVICE PERSONNEL. The lightning flash with arrowhead symbol, within an equilateral triangle, is intended to alert the user to the presence of uninsulated “dangerous voltage” within the product’s enclosure that may be of sufficient magnitude to constitute a risk of electric shock.
This set has been designed and manufactured to assure personal safety. Improper use can result in electric shock or fire hazard. The safeguards incorporated in this unit will protect you if you observe the following procedures for installation, use and servicing. This unit is fully transistorized and does not contain any parts that can be repaired by the user. 1 Read Instructions All the safety and operating instructions should be read before the unit is operated.
• DVD, VCD, MP3 on CD-R/RW, and VHS playback • Watch DVD and Record TV at the same time • Multi-function remote control (VCR, DVD) • VISS function • MTS sound playback/record • High Quality 6-Head Hi-Fi Sound • One Touch Recording (OTR) • Progressive Scan • MP3 playback • Graphical On Screen Display • Screensaver function (DVD) • 3D sound (3D sound effect using 2 speakers) • High bit / high sampling with 27MHz / 10bit video encoder • High bit / high sampling with 96KHz / 24bit audio D/A converter • Coaxial
PRODUCT INFORMATION Important Safeguards ................................. 1 Features... ............................................. 4 Read Carefully Before Using ......................... 5 Contents ................................................ 6 Identification of Controls ............................ 7 Remote Control ...................................... 10 PRODUCT INFORMATION Contents Identification of Controls DVD OPERATION Playing a Desired Scene .............................
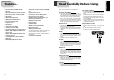
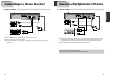
Operation Display Window Identification of Controls Rear Panel ! #$ % ^& DVD + VCR DVD ONLY AUDIO OUT VCR Operation REC and TIMER REC display AM Progressive Scan dts Disc Indicator Track Chapter Time, Counter and Current Operation Tray is opened Tray is closed COMPONENT VIDEO OUT Y VIDEO VIDEO 1 OUT IN AUDIO Pr L RF S-VIDEO OUT COAXIAL DIGITAL AUDIO OUT L Connect to wall oulet. @ Digital Output (COAXIAL) Jack Connect to digital receiver/ amplifier or digitial audio decoder.
Connecting to TV ! [DVD] DISC MENU button @ POWER button @ # $ 7 8 9 % [DVD] $ [DVD, VCR] % [DVD, VCR] MOVE/SELECT in OSD, [VCR] Channel Up/Down button “ Various methods of connecting your TV ^ SETUP button & [DVD] REPEAT Playback button * [DVD] A-B REPEAT button ( PREVIOUS button (skip to previous chapter or track) DVD + VCR DVD ONLY AUDIO OUT COMPONENT VIDEO OUT Y VIDEO VIDEO 1 OUT IN IN (FROM ANT.
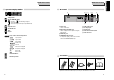
Connecting a Cable Box Connecting Other Video Equipment ■ You can connect a wide variety of audio/video equipment to your DVD+VCR, including : an additional VCR, Laser Disc Player, DVD Player, Camcorder, Satellite Receiver, or Video Game. Since all of these devices use essentially the same connections, they will be described together.
Connecting to a Stereo Receiver How to Connect Connecting to a Dolby Digital decoder or DTS decoder How to Connect COMPONENT VIDEO OUT Y AUDIO OUT IN (FROM ANT.) AUDIO RF S-VIDEO OUT L L DO NOT REMOVE COVER (OR BACK). NO USER SERVICEABLE PARTS INSIDE.
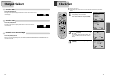
Output Select Clock Set ■ Set TV to CH 3 (or 4). ■ Press [VCR] on the remote control to select VCR mode and follow the procedures below. To Select DVD Press the [DVD] button. 1 DVD lights on the operation display window and all remote control buttons control the DVD player. Press [SETUP]. Press [ENTER] to select CLOCK SET. Select Time and Date Set and press [ENTER].
DVD Playback PREV NEXT Press [POWER] to power on. Press [DVD] to select DVD mode. Press [EJECT] to open the disc tray. Place your disc firmly on the disc tray, with the label facing upward. Insert the disc and press [EJECT] to close the tray. The disc tray is closed and after checking the disc’s condition, many discs will start playback automatically. NEXT To start playback, press [PLAY/PAUSE].
Memorizing TV Channels Memorizing TV Channels To Automatically Memorize Channels 1 2 SETUP Press [SETUP]. Press [ ] to move then press [ENTER]. to CHANNEL SET, and Select “AUTO CHANNEL SEARCH”. Press [ENTER] to select AUTO CHANNEL SEARCH. Select “Detect Automatically”. Press [ENTER] to detect the channel automatically.
Recording Recording To Record With VCR PREV NEXT To Record From DVD To Videotape during DVD playback 1 Press [POWER] to power on. 2 3 4 5 6 7 Insert a recordable tape. • • Press [VCR] to select VCR mode. Power on TV and select Ch 3, or press [INPUT] on your TV to select External Input mode. Insert a tape with recording tab. With [CHANNEL], [0-9] and [INPUT] buttons, select the desired channel or external input to record. 1 Insert the desired DVD disc. 2 3 Play the DVD disc and press [REC].
Timer Recording Timer Recording TIMER RECORDINGS ■ ■ ■ ■ Power on TV. Make sure the current time is set correctly. Insert a recordable tape with recording tab. Press [VCR] to select VCR mode. 1 Press [SETUP] and select “TIMER RECORDINGS”. Move to “TIMER RECORDINGS” with [ ] and press [ENTER]. 6 2 Press [ENTER] to select “Make a New Program”. TIMER RECORDINGS 4 Move to desired recording type with [ ] and press [ENTER]. For details, see “Types of Timer Recordings” on the page 26.
Timer Recording Types of Timer Recordings One Time: A single Timer Recording on a specific date and time. Daily : A Timer Recording that will record at the same time every day. Weekday : A Timer Recording that will record at the same time Monday through Friday. Weekly : A Timer Recording that will record once a week on the selected day and time. Watching and Recording Cable TV To Watch and Record Cable TV 1 Power on converter and then set a channel to watch or to record.
Using Advanced Features Using Advanced Features Auto Playback Searching a cassette tape for programs (indexing) ■ When you record a program, the VCR places an index mark at the start of the recording. To search for an index mark: ■ This feature allows the VCR to automatically start playing when you insert a tape with the safety tab removed. 1 Press [SETUP] and select “FUNCTIONS”. Move to “FUNCTIONS” with [ ] and press [ENTER].
Using Advanced Features Hi-Fi Stereo Playback Display (O.S.D) 1 2 Playing a tape in Hi-Fi high-quality Press [DISPLAY] to display the tape counter, clock and status mode on the TV screen. • • Hi-Fi Press [DISPLAY] again to view just the tape counter. Press [SETUP] button and select “CLOCK SET”. Move LINEAR MIX If there is noise in the recording, please “Linear” to reduce it. Daylight-Saving Time 1 2 “Hi-Fi” appears at the top of the screen.
Playing a Desired Scene To skip scenes on a disc Playing a Desired Scene DVD, VCD, VCD2.0, CD, MP3 Playing a programmed order To skip to the next chapter (or track), press [NEXT √√❚ ]. 1 The current chapter (or track) skips to the next chapter (or track). œœ PREV]. Press [❚œ Jumping directly to a desired title ■ Some movie discs contain multiple titles. If the disc has a title menu, the [TITLE] button can be used to select the desired title.
Playing a Desired Scene DVD, VCD, CD ■ You may repeat a defined period from A to B. 2 At the point where you want to end the repeat playback, press [A-B] again. 3 To exit repeat playback mode, press [AB]. 1 A- Point A is set. T 001/013 total track number * If PBC is ON, entering the track number converts PBC to OFF mode automatically. A-B Point B is set and the segment from A to B plays repeatedly. OFF 2 If you want to search for a track time, press [SEARCH] twice.
Confirming Current PLAY Mode Confirming Current PLAY Mode Confirming the current DVD disc mode DVD Confirming the current VCD disc mode While in Play mode, press [DISPLAY]. While in Play mode, press [DISPLAY]. The current disc mode is displayed. If you want to change the mode, select the item with up/down cursor and enter the new settings with [0-9], [<] or [>]. When finished, press [ENTER]. To exit Display mode, press [DISPLAY] again. The current disc mode is displayed.
AUDIO, SUBTITLE and 3D AUDIO Selecting an audio language DVD ■ The user may select an audio language and subtitle language if a disc includes multiple languages. If the DVD disc includes audio information, every time you press [AUDIO], English (ENG), French (FRE), Spanish (SPA), etc. appear one by one. DVD, VCD In the case of SVCD and VCD, only 2 times Zoom is available. Keep pressing [ZOOM] until the preferred level of magnfication appears.
About MP3, JPEG discs About MP3, JPEG discs Playing a disc containing MP3, JPEG files MP3, JPEG This unit will play MP3, JPEG files recorded on CD-R and CD-RW discs. 1 Turn on your television and select the channel assigned to this DVD+VCR. Press DVD [EJECT] to open the disc tray. Place a disc with MP3, JPEG files on the disc tray with the label side up. 6 Select the file to listen to (or view). Move the cursor to the file you want to listen to (or view) by pressing [ ] and press [ENTER] to confirm.
Displaying Disc Menus To display disc menus 1 LANGUAGE Setup DVD, VCD2.0 You can set your preferred language of disc menus, audio soundtracks and subtitles. Press [TITLE] or [MENU]. 1 • The disc menu is displayed. These menus vary by disc. (“Return” will appear on the OSD with VCD2.0.) • If it is a VCD2.0, select PBC ON mode by pressing [TITLE]. While in Stop mode, press [SETUP]. * CD and VCD1.1 do not support the function. 2 Move the cursor to the desired menu item with [ with [ENTER] or [PLAY].
VIDEO Setup AUDIO Setup To set the DVD+VCR to match the capabilities of your TV: 1 While in Stop mode, press [SETUP]. To set the DVD+VCR to match the capabilities of your audio system: LANGUAGE VIDEO TV ASPECT VIDEO OUT SCAN MODE AUDIO OTHERS 4:3 LB COMPONENT INTERLACED 1 While in Stop mode, press [SETUP]. MOVE :œ √†… SELECT:ENTER EXIT:SETUP 2 Selecting TV ASPECT. 3 Selecting VIDEO OUT. Every time you press [ENTER], TV ASPECT changes as follows: 4:3 LB ➝ 16:9 WIDE ➝ 4:3 PS ➝ ...
Others Setup 1 While in Stop mode, press [SETUP]. About DVD LANGUAGE VIDEO OSD SCREEN SAVER DEFAULTS PARENTAL AUDIO OTHERS ON ON RESET 8 ADULT Playable Discs • DVD, Video CD (Version 1.1, 2.0), S-VCD and Audio CD Disc type Playable DVD Video CD CD CD-G CD-ROM CD-R Yes Yes Yes Yes Yes Yes CD-RW DVD-R DVD-RW DVD+RW DVD-ROM Yes Yes Yes Yes No DVD-RAM Photo CD No No MOVE :œ √†… SELECT:ENTER EXIT:SETUP • If the password is wrong, “WRONG PASSWORD” appears instead of “CHANGE PASSWORD”.
About DVD About VCR and Videotape VCR Terms CHAPTER Information recorded on a DVD. A title on a DVD is divided into many tracks, each of which are referred to as chapters. Each chapter is numbered and can be searched using its number. TITLE Information recorded on a DVD. A DVD can be divided into may titles. AFT Automatic fine tuning, a circuit that automatically adjusts TV reception to optimum condition. TRACK Information recorded on a video CD or audio CD. A disc consists of many tracks.
Troubleshooting (DVD) Symptom • The player does not play. Troubleshooting (VCR) Checks Symptom Checks ➤ If a DVD is from overseas, it may not play. Make sure the DVD’s region code is 1 or All. ➤ Make sure the DVD is inserted in the right direction. ➤ If it is a CD-ROM for PC or DVD-ROM, it will not work. • “Power On” does not work. ➤ Make sure the power plug is inserted in an electric outlet. • Unit does not work even in “Power On”. ➤ Make sure a videotape is inserted. ➤ Try to insert a plug again.
Troubleshooting (VCR) Symptom • Recording a TV program is impossible. • Once [REC] is pressed, a videotape is ejected automatically. • Timer recording of Cable TV does not work. Checks ➤ Check whether the desired channel is visible on the screen. If not, press [OUTPUT] to view the TV. ➤ Check whether the timer recording settings are right. ➤ Are RF cables connected to the antenna connection correctly? ➤ Does a channel number appear on the display? ➤ Check the record safety tab on the videotape.