D V D + V C R C O M B O DV R 4 0 0 0 SSC.4000-1.
Congratulations... W E L C O M E ...on your purchase of this Go-Video DVD+VCR! We know you will enjoy this product for many years to come. In case warranty service is required, please take a moment to attach your receipt to this manual and write down your Serial Number (located on the back panel of the DVD+VCR): __________________________________ . CAUTION: To prevent fire, shock hazard, or annoying interference, use only the recommended accessories.
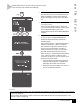
TA B L E Important Safety Instructions ............................................... iii 1 - GETTING STARTED 1 Unpacking ...................................................................... Basic Connections .......................................................... Auto Setup ..................................................................... Feature Summary ........................................................... 1 2 3 4 O F 2 - QUICK TOUR 5 C O N T E N T S Remote Control ..................
Dolby/DTS Decoder Setting ........................................ Other A/V Hookup ....................................................... Cable Box Hookup ....................................................... Alternative Cable Box Hookup ..................................... 33 34 35 36 APPENDIX B - SYSTEM SETTINGS 37 Language Settings ........................................................ Auto Clock Settings ...................................................... Manual Clock Settings ..............
READ INSTRUCTIONS All the safety and operating instructions should be read before the unit is operated. R E TA I N I N S T R U C T I O N S The safety and operating instructions should be retained for future reference. HEED WARNINGS All warnings on the unit and in the operating instructions should be adhered to. FOLLOW INSTRUCTIONS All operating and maintenance instructions should be followed. CLEANING Unplug this video unit from the wall outlet before cleaning. Do not use liquid or aerosol cleaners.
Electrical Code, ANSI/NFPA No. 70-1984, provides information with respect to proper grounding of the mast and supporting structure, grounding of the lead-in wire to an antenna discharge unit, size of grounding conductors, location of antenna-discharge unit, connection to grounding electrodes, and requirements for the grounding electrode. See figure below. spillage occur, unplug unit and have it checked by a technician before use.
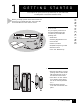
1 G E T T I N G S TA R T E D This Chapter will guide you through initial setup of your DVD+VCR, including basic connections and Auto Setup. 1 POWER As you unpack, please check that the following items are included in your DVD+VCR packing case: OPEN/CLOSE TRK— 1 ZOOM AUTO TRK+ 2 3 DISPLAY SHUTTLE MODE REPEAT SKIP 4 5 7 8 6 CLOCK/ COUNTER 9 3D SOUND F.
C O N N E C T I O N S Follow these steps to connect the DVD+VCR to your television and antenna/cable TV. From Antenna or Cable TV To Television B A S I C 1 To Line Inputs on your Television (Optional) CONNECT ANTENNA/CABLE TV 3 Connect the RF antenna cable from your indoor/outdoor antenna or cable wall outlet to the IN (FROM ANT.) jack on the back panel of the DVD+VCR.
1 SET MENU LANGUAGE 2 CONFIRM ANTENNA/CABLE CONNECTION If you have not already done so, make sure you have connected an antenna or basic cable to the “IN (FROM ANT.)” jack on the DVD+VCR back panel. Press SETUP/ENTER to continue. 3 S E T U P The first time you turn on your DVD+VCR, you will be prompted to set the menu language. Press 1 for English, 2 for French or 3 for Spanish. A U T O Follow these steps to run Auto Setup, which will set the clock and save local channels automatically.
S U M M A R Y F E AT U R E Enjoy the following features of your DVD+VCR.
2 Q U I C K T O U R This Chapter provides an overview of the DVD+VCR remote control, front panel, front panel display and rear panel. OPEN/CLOSE POWER TRK— 1 ZOOM AUTO TRK+ 2 3 POWER Press to power the DVD+VCR on and off. DISPLAY SHUTTLE MODE REPEAT 5 7 8 9 3D SOUND F.ADV CLOCK/ COUNTER 6 CLEAR TV/VCR DVD Press to set the remote control to operate the DVD deck. 0 100+ DVD TV VIEW VCR MUTE VCR Press to set the remote control to operate the VCR deck.
( c o n t . ) POWER OPEN/CLOSE TRK— C O N T R O L TRK+ 2 3 1 ZOOM OPEN/CLOSE Press to open and close the DVD disc drawer. DISPLAY SHUTTLE MODE REPEAT SKIP 4 5 7 8 F.ADV CLOCK/ COUNTER 6 9 3D SOUND CLEAR TV/VCR 0 100+ DVD R E M O T E AUTO TV VIEW VCR MUTE LCV VOL DVD CONTROL KEYS CH 0-9 Press to select specific disc menu items. ZOOM While a DVD is playing, press to zoom in at 2 or 4 times the normal magnification.
OPEN/CLOSE TRK— 1 ZOOM AUTO TRK+ 2 3 OPEN/CLOSE Press to eject the VHS tape from the VCR deck. DISPLAY SHUTTLE MODE REPEAT SKIP 4 5 6 7 8 9 3D SOUND F.ADV CLOCK/ COUNTER CLEAR TV/VCR 0 100+ DVD TV VIEW VCR LCV VOL CH ANGLE REC DISC MENU TITLE SUBTITLE SET TIMER AUDIO SHUTTLE << >> While a tape is playing, press SHUTTLE >> to gradually increase the cue speed (visual search forward).
PA N E L F R O N T The following is an overview of the DVD+VCR front panel. 2 1 6 7 8 9 10 1 DVD DECK 2 11 3 Press to play a DVD. Press again to pause playback. DVD OPEN/CLOSE Press once to play the VHS tape in the VCR deck. While a tape is playing or recording, press to pause. VCR DECK Deck used for VCR playback and other VCR functions. 4 5 6 RECORD 9 STOP Press to stop playback in the active deck. 10 DVD - SKIP/SEARCH FORWARD Press to start recording in the VCR deck.
F L A P The following is an overview of the keys and inputs located behind the front panel flap door. D O O R 1 1 2 3 4 5 COPY Press to copy a DVD in the DVD deck to a VHS tape in the VCR deck. Note: The DVD+VCR will not copy Macrovision® encoded DVDs. 2 5 6 7 SETUP TV/VCR Press to switch back and forth between your television’s tuner and the DVD+VCR’s internal tuner.
D I S P L AY PA N E L The following is an overview of the DVD+VCR front panel display. 1 2 3 4 5 12 13 14 1 15 16 DVD DECK INDICATOR The DVD deck is active. 2 DISC TYPE INDICATOR F R O N T A DVD, CD, VCD or SVCD is loaded. 3 LPCM INDICATOR A disc with LPCM (Linear Pulse Code Modulation) audio is loaded. 4 5 DOLBY DIGITAL INDICATOR DECK STATUS INDICATOR STEREO INDICATOR HI-FI INDICATOR TIMER RECORD INDICATOR A timer recording is programmed or in progress. If blinking there is an error.
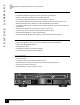
R E A R The following is an overview of the DVD+VCR rear panel. 1 PA N E L 2 1 3 4 5 6 RF ANTENNA INPUT 7 8 7 RF OUT TO TV Connect to your television with an RF coaxial cable. 3 4 5 COMPONENT VIDEO OUT S-VIDEO OUT Connect to your television with an S-Video cable. For audio, use the Line Out or Digital Audio Out (optical or coaxial). LINE 2 INPUT DIGITAL AUDIO OUT (OPTICAL) Connect from the outputs of an external audio/video device.
P L AY B A C K 3 B A S I C O P E R AT I O N S This Chapter shows you how to play DVDs and videotapes with your DVD+VCR. You will also learn how to navigate in the DVD+VCR menu system. Follow these steps to play a DVD. POWER OPEN/CLOSE TRK— 1 ZOOM AUTO TRK+ 2 3 REPEAT SKIP 4 5 DISPLAY 2 7 8 F.ADV CLOCK/ COUNTER 6 9 3D SOUND OPEN DISC DRAWER Press OPEN/CLOSE to automatically power on the DVD+VCR and open the disc drawer.
POWER OPEN/CLOSE TRK— 1 ZOOM AUTO TRK+ 2 3 1 INSERT VHS TAPE Insert a standard VHS videotape into the VCR deck. The DVD+VCR will power on automatically when you insert a tape. DISPLAY B A S I C Follow these steps to play a VHS tape. SHUTTLE REPEAT SKIP 4 5 6 7 8 9 3D SOUND F.ADV CLOCK/ COUNTER 2 Press PLAY/PAUSE CLEAR DVD TV VIEW VCR LCV VOL CH 3 ANGLE REC DISC MENU TITLE SUBTITLE SET TIMER AUDIO • To freeze playback, press PLAY/PAUSE .
N A V I G AT I O N The following keys are used to open and navigate through the DVD+VCR on-screen menu system. SETUP/ENTER KEY POWER OPEN/CLOSE TRK— 1 ZOOM AUTO TRK+ 2 3 Press to access the DVD+VCR on-screen menu system. DISPLAY SHUTTLE MODE 4 5 6 7 8 9 UP ARROW KEY CLOCK/ COUNTER Moves pointer up the list of menu items. REPEAT SKIP 3D SOUND F.ADV CLEAR TV/VCR 0 100+ DVD DOWN ARROW KEY TV VIEW VCR MUTE Moves pointer down the list of menu items.
4 S P E C I A L D V D F E AT U R E S This Chapter explains some of the special features of DVD/CD/VCD playback. press DISPLAY 1 V I E W D V D / C D D I S P L AY Press DISPLAY during DVD/CD playback. 2 SELECT TITLE, CHAPTER OR TIME Title Use the LEFT/RIGHT arrow keys to select “Title,” then use the UP/DOWN arrow keys to select from all available titles on the disc. Select Title Press SETUP/ENTER to jump to the desired title.
A N G L E / Z O O M Follow these instructions to view a DVD movie from multiple angles, or to zoom in during playback. LCV press ANGLE ANGLE Some DVDs allow you to view the same scene from different perspectives, or angles, while watching a movie. Press ANGLE to activate this feature. 1 If multiple Angles are available on the DVD, the Angle mark will appear on the front panel display during playback. 2 Press ANGLE to view the Angle Selection menu.
SUBTITLE SET TIMER SUBTITLES Many DVDs provide subtitles in one or more languages. The SUBTITLE key provides a shortcut to view and select these options. 1 While playing a DVD, press SUBTITLE. 2 Use the UP/DOWN arrow keys to select from all available subtitle languages. 3 Use the LEFT/RIGHT arrow keys to turn the selected subtitle on or off. 4 Press SETUP/ENTER to confirm your selection. AUDIO press RETURN AUDIO Many DVDs provide multiple language and audio setup options, such as Dolby Digital 5.
F E AT U R E S R E P E AT Follow these steps to repeat a chapter, title, or segment (A-B) or a DVD disc. press MODE REPEAT R E P E AT C H A P T E R / T I T L E You can repeat a single chapter over and over, or you can repeat a complete title. 1 While playing a DVD, press MODE/REPEAT. On the Repeat menu, the current Repeat Mode will blink. 2 Use the LEFT/RIGHT arrow keys to select Chapter or Title. 3 Press SETUP/ENTER to repeat the current chapter/title.
MARK press SEARCH/INDEX SET BOOKMARKS 1 While a DVD is playing, press MARK. The “Mark” header will appear on the screen. 2 Use the LEFT/RIGHT arrow keys to move to one of the three bookmark placeholders (- - -). The selected placeholder will blink. 3 When the DVD is at the scene you want to bookmark, press SETUP/ENTER. The place holder will change to a number (1, 2 or 3). B O O K M A R K S You can insert up to three Bookmarks on your DVDs, so you can jump quickly to your favorite scene or song.
P L AY B A C K R A N D O M / P R O G R A M M E D 20 Follow these steps to program playback of a DVD or CD in a random or preset order. press MODE REPEAT with TV View set to DVD R A N D O M P L AY B A C K Random Playback sets a random order for playback of chapters/tracks on a DVD or CD. 1 While a DVD/CD is stopped, press MODE/REPEAT. 2 Use the UP/DOWN arrow keys to move the pointer to “Random Play,” then press the RIGHT arrow key to select. The disc will play back automatically in random order.
5 V C R R E C O R D I N G This Chapter will show you how to record television programs in the VCR deck and set recording preferences. 1 Insert a VHS tape with a record safety tab into the VCR deck. 2 POWER 1 TRK+ 2 3 • SP – Standard Play, for best quality. • SLP – Super Long Play, for maximum recording time (3 times longer than SP). DISPLAY SHUTTLE MODE REPEAT SKIP 4 5 7 8 3 9 3D SOUND F.ADV CLOCK/ COUNTER 6 Use the 0-9 keys or the CH keys to select the channel you wish to record.
S E T T I N G S R E C O R D Follow these steps to set the default VCR record settings for your DVD+VCR. 1 SETUP /ENTER press Press SETUP/ENTER. 2 SETUP MENU Set Timer Recording Child Lock Set Clock DVD Setup VCR & Channel Setup Language/Langue/Idioma / To Move OPEN “SETUP MENU” Use the UP/DOWN arrow keys to select “VCR & Channel Setup,” then press the RIGHT arrow key to select.
C O P Y I N G The DVD+VCR allows you to copy the contents of a DVD to a VHS tape with a press of the COPY button. F R O M 1 INSERT DISC Insert the disc you wish to copy in the DVD deck and close the drawer. 2 INSERT VHS TAPE D V D Insert a VHS tape with a record safety tab into the VCR deck. 3 COPY THE DVD TO VHS TAPE Press COPY on the DVD+VCR front panel. • The DVD will begin playing and the VCR will begin recording.
T I M E R R E C O R D I N G 6 T I M E R R E C O R D I N G This chapter provides step by step instructions for programming Timer Recordings. Follow these steps to program your DVD+VCR to record up to 16 television shows. 1 SETUP /ENTER press Insert a blank tape with a record safety tab into the VCR deck. 2 SETUP MENU Set Timer Recording Child Lock Set Clock DVD Setup VCR & Channel Setup Language/Langue/Idioma / 3 • You can also press SET TIMER on the remote control.
...continued 6 Use the 0-9 keys to set the length of the event in hours and minutes. SET LENGTH (H) [0-9] :00 Aug 2001 10:30PM 1H00M 1 Su Mo Tu 5 12 19 26 6 13 20 27 7 14 21 28 1-Time Th 2 9 16 23 30 Fr 3 10 17 24 31 Ch10 0 press 1 We 1 8 15 22 29 to set hours and minutes SET TYPE [1-4] : 1 2001 10:30PM Aug Su Mo Tu 5 12 19 26 6 13 20 27 7 14 21 28 1-Time We 1 8 15 22 29 Set Length (H) Sa 4 11 18 25 Enter the hours as a 1-digit number; e.g., for one hour, press “1.
E R R O R S ...continued AUDIO press 1 2 3 T I M E R R E C O R D I N G 4 RETURN SELECT EVENT [1-16] :01 10:30 PM On Wednesdays Ch10 1H30M Auto --:--------/-Ch - -H--M ---:--------/-Ch - -H--M ---:--------/-Ch - -H--M -/ To Move To Select TIMER RECORDING ERRORS Ta p e M i s s i n g Solution: Insert a tape in the VCR deck. 10 VIEW EVENT SUMMARY Press RETURN to confirm the event and view a summary of all programmed events. • The event is now stored in memory and will record at the scheduled time.
7 S E A R C H / I N D E X This Chapter will show you how to locate recordings on your VHS tapes using Index Marks. What are Index Marks? POWER OPEN/CLOSE TRK— 1 ZOOM AUTO TRK+ 2 3 DISPLAY SHUTTLE REPEAT SKIP 4 5 7 8 9 3D SOUND F.ADV CLOCK/ COUNTER 6 CLEAR TV/VCR 0 100+ DVD TV VIEW VCR MUTE LCV VOL CH Automatic Index Marks The DVD+VCR places an Index Mark on your tape the moment you start recording.
S E A R C H / S C A N Follow these steps to locate recordings by scanning or searching for Index Marks. MARK press 1 2 SEARCH MENU 3 To Move Select Index Search/Scan 4 I N D E X SEARCH/SCAN FOR INDEX MARKS Scan INDEX MENU Index: - - Press FAST-FORWARD or REWIND to begin scanning for all Index Marks forwards or backwards. • When Index Scan locates an Index Mark, it will play the tape for 5 seconds. If it is the scene you want to watch, press PLAY/PAUSE .
MARK press 1 2 SEARCH MENU 3 To Select RETURN to Quit SELECT A SPECIAL SEARCH FUNCTION Use the UP/DOWN/RIGHT arrow keys to select from the following: Blank Search Select Blank Search, Direct Time Search, & Return to 0:00:00 TIME SEARCH Enter Counter Value Enter [1] = Pos Or [2] = Neg P r e s s C L E A R To C o r r e c t MENU TO Quit • If the DVD+VCR finds blank tape, it will stop at the beginning of the blank segment. • If the DVD+VCR does not find blank tape, it will eject the tape.
APPENDIX HOOKUP A A D VA N C E D C O N N E C T I O N S This Chapter will show you how to use the S-Video and Component outputs, as well as how to connect additional audio/video devices to your DVD+VCR. Follow these steps to connect the DVD+VCR to your TV using the S-Video or Component Video outputs. 1 CONNECT S-VIDEO OUT TO TV Connect an S-Video cable from the S-Video Out on the back panel of the DVD+VCR to the S-Video Input on your television.
1 SETUP /ENTER press To Move Off 2 Use the UP/DOWN arrow keys to move the pointer to “DVD Setup,” then press the RIGHT arrow key to select. To Select 3 Use the UP/DOWN arrow keys to move the pointer to “Alt Video Out,” then press the RIGHT arrow key to select from the following: DVD SETUP / To Move RETURN to Quit 4:3PS Off [None] Auto Low Off To Select Off Component S-Video Indicates that you are using the standard RF or Line Out jacks to connect your DVD+VCR to your TV or display device.
H O O K U P R E C E I V E R / S T E R E O A / V 32 Follow these steps to connect your DVD+VCR to an A/V receiver or stereo system using the Line Out or Digital Audio Out jacks. Connect to Stereo Line Inputs, OR Connect to the Digital Audio Input of an A/V Receiver with a Dolby Digital and/or DTS Decoder. STEREO CONNECTION 1 CONNECT DVD+VCR TO STEREO Connect RCA cables from the ”Line Out” audio jacks (R and L) on the back of the DVD+VCR to the line inputs on your stereo receiver.
SETUP /ENTER press 1 OPEN “SETUP MENU” Press SETUP/ENTER. • Make sure the DVD deck is stopped before pressing SETUP/ENTER. You will not be able to enter the “DVD Setup” menu if a DVD is playing.
Front Panel From Audio/Video Outputs of External Device (Line 1) A / V H O O K U P Follow these steps to connect your DVD+VCR to an external audio/video component, such as a camcorder, video game, etc. O T H E R Rear Panel From Audio/Video Outputs of External Device (Line 2) 1 CONNECT DEVICE TO VCR Connect RCA cables from the audio/video outputs of your external device to the audio/video inputs on the front (Line 1) or rear (Line 2) of the DVD+VCR.
C A B L E Follow these instructions to connect a Cable Box to your DVD+VCR. Cable Box From Cable Wall Outlet Input Output B O X VHF/UHF 1 CONNECT CABLE TO CABLE BOX 6 Connect an RF antenna cable from your cable wall outlet to the “In from Cable” jack on the Cable Box. 2 CONNECT CABLE BOX TO DVD+VCR Set the CH (channel) switch on the back panel of the DVD+VCR to 3 or 4, whichever is NOT used by your cable box.
From Cable Wall Outlet B O X H O O K U P Follow these steps if you have a cable box and want to be able to watch a second channel while recording a TV program. To Cable Box Input A LT E R N AT I V E C A B L E Cable Box Input 1 Output CONNECT CABLE TO TV TV VHF/UHF 4 Connect a coaxial cable from the wall outlet to the “IN (From Ant)” jack on the back panel of the DVD+VCR. Tune the TV to channel 3 or 4, whichever is used by your cable system.
APPENDIX B S Y S T E M SETTINGS This Chapter will show you how to customize your DVD+VCR experience, with settings that affect language, clock, channels, displays and more. 1 OPEN “SETUP MENU” Press SETUP/ENTER. 2 SELECT “LANGUAGE/LANGUE/ IDIOMA” Use the UP/DOWN arrow keys to move the pointer to “Language/Langue/Idioma,” then press the RIGHT arrow key repeatedly to set the On-Screen menu language to English, French or Spanish.
S E T T I N G S Follow these steps to turn Auto Clock Set on or off. You can also specify the time zone and the channel that Auto Clock Set uses to determine your local time. 1 SETUP /ENTER press Press SETUP/ENTER.
SETUP /ENTER press 1 OPEN “SETUP MENU” Press SETUP/ENTER. SETUP MENU 2 / Use the UP/DOWN arrow keys to move the pointer to “Set Clock,” then press the RIGHT arrow key to select. Off 3 To Select To Move Select Set Clock 4 Off Auto Use the 0-9 keys or the UP/DOWN arrow keys to set each of the following items. To skip an item, press the RIGHT arrow key: Set Month – Enter the month as a 2-digit number; e.g., January = “01” Set Year – Enter the year as a 2-digit number; e.g.
T I M E Follow these steps to set Daylight Savings Time manually. You should only set “Daylight Savings” if Auto Clock Set has set the time incorrectly. S A V I N G S 1 SETUP /ENTER press Press SETUP/ENTER.
press 1 SETUP /ENTER Press SETUP/ENTER. 2 SETUP MENU Set Timer Recording Child Lock Set Clock DVD Setup VCR & Channel Setup Language/Langue/Idioma Use the UP/DOWN arrow keys to move the pointer to “VCR & Channel Setup,” then press the RIGHT arrow key to select.
L O C K Follow these steps to prevent children from tampering with the DVD+VCR. Child Lock disables all front panel keys so the DVD+VCR can only be operated with the remote control. press 1 SETUP /ENTER Press SETUP/ENTER.
press 1 SETUP /ENTER Press SETUP/ENTER. 2 Set Timer Recording Child Lock Set Clock DVD Setup VCR & Channel Setup Language/Langue/Idioma To Move Use the UP/DOWN arrow keys to move the pointer to “VCR & Channel Setup,” then press the RIGHT arrow key to select.
D I M M E R PA N E L F R O N T 44 Follow these steps to set the dimmer on the Front Panel Display. press 1 SETUP /ENTER Press SETUP/ENTER.
APPENDIX ADVANCED DVD SETUP C This Chapter explains advanced DVD setup options, including Aspect Ratio, Language Preferences, Dynamic Compression, Rating Control, Still Mode and Black Level. T V Follow these steps to set the TV Aspect Ratio so the DVD player will display movies at the appropriate size for your television. press Press SETUP/ENTER. • Make sure the DVD deck is stopped before pressing SETUP/ENTER. You will not be able to enter the “DVD Setup” menu if a DVD is playing.
P R E F E R E N C E S Follow these steps to choose the default language for DVD audio soundtracks, subtitles and disc menus. 1 SETUP /ENTER press Press SETUP/ENTER. • Make sure the DVD deck is stopped before pressing SETUP/ENTER. You will not be able to enter the “DVD Setup” menu if a DVD is playing.
1 SETUP /ENTER press Press SETUP/ENTER. • Make sure the DVD deck is stopped before pressing SETUP/ENTER. You will not be able to enter the “DVD Setup” menu if a DVD is playing. SETUP MENU Set Timer Recording Child Lock Set Clock DVD Setup VCR & Channel Setup Language/Langue/Idioma Off 2 Use the UP/DOWN arrow keys to move the pointer to “DVD Setup,” then press the RIGHT arrow key to select.
S E T T I N G S Follow these directions to set up a rating control system for your DVD movies. 1 SETUP /ENTER press Press SETUP/ENTER. • Make sure the DVD deck is stopped before pressing SETUP/ENTER. You will not be able to enter the “DVD Setup” menu if a DVD is playing.
continued... 1 OPEN “SETUP MENU” Press SETUP/ENTER. • Make sure the DVD deck is stopped before pressing SETUP/ENTER. You will not be able to enter the “DVD Setup” menu if a DVD is playing. CHANGE PASSWORD Enter New Password ---- 2 Use the UP/DOWN arrow keys to move the pointer to “DVD Setup,” then press the RIGHT arrow key to select. Use 0-9 Keys RETURN to Go Back to enter new password 3 Use the UP/DOWN arrow keys move the pointer to “Changing Password,” then press the RIGHT arrow key to select.
L E V E L Follow these steps to set Still Mode (the method used to freeze a single image) and Black Level (the reference level for black in the video signal). 1 SETUP /ENTER press Press SETUP/ENTER. • Make sure the DVD deck is stopped before pressing SETUP/ENTER. You will not be able to enter the “DVD Setup” menu if a DVD is playing.
APPENDIX D H E L P This Chapter provides customer support information, as well as a list of frequently asked questions, technical specifications, and the product warranty. Phone: Office hours: 1-800-SENSORY Monday-Friday, 7:30 a.m. to 9:00 p.m. MST E-Mail: “dvdhelp@sensoryscience.com” Web: “www.govideo.com” or “www.sensoryscience.com” SYMPTOM SOLUTION(S) Cannot access Setup menu. • Stop the DVD player. You cannot access the Setup menu while a disc is playing. No sound from speakers.
( c o n t . ) T R O U B L E S H O O T I N G 52 Poor picture quality on VCR. • Set Channel Switch to channel 4. • Adjust tracking with AUTO and TRK –/+ keys. • Clean video heads with nonabrasive head cleaning tape. Remote not working. • Remove all obstacles and point directly at DVD+VCR. • Make sure batteries are fresh and properly installed. • Press DVD or VCR key. Note: If you press DVD key by accident, remote will only operate the DVD player. The same is true of the VCR key.
INPUTS AUDIO VIDEO RF 2 Stereo audio inputs, RCA Connector, -8dbm, 47KΩ, front and rear 2 Composite video inputs, RCA Connector, 75Ω, 1Vp-p Antenna or CATV Input, F-Connector, 75Ω – Ch 2-69, CATV Ch 1-125 OUTPUTS 2 Stereo audio outputs, RCA Connector, -8dbm, 1.5kΩ VIDEO DVD+VCR: 1 Composite video output, RCA Connector, 75Ω, 1Vp-p DVD only: 1 S-Video output, S-Connector, 75Ω, Y = 1.0Vp-p, C = 0.286Vp-p DVD only: 1 Component video output, 75Ω, Y = 1.0Vp-p, Pb = 0.7Vp-p, Pr = 0.
W A R R A N T Y W h o P r o v i d e s t h e L i m i t e d Wa r r a n t y During the warranty period, the Go-Video Warranty Administrator will honor DVD+VCR service for 90 days labor, 1 year parts from the original date of consumer purchase. See below for Commercial, Industrial or Educational use coverage. The DVD+VCR remote control is warranted for 90 days from the date of purchase. Who is Protected This warranty protects the original consumer owner of this Go-Video product.
0-9 keys 5, 6 1-Time recording 100+ key 5 16:9 Widescreen 3D Sound 6, 10, 4:3 Letterbox 45 4:3 Pan and Scan Complete Program Record 25, 26 Component Video 31 Component Video Out 11 Composite Video 11 Connections Advanced 30 Alternative Cable Box 36 Antenna 2 Basic 2 Cable Box 35 Component 30 Line Out 2 Other A/V 34 RF Antenna 2 S-Video 30 Stereo 32 Copy DVD to VCR 23 indicator 10 key 9, 23 Customer Service 51 I N D E X 25 45 17 45 A A-B Repeat 18 A/V Receiver 32 Add/Remove Channel 41 Alt Video Out 30, 3
M Macrovision 4 Manual Clock Set 39 Mark key 6, 19 Menu Navigation 14 Minute 39 Mode/Repeat key 6, 7, 18, 20 Monday-Friday recording 25 Mono 7 Month 39 Mute key 5 O One-Touch Recording 21 Open/Close key 6, 7, 8, 12 Optical 11 OTR 21 OTR Loop Record 21 Overlapping Events 26 P Password 48, 49 Play/Pause key 6, 7, 8 Playback DVD 12 VCR 13 Power key 5, 8 Programmed Playback 20 R Random Playback 20 Rating Control 48 Rating Level 48 Rear Panel 11 Record key 7, 8, 21, 27 Record Safety Tab 13, 24 Record Settings
1-Time Ch10 Th 2 9 16 23 29 5 13 6 14 7 8 9 15 16 RETURN to Continue Please review the events from the Select Event menu and remove on using the CLEAR key 1 2 3 4 10 11 12 Fr 3 10 17 24 30 Auto Sa 4 11 18 25 31 SET MONTH [1-12] :08 2001 10:30PM 1H00M Su Mo Tu We 1 5 6 7 8 12 13 14 15 19 20 21 22 26 27 28 Aug TIMER EVENTS OVERLAP 1 1 SELECT EVENT [1-16] :01 --:--------/-Ch - -H--M -2 --:--------/-Ch - -H--M -3 --:--------/-Ch - -H--M -4 --:--------/-Ch - -H--M -/ To Move To Select 7 14 21
Thank you for purchasing this Go-Video DVD+VCR! Sensory Science specializes in developing and marketing innovative digital entertainment products, including digital televisions, Internet media players, DVD players, and high-end home theater components for the digital living room. We take pride in our ability to deliver unparalleled customer support, and are honored to have received the prestigious Inside Track award for Supplier Loyalty two years running.