
User's Manual


1. QUICK SET UP AND OPERATION
Synching Up the Transmitter and Base
The synch operation only needs to be performed the first time a system is used, or a new bodypack is used
with a base previously synched to another bodypack. Do not perform the synch operation multiple times;
it only needs to be done one time when a new bodypack is used with a new base.
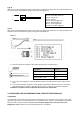
1) Turn the transmitter power switch to ON and place the transmitter in the recharge cradle of the base.
The transmitter goes in the base with the belt clip facing out.
2) The recharge LED will light (Green if fully charged, Red if charging). Leave the transmitter in the cradle
for 4 hours for a full charge.
3) Press the REC button on the transmitter and hold until the In-Use LED on the transmitter and base start
to flash, then release the button.
4) After a few seconds the light will stop flashing, and a beep will sound (If the beep is enabled).
5) The transmitter and base are now synched and will continue to be until another transmitter is linked to
that base.
Normal Operation
1) With the transmitter synched up, remove it from the cradle, plug in the lapel microphone (if used)
and place the transmitter on your belt.
2) When you remove Transmitter from the cradle, The TR and Base’s In-USE LED will light a constant
Green and you will hear short beep. To start the recording, press the REC button and the In-Use
LED will blink in green.
3) To end recording, press the REC button and the In-Use LED will light a constant green.
4) At the end of your shift turn the transmitter off and replace it in the charging cradle.
Out of Range
1) The transmitter will alert you with Audible warning beeps (two tone) and the In-Use LED will blink in
red.
2) Move closer to the receiver base and the link will be re-established once you return to normal
range. The In-Use LED will light constant green when link is back to normal operation.
3) If the link is not re-established within 30 seconds, the transmitter and receiver will return to standby
mode.
4) If you went out of range in Standby mode, or the unit reverted to standby mode, re-enter normal range
and press the In-Use button. Operation will return to normal.
5) If you will be out of range for a long period of time, turn the bodypack off.
Low Battery Warning
1) If the transmitter Low BATT indicator (red) starts flashing or you hear warning beeps, return the
transmitter to its cradle on the receiver to fully charge the transmitter.
2) The Charge LED indicator will light constant green when the unit is fully charged.
EMG Panic Button (if wired for use in your vehicle)
1) The EMG or Panic Button can be programmed to do many things but may not be connected in your
vehicle. Check with your technical department to understand what this button will control before you use
it.
2) In Record mode: Press the EMG button on the transmitter, a beep will sound and the relay will be
triggered at the receiver.
3) In Standby mode: Press the EMG button on the transmitter, a beep will sound, the green In-Use
indicator will blink and the relay will be triggered at the receiver.
Disabling the Beep Sound On the Transmitter
1) All of the audible beep signals on the transmitter can be disabled by setting the BEEP switch to the
off position.
Record Trigger (if video recording equipment supports)
1) The Record trigger feature is used to turn on recording whenever the video recorder is turned on.
Some video record units can be triggered by other events (lights and siren being turned on etc.) and
ensures the microphone starts recording at the same time.
The transmitter must be turned on and in standby mode.
2) A +12V signal on the line means the microphone is Record off.
3) 0V or ground on the line turns on the microphone is Record on.