
Product Manual


Do not overll the tank. Repeated attempts to “top off” the
tank with an automatic nozzle may result in overlling.
3. After dispensing fuel, release the nozzle handle, turn
the pump off, and return the nozzle to its holder.
Auxiliary Temperature-Limiting Device
The motor is provided with an internal auxiliary
temperature-limiting device. Excessive motor heat can
trip the device. It resets automatically after the motor has
cooled approximately 30 minutes.
Circuit Breaker
The magnetic circuit breaker trips automatically when the
motor draws more than 2.5 amps. This feature provides
added protection against motor damage and must be
reset manually.
When the circuit breaker trips, turn the power off at the
source before attempting any repairs. Inspect the pump
thoroughly and clean or repair it as necessary.
Reset the circuit breaker after repairs are complete. To
reset, turn the pump’s power switch off and then back on.
This pump is designed for minimum maintenance. Motor
bearings are sealed and require no lubrication. Inspect
the pump and components regularly for fuel leaks and
make sure the hose and power cord are in good condition.
Keep the pump exterior clean to help identify leaks.
Perform a regular visual inspection of the system using
the Before Each Use procedure in the Operation Section.
Do not use this pump to pump water, chemicals, or
herbicides. Dispensing any uid other than gasoline,
diesel fuel or kerosene will damage the pump. Use of
the pump with unauthorized uids will void the warranty.
Remove and clean the fuel strainer after every 40 hours
of operation or if low ow is noticed. Refer to the Repair
Section for Strainer Cleaning instructions.
The pump may not deliver uid if an air lock occurs due
to an external lter, meter, or an off-the-shelf automatic
nozzle. To correct, remove the pipe plug in the top outlet
port and ll the gear cavity and meter with fuel. Use of
a factory-supplied automatic nozzle is recommended.
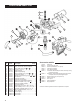
When disassembling, carefully inspect all parts for wear
or damage. Replace components, as necessary. The
Illustrated Parts List gives information on replacement
parts and kits.
Important Information
To ensure safe operation, all fuel transfer systems must
be properly grounded.
Proper grounding means a continuous metal-to-metal
contact from one component to the next, including tank,
bung, pump, meter, lter, hose and nozzle.
Care should be taken to ensure proper grounding
during initial installation and after any service or repair
procedures.
All factory-supplied accessories and components assure
proper grounding.
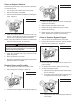
Remove Pump from Tank
1. Turn the pump off and disconnect from power.
2. Turn the union ring counterclockwise to release the
inlet tting.
3. Lift the pump and suction pipe from the bung adapter.
4. Elevate the nozzle and hose to allow excess fuel to
drain into the tank.
5. Wipe the entire system with a clean cloth.
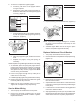
Service O-Rings
A Wet Seal Kit contains all seals for your pump and should
be on hand when performing repairs. Old seals may then
be replaced with new ones as seals are accessible.
In general, when inspecting O-rings, look for breaks, wear,
and signs of deterioration, such as swelling. Replace, as
necessary. Before seating, coat O-rings with light grease.
5
CAUTION
To avoid pump damage, do not run the pump for
more than 10 minutes with the nozzle closed.
WARNING
Observe precautions against electrical shock when
servicing the pump. Always disconnect power before
repairing or servicing. Never apply electrical power to
the system when any of the coverplates are removed.
Avoid prolonged skin contact with petroleum fuels.
Use protective goggles, gloves, and aprons in case
of splashing or spills. Change saturated clothing and
wash skin promptly with soap and water.
WARNING
CAUTION
The duty cycle of this pump is 30 minutes ON and 30
minutes OFF. Allow to cool for 30 minutes.
CAUTION
Make sure the pump switch is in the off position
before restoring power.
MAINTENANCE
REPAIR