
Product Manual


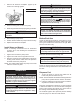


Clean or Replace Strainer
Clean the inlet strainer after every 40 hours of operation
or if low ow occurs.
1. Turn the pump off and disconnect from power.
2. Remove the strainer coverplate.
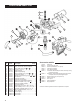
3. Remove the inlet strainer and inspect for damage or
clogs. (Figure 3)
4. Clean the strainer with a soft-bristled brush and
solvent. If the strainer is very dirty, compressed air
may be used. If damaged, replace the strainer.
NOTE: A very dirty strainer can indicate a contaminated
fuel tank. Clean the tank, as necessary.
5. Clean the coverplate and O-ring. Coat the O-ring
lightly with grease.
6. Place the strainer in the cavity.
7. Ensure the coverplate O-ring is properly seated and
tighten the strainer coverplate.
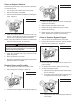
Replace Gears and Drive Key
1. Turn the pump off and disconnect from power.
2. Remove the gear coverplate. (Figure 4)
4. Inspect the gears and key for wear and damage.
Replace, as necessary.
5. Wipe the gear cavity with a clean cloth.
6. Replace the gears. Make sure they turn freely.
7. Replace the drive key.
8. Make sure the gear coverplate O-ring is securely in
place. Tighten the coverplate to the housing.
Clean or Replace Bypass Poppet
1. Turn the pump off and disconnect from power.
2. Using a drive ratchet or extension, remove the pipe
plug from the top outlet port. (Figure 6)
3. Remove the gear coverplate and O-ring from the
pump housing.
4. Lift the drive key and two gears from the pump.
5. To clean the bypass poppet:
a. With a clean cloth, wipe the poppet cavity through
the top outlet port.
b. Push down on the poppet until the poppet O-ring
is exposed inside the housing. (Figure 7)
c. Using a clean cloth, rotate the poppet and clean
it thoroughly.
6
Figure 4
Figure 5
Figure 6
Figure 7
Figure 3
If using solvent to clean pump components or tank,
observe the solvent manufacturer’s recommenda-
tions for safe use and disposal.
WARNING
3. Lift the drive key and gears from the pump. (Figure 5)