USER’S GUIDE V:1807-0706-10 BT780B Portable DVD Stereo System For the most up-to-date version of this User’s Guide, go to www.gpx.
Warnings And Precautions • • • • • • • • • • • • CAUTION: TO PREVENT ELECTRIC SHOCK, MATCH WIDE BLADE OF PLUG TO WIDE SLOT, FULLY INSERT. WARNING: To reduce the risk of fire or electric shock, do not expose this apparatus to rain or moisture. Avertissement: Pour réduire le risque d’incendie ou de choc électrique, ne pas exposer cet appareil sous la pluie et l’humidité. CAUTION: Use of controls or adjustments or performance of procedures other than those specified may result in hazardous radiation exposure.
FCC Warnings NOTE: This equipment has been tested and found to comply with the limits for a Class B digital device, pursuant to Part 15 of the FCC Rules. These limits are designed to provide reasonable protection against harmful interference in a residential installation. This equipment generates, uses, and can radiate radio frequency energy and, if not installed and used in accordance with the instructions, may cause harmful interference to radio communications.
PORTABLE DVD STereo System Features • CD player: CD, CD-R/RW, JPEG CD, MP3 CD • Karaoke: CD+G • DVD player: DVD, DVD±R/RW • 7” TFT display • AM/FM stereo radio • Telescopic FM antenna • Built-in speakers • ATSC/NTSC HDTV tuner • Electronic Program Guide • Line input (3.
TABLE OF CONTENTS CUSTOMER HELPLINE | 1-888-999-4215 Introduction 6 Setup 9 Television 10 DVD And CD 12 Setup MEnu 13 USB and SD/MMC Cards 14 Miscellaneous Operations 15 Company Information 16 GPX 5
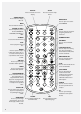
introduction OPEN/CLOSE Press to open or close the DISC DRAWER. FM ST. INDICATOR POWER INDICATOR DISC DRAWER USB PORT SD/MMC MEMORY CARD EXPANSION SLOT LINE INPUT LINE IN MICROPHONE JACK MIC VOLUME Turn to adjust the volume of audio from a connected microphone.
HEADPHONE JACK VOLUME Turn to adjust the volume. SOURCE Adjust to switch between TV/DVD, LINE IN, OFF, and RADIO modes. TV MENU Press to view the TV MENU. CH +/UP/CH-/DOWN Press to adjust the television channel and navigate the setup menu. TV/DVD Press to switch between TV and DVD modes. TELEVISION DISPLAY TUNING Turn to adjust the AM or FM radio station. BAND Adjust to switch between AM, FM, and FM ST. modes. PLAY/PAUSE Press to play or pause a loaded disc.
DISPLAY Press to view the on screen display. SETUP Press to access the setup menu. SCREEN OFF/ON Press to turn the display off or on. OPEN/CLOSE Press to open or close the DISC DRAWER. MUTE Press to mute the volume. P MODE (TV ONLY) Press to adjust the picture mode to PERSONAL, STANDARD, DYNAMIC, or SOFT. GUIDE Press to view the electronic program guide for the television. NUMBER KEYPAD TV MENU Press to view the TV menu. DVD MENU Press to access the DVD MENU. PLAY Press to play the loaded disc.
Setup Power R - AUDIO - L Plug the included AC power cable into AC POWER INPUT and a standard AC power outlet to power the portable DVD stereo system.
TELEvision Connecting a TV Antenna or Cable Auto Scanning for Channels A TV Antenna or Cable must be connected before the portable DVD stereo system can be used as a television. 1 Connect the TV Antenna (included) or Cable to the RF ANTENNA INPUT. The auto scan feature must be run before the portable DVD stereo system can play television channels. 1 Follow the instructions for CONNECTING A TV ANTENNA OR CABLE and CHOOSING AIR OR CATV. 2 Adjust the SOURCE switch to TV/ DVD.
Watching Television TV Menu 1 Follow the instructions for CONNECTING A TV ANTENNA, CHOOSING AIR OR CATV (CABLE), and AUTO SCANNING FOR CHANNELS. 2 Adjust the SOURCE switch to TV/ DVD. 3 Press the TV/DVD button repeatedly to select TV mode. Press the OK button on the remote. 4 Press the CH+/UP and CH-/DOWN buttons to flip through the available channels. 5 Press the GUIDE button to see the electronic program guide.
DVD And CD Disc Compatibility Programming a Disc • • 1 Follow the instructions for LOADING A DISC and PLAYING A DISC. 2 Adjust the SOURCE switch to TV/ DVD. 3 Press the TV/DVD button repeatedly to select DVD mode. Press the OK button on the remote. 4 Press the PROGRAM button on the remote. 5 Use the NUMBER KEYPAD to enter in the track or chapter and title. 6 Press the DIRECTIONAL buttons to select the next open slot. 7 Repeat steps 6 and 7 until the desire tracks or chapters are programmed.
SETUP MENU Setup Menu SYSTEM SETUP • TV SYSTEM • SCREEN SAVER • TV TYPE • DEFAULT • EXIT SETUP LANGUAGE SETUP • OSD LANGUAGE • AUDIO LANGUAGE • SUBTITLE LANGUAGE • MENU LANGUAGE • EXIT SETUP VIDEO SETUP • BRIGHTNESS • CONTRAST • HUE • SATURATION • EXIT SETUP SPEAKER SETUP • DOWNMIX • EXIT SETUP CUSTOMER HELPLINE | 1-888-999-4215 GPX 13
USB and SD/MMC Cards 14 Using the USB Port Using the SD/MMC Port 1 Connect a USB thumb drive to the USB PORT. 2 Adjust the SOURCE switch to TV/ DVD. 3 Press the TV/DVD button repeatedly to select DVD mode. Press the OK button on the remote. 4 Press and hold the STOP/DVD/USB/ SD button for 2 seconds. 5 Press the DIRECTIONAL buttons on the remote to select USB. 6 Press the OK button. 7 Press the DIRECTIONAL buttons to navigate content on the connected USB thumb drive.
MIscellaneous Operations Using the Video Output Tuning the AM/FM Radio 1 Connect the VIDEO OUTPUT to a television using an RCA cable (not included). 2 Adjust the television to the proper input setting. 3 Video played through the portable DVD stereo system will now be seen on the connected television. 1 Adjust the SOURCE switch to RADIO. 2 Adjust the BAND switch to AM, FM, or FM ST. 3 Turn the TUNING dial to adjust the radio station.
Company Information International Support To download this User’s Guide in English, Spanish, or French, visit the support section at www.gpx.com. Para transferir esta guía de usuario en inglés, español, o francés, visite la sección de la ayuda en www.gpx.com. Pour télécharger ce guide de l’utilisateur en anglais, espagnol, ou français, visitez la section de soutien chez www.gpx.com. Contact Information Phone: 1-888-999-4215 Email: prodinfo@gpx.com Parts Email: partsinfo@dpi-global.com Website: www.gpx.