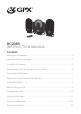
HC208B INSTRUCTION MANUAL Contents Warnings & Precautions.................................................................................... 2 Important Safety Instructions............................................................................. 3 In the Box & Features........................................................................................ 4 Powering the Unit & Mounting the Unit to a Wall............................................... 5 Connecting the Speaker............................
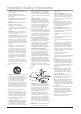
Warnings and Precautions TO PREVENT FIRE OR SHOCK HAZARDS, DO NOT EXPOSE THIS UNIT TO RAIN OR MOISTURE. This symbol, located on back or bottom of the unit, is intended to alert the user to the presence of uninsulated “dangerous voltage” within the product’s enclosure that may be of sufficient magnitude to constitute a risk of electric shock to persons. WARNING: Use of this unit near fluorescent lighting may cause interference regarding use of the remote.
Important Safety Instructions 1. Read Instructions - All the safety and operating instruction should be read before the product is operated. 2. Retain Instructions - The safety and operating instruction should be retained for future reference. 3. Heed Warnings - All warning on the product and in the operating instructions should be adhered to. 4. Follow instructions - All operating and use instructions should be followed. 5. Cleaning - Unplug this product from the wall outlet before cleaning.
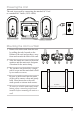
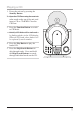
In the Box • HC208B • Remote Control • Documentation DIS P AUX MIN HR/ CD CLK /DN RA E MUT BA ND DIO AD RNO EP /UP SLE MIN HR/ AT REPE G PRO L VO SET O INTR M Features • Vertical-Load Disc Player • Plays CD/CD-R/CD-RW Audio Tracks • AM/FM Radio with Digital Readout • Digital Volume Control • Blue Backlit LCD Display • Digital Clock • Full-Range Stereo Speakers • Stereo Line-In Jack for other Audio Player, 3.
Powering the Unit The unit is powered by connecting the attached AC Cord to a standard AC Outlet (120V~60Hz) (120V~60Hz) Mounting the Unit to a Wall 1. Remove the table stand from the unit by pulling the tabs, located on the bottom of the unit and speakers, away from and towards the back of the unit. 2. After the stands are removed from the speakers and the main unit, designate a location for the unit to hang.
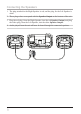
Connecting the Speakers 1. The plug attached to the Right Speaker is red, and the plug for the Left Speaker is white. 2. These plug colors correspond with the Speaker Output on the bottom of the unit. 3. Plug the red plug, from the Right Speaker, into the red Speaker Output, and plug the white plug, from the Left Speaker, into the white Speaker Output. 4. Audio played from the unit will now be heard through the connected speakers.
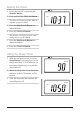
Setting STANDBY the Clock SLEEP DISPLAY 1. Power the unit off by pressing the Standby Button. PROG SKIP/SEARCH 2. Press and hold the CLK Set Button. PM The hour will begin to blink, indicatDN HR/MIN UP ing that itMODE can be edited. 3. Press the Skip/Search Buttons to adjust the hour. STOP/BAND PLAY/CLK SET FUNCTION 4. Press the CLK Set Button. VOLUME The minute will begin to blink, indicating that it can be edited. 5. Press the Skip/Search Buttons to adjust the minute. 6. Press the CLK Set Button.
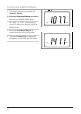
Tuning the AM/FM Radio STANDBY SLEEP DISPLAY 1. Power the unit on by pressing the Standby Button. PROG SKIP/SEARCH 2. Press the Function Button to switch the unit to AM/FM Radio Mode. MODE An “AM” or “FM” DN will HR/MIN appearUPin the LCD display to indicate AM/FM Radio Mode. FUNCTION STOP/BAND PLAY/CLK SET SLEEP 3. Press theSTANDBY Stop/Band ButtonDISPLAY to switch between AM or FM radio. VOLUME 4. Turn the PROG Tuning Dial SKIP/SEARCH to adjust the frequency for the AM and FM radio.
Playing a CD 1. Power the unit on by pressing the Standby Button. 2. Open the CD Door using the semi-circular notch on the top of the unit, and insert a CD or CD-R/RW. Close the CD Door. 3. Press the Function Button to switch to CD Mode. Initially, CD Mode will be indicated by flashing dashes in the LCD display. When the CD loads, these dashes will be replaced by track numbers. 4. Press the Play Button to play the loaded CD. 5. Press the Skip/Search Buttons to skip through tracks.
Programming a CD 1. Power the unit off by pressing the Standby Button. 2. Load a CD, and switch to CD Mode. (See Playing a CD on page 7) 3. Press the Program Button. Two numbers will appear on the LCD display. The number on the left represents the program track number and the number on the right represents the CD track number. The CD track will blink, indicating that it can be edited. 4. Press the Skip/Search Buttons to adjust the CD track. 5.
Using the Line Input When connecting two products using an RCA Cable, match the colored ports with the same colored connection. (Red to Red, White to White, and Yellow to Yellow) 1. Plug one end of a 3.5 mm Cable (not included) or a 3.5 mm - RCA Cable (not included) into the Line Input on the unit. 2. Plug the other end of the 3.5 mm Cable into the audio output/headphone output on an Mp3 Player or Other Audio Source. When the Line Input is connected, the Aux Input will be disabled. 3.
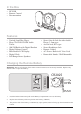
Controls 1 10 2 3 4 5 6 11 POWER SLEEP DISPLAY PROG RAND INTRO PROG SKIP/SEARCH PM REP SLEEP 12 VOL MUTE AUX 7 8 9 MODE FUNCTION /BAND kHz MHz AM FM HR/MIN /CLK SET TUNING VOLUME 13 14
Definitions 1 Line Input Use the Line Input to connect the unit to an MP3 Player or other audio source. 2 Skip/Search/HR/MIN/DN/UP Buttons Press the Skip/Search/HR/MIN/DN/UP Buttons to skip or search through CD tracks or to adjust the hour and minute when setting the clock. 3 Display Button Press the Display Button to switch between the current function and clock on the LCD display.
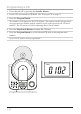
Controls 22 15 23 16 24 17 18 25 19 20 26 21 27 28 29
Definitions 15 Standby Button Press the Standby Button to turn the unit off and on. 16 Display Button Press the Display Button to switch between the current function and the time on the LCD display. 17 Play/Pause/CLK Set Button Press the Play/Pause Button to play and pause a CD. Press and hold the CLK Set Button to adjust the clock. 18 Aux Button Press the Aux Button to enter Aux Mode.
Service Information Address Phone Fax Email Website 2116 Carr Street, St. Louis MO, 63106 1-314-621-2881 1-314-588-1805 prodinfo@gpx.com www.gpx.com To download this Instruction Manual in English, Spanish, or French visit the Support section at www.gpx.com. © 2007 DPI, Para descargar este manual de instrucción en inglés, español, o francés visite la sección de la ayuda en www.gpx.com. Pour télécharger ce manuel d’instruction en anglais, espagnol, ou le Français visitez la section de soutien à www.gpx.