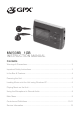
MW338B 1GB INSTRUCTION MANUAL Contents Warnings & Precautions.................................................................................... 2 Important Safety Instructions............................................................................. 3 In the Box & Features........................................................................................ 4 Powering the Unit..............................................................................................
Warnings and Precautions TO PREVENT FIRE OR SHOCK HAZARDS, DO NOT EXPOSE THIS UNIT TO RAIN OR MOISTURE. This symbol, located on back or bottom of the unit, is intended to alert the user to the presence of uninsulated “dangerous voltage” within the product’s enclosure that may be of sufficient magnitude to constitute a risk of electric shock to persons.
In the Box • Mp3 Player • USB Cord • Earbuds • Documentation Features • WMA™/MP3 Player with 1GB* Installed Flash Memory • Backlit LCD Display is ID3 Tag Compatible • DRM Compliant • Plug and Play • 6-Preset EQ: Normal, POP, Rock, Jazz, Classic, Bass • Electronic Volume • Player uses 1-’AAA’ Battery, (not included) • The amount of memory your operating system reports may vary from the stated memory of this device.
Powering the Unit The unit is powered by a single AAA-Size Battery (not included).
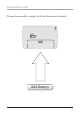
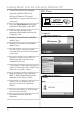
Loading Music onto the Unit using Windows XP 1 Connect the unit to the computer using the included USB Cord. Microsoft Windows XP should immediately recognize that the unit is connected. MP3 Player FS 2 Press the Menu Button on the unit until the LCD Display reads MTP. 3 Click the Start Button on the computer, then double click the My Computer icon. 4 Double Click on the drive labelled Audio Player. 5 Double Click on the icon labelled Audio Player.
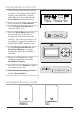
Playing Music on the Unit 1 After loading music into the internal memory or inserting an SD or MMC memory card with MP3 or WMA audio files on it, press and hold the Power Button to turn the unit on. 2 Press and hold the Menu Button. WMA 192 00:00 01/04 25 Title: Thnks for 3 Use the Skip/Search Buttons to select the Music Icon. 4 Press the Menu Button and select Internal Memory if the audio to be played is stored on the internal memory.
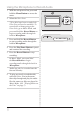
Using the Microphone to Record Audio 1 With the unit powered on, press and hold the Menu Button to access the menu. v+ 2 Select the Voice Icon. * If no files have been recorded, the Voice Icon will not be available. To record a file without going to the Voice Icon, go to Music Mode, and press and hold the Record Button to begin recording audio through the built-in Microphone. 3 Press and hold the Record Button to start recording audio through the built-in Microphone.
Main Menu Press and hold the Menu Button to access the Main Menu. Press the Play/Pause Button to make selections in the menu. Music Access and play music files stored on the unit or on a loaded SD or MMC memory card. Voice Access and play audio files recorded from the built-in microphone. Settings Adjust the EQ, Play Mode, Display, Sleep Timer, Shutdown Time, and Record Settings.
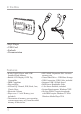
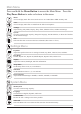
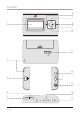
Controls 6 7 v+ 1 8 9 v- 10 11 HOLD 2 12 POWER 3 4 5 14 MENU 15 REC SD / MMC CARD 13 MIC
Control Definitions 1 LCD Display The LCD Display shows all of the unit’s operations and music information. 9 Play/Pause Press the Play/Pause Button to play or pause an audio track on the unit. 2 Lanyard Connection Use the Lanyard Connection to connect a lanyard or string to the unit. 10 V- (Volume) Button Press the V- Button to decrease the unit’s volume. 3 Mini-USB Connection Use the Mini-USB Connection and the included USB cable to connect the unit to a computer.
Service Information Address Phone Fax Email Website 2116 Carr Street, St. Louis MO, 63106 1-314-621-2881 1-314-588-1805 prodinfo@gpx.com www.gpx.com To download this Instruction Manual in English, Spanish, or French visit the Support section at www.gpx.com. © 2007 DPI, Para descargar este manual de instrucción en inglés, español, o francés visite la sección de la ayuda en www.gpx.com. Pour télécharger ce manuel d’instruction en anglais, espagnol, ou le Français visitez la section de soutien à www.gpx.