USER’S GUIDE V:1012-0318-10 PD7719B Dual 7” Screen DVD Player with Rechargeable Battery For the most up-to-date version of this User’s Guide, go to www.gpx.
Warnings and Precautions • CAUTION: TO PREVENT ELECTRIC SHOCK, MATCH WIDE BLADE OF PLUG TO WIDE SLOT, FULLY INSERT. • WARNING: To reduce the risk of fire or electric shock, do not expose this apparatus to rain or moisture. • AVERTISSEMENT: Pour réduire le risque d’incendie ou de choc électrique, ne pas exposer cet appareil sous la pluie et l’humidité. • CAUTION: Use of controls or adjustments or performance of procedures other than those specified may result in hazardous radiation exposure.
Important Safety Instructions 1. 2. 3. 4. 5. 6. 7. 8. 9. 10. 11. 12. 13. 14. Read these Instructions. Keep these Instructions. Heed all Warnings. Follow all instructions. Do not use this apparatus near water. Clean only with a dry cloth. Do not block any ventilation openings. Install in accordance with the manufacturer’s instructions. Do not install near any heat sources such as radiators, heat registers, stoves, or other apparatus (including amplifiers) that produce heat.
Dual 7” DVD Player with Rechargeable Battery Features • • • • • • • • • • • • • • • • • DVD player: DVD, DVD-R/RW CD player: CD, CD±R/RW, JPEG CD SD/MMC memory card slot USB port, 2.
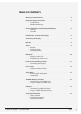
TABLE OF CONTENTS Warnings and Precautions . . . Important Safety Instructions . • FCC Warnings • Additional Warnings . . . . . . . . . . . . 2 . . . . . 3 . . . . . 4 Dual 7” DVD Player with Rechargeable Battery. • Features • Included Introduction - Primary LCD Display. . . . . . . . . 6 Secondary LCD Display. . . . . . . . . . . . 7 Remote. . . . . . . . . . . . 8 . . . . Setup.
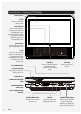
Introduction - Primary LCD Display LCD DISPLAY SETUP Press to access the setup menu. SKIP/SEARCH Press to skip between chapters and tracks on a loaded DVD or CD. Press and hold to search through the current chapter or track on a loaded DVD or CD. PLAY/PAUSE Press to play or pause the loaded DVD or CD. STOP Press to stop a loaded DVD or CD during play. Once stopped, press PLAY/PAUSE to resume, or STOP to enter fullstop mode. DC POWER INPUT DISPLAY POWER Adjust to turn the LCD display off or on.
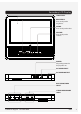
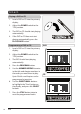
Secondary LCD Display LCD DISPLAY BRIGHTNESS Press to adjust the brightness. COLOR Press to adjust the color. VOLUME Press to adjust the volume. POWER Adjust the power the display off or on.
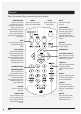
Remote Note: The remote will only control the primary display. SCREEN ON/OFF Press to access the brightness and color controls on the primary display, and use the right and left arrows on the remote to adjust. Press and hold to turn the primary LCD display off and on. MENU Press access the DVD menu on a loaded DVD. SETUP Press to access the setup menu. STOP/USB/SD Press to stop a DVD or CD during play. Press and hold to switch between DVD, CARD (memory card), and USB modes.
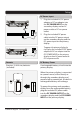
Setup DC Power Input 1. Plug the included AC/DC power adapter or DC car adapter into the DC POWER INPUT on the secondary display and an AC power outlet or DC car power outlet. 2. Plug the included DC power cable into the DC power output on the secondary display and the DC power input on the primary display. To power the primary display by itself, plug the included AC/DC power adapter or DC car adapter into the DC POWER INPUT on the primary display and an AC power outlet or DC car power outlet.
DVD & CD Playing a DVD or CD 3. The DVD or CD should start playing automatically. 4. If the DVD or CD does not start playing automatically, press the PLAY/PAUSE button. Y Adjust the POWER switch to the “ON” position. PLA 2. DIS Load a DVD or CD into the primary display. ON 1. OFF Programming a DVD or CD 1. Load a DVD or CD into the primary display. 2. Adjust the POWER switch to the “ON” position. 3. The DVD should start playing automatically. 4. Press the PROGRAM button. 5.
Primary and Secondary Displays Connecting the Displays Customer Support: 1-314-621-2881 1. Connect the included 3.5mm/RCA cable to the 3.5mm AUDIO/VIDEO OUTPUT on the primary display and the RCA AUDIO/VIDEO INPUT on the secondary display. 2. Adjust the POWER switches on the primary display and the secondary display to the ON position. 3. Video and audio played through the primary display will now play through the secondary display as well.
In Car Setup Using the Headrest Straps 1. Slide the primary and secondary display into their headrest strap cases. 2. Run the headrest strap through the HEADREST STRAP CONNECTIONS on the back of both displays. 3. Tighten the straps around the headrests of a vehicles seats.
Setup Menu Accessing the Setup Menu To access the Setup Menu, press the SETUP button on the primary display or remote control. Setup Menu General • TV Display • LCD Mode • OSD Language • Screen Saver • Exit Setup Audio • Downmix • Exit Setup Video • Sharpness • Brightness • Contrast • Hue • Color • Exit Setup System To access the system section of the setup menu, the DVD player must be in fullstop mode. Press the STOP button twice to enter full-stop mode.
SD/MMC Memory Card Slot Connecting an SD or MMC Card 1. Load an SD or MMC into the SD/ MMC MEMORY CARD SLOT as shown in the image to the right. MMC Using a Loaded SD or MMC Card 14 1. Follow the instructions for connecting an SD or MMC card. 2. Press and hold the STOP button. 3. Press the VOLUME buttons on the primary display or the up and down ARROW KEYS on the remote to switch between DVD, CARD, and USB. Highlight CARD. 4. Press the PLAY/PAUSE button. 5.
USB Port Connecting a USB Thumb Drive 1. Load a USB thumb drive into the USB PORT as shown in the image to the right. Using a Loaded USB Thumb Drive Customer Support: 1-314-621-2881 1. Follow the instructions for connecting a USB thumb drive. 2. Press and hold the STOP button. 3. Press the VOLUME buttons on the primary display or the up and down ARROW KEYS on the remote to switch between DVD, CARD, and USB. Highlight USB. 4. Press the PLAY/PAUSE button. 5.
Company Information Green Initiative International Support Environmental Commitment to ‘Protect for Today and Sustain for Tomorrow’ To download this User’s Guide in English, Spanish, or French, visit the support section at www.gpx.com. 2009 marked the official launch of DPI, Inc.’s corporate campaign for a greener and cleaner world.