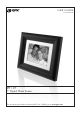
USER’S GUIDE V:1153-0811-09 PF719 7” Digital Photo Frame For the most up-to-date version of this User’s Guide, go to www.gpx.
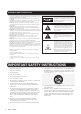
Warnings And Precautions • • • • • • • • • • • CAUTION: TO PREVENT ELECTRIC SHOCK, MATCH WIDE BLADE OF PLUG TO WIDE SLOT, FULLY INSERT. WARNING: To prevent fire or shock hazards, do not expose this unit to rain or moisture. CAUTION: Use of controls or adjustments or performance of procedures other than those specified may result in hazardous radiation exposure.
FCC Warnings NOTE: This equipment has been tested and found to comply with the limits for a Class B digital device, pursuant to Part 15 of the FCC Rules. These limits are designed to provide reasonable protection against harmful interference in a residential installation. This equipment generates, uses, and can radiate radio frequency energy and, if not installed and used in accordance with the instructions, may cause harmful interference to radio communications.
7” Digital Photo Frame Features • 7” LCD color display • Memory card expansion slot - SD/MMC • Portrait or landscape • Image compatibility: JPEG • Resolution: 480 X 234 • Auto-slide show • Thumbnail view • Auto ON/OFF timer option • 7 pre-loaded pictures • Black frame and adjustable easel • 16MB installed flash memory • USB 2.
TABLE OF CONTENTS CUSTOMER HELPLINE | 1-314-621-2881 Introduction 6 Setup 8 Clock & Calendar 9 photos 10 Setup Menu 12 Auto-Power 14 Company Information 16 GPX | PF719 5
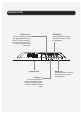
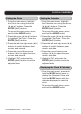
introduction ENTER ( ►II ) Press and hold to power the digital photo frame off and on. Press to make selections in the menu. Press to play or pause a photo slide show. RETURN () Press and hold to access the previous menu. Press to navigate up. ENTER LCD DISPLAY SKIP () Press to skip between photos in thumbnail mode or photo slideshow mode. Press to navigate left and right. 6 GPX | PF719 RETURN MODE MODE () Press and hold to return to the main menu. Press to navigate down.
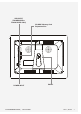
USB INPUT (THUMBDRIVE or FLASH DRIVE ONLY) SD/MMC Memory Card Expansion Slot THUMB DRIVE SD/MMC DC IN 5V POWER INPUT CUSTOMER HELPLINE | 1-314-621-2881 EASEL GPX | PF719 7
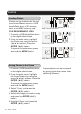
Setup Power Wall Mount Setup The Easel must be removed from the digital photo frame when mounting it to a wall. Use one of the two Easel connections on the back of the unit to hang the digital photo frame on a nail or a screw. It is recommended that you only hang the digital photo frame on a nail or screw that is securely driven into a wall stud. 8 GPX | PF719 DC IN 5V The Easel on the back of the unit can be attached so that the digital photo frame sits in either landscape mode or portrait mode.
Clock & Calendar Setting the Clock Setting the Calendar 1 From the main menu, highlight the Clock icon using the arrow () buttons. Press the ENTER ( ►II ) button. To access the main menu, press and hold the MODE button. 2 Press the arrow () buttons to highlight "Set Time". Press the ENTER ( ►II ) button. 3 Press the left and right arrow () buttons to switch between hour, minute, and second. 4 Press the up and down arrow buttons () to adjust the hour, minute, and second.
photos Loading Photos THUMB DRIVE SD/MMC DC IN 5V USB Thumb/Flash Drive THUMB DRIVE SD/MMC SD DC IN 5V SD Memory Card THUMB DRIVE SD/MMC MMC Photos can be loaded onto the unit from three different source, a USB thumb/flash drive, a SD memory card, or an MMC memory card. FILE REQUIREMENT: JPEG 1 Connect a USB thumb/flash drive to the digital photo frame. 2 From the main menu, highlight the Photo icon using the arrow () buttons. Press the ENTER ( ►II ) button.
Playing a Photo Slideshow 1 From the main menu, highlight the Photo icon to view photos from a connected Thumb Drive, SD Card, or MMC Card. Highlight the Memory icon to view photos stored on the digital photo frame. Press the ENTER ( ►II ) button. To access the main menu, press and hold the MODE button. 2 Press and hold the RETURN () button to view photos in Thumbnail mode. 3 Press the ENTER ( ►II ) button to begin playing a photo slideshow.
Setup Menu Opening the Setup Menu 1 From the main menu, highlight the Setup icon using the arrow () buttons. Press the ENTER ( ►II ) button. To access the main menu, press and hold the MODE button. This will give you access to the setup menu.
CUSTOMER HELPLINE | 1-314-621-2881 GPX | PF719 13
Auto-Power Auto-Power 1 From the main menu, highlight the Auto Power icon using the arrow () buttons. Press the ENTER ( ►II ) button. To access the main menu, press and hold the MODE button. 2 Highlight "Set Time" and press the ENTER ( ►II ) button. 3 Select Power On to set a time for the digital photo frame to turn on. Select Power Off to set a time for the digital photo frame to turn off. Press the ENTER ( ►II ) button. 4 Press the left and right arrow () buttons to switch between hour and minute.
Disabling the Auto-Power 1 To cancel the auto power on or off setting, highlight "Power On Enable" or "Power Off Enable", depending on which is set, and press the ENTER ( ►II ) button. 2 Highlight "Off" and press the ENTER ( ►II ) button to disable to auto-power timer.
Company Information Green Initiative Environmental Commitment to ‘Protect for Today and Sustain for Tomorrow’ 2009 marks the official launch of DPI, Inc.’s corporate campaign for a greener and cleaner world. DPI and its four brands, iLive, WeatherX, Capri, and GPX, are building upon environmental initiatives introduced at all of their facilities to help formulate and sustain significant and important conservation efforts within its manufacturing and marketing communities.