BRAVADO-X WiFi Internet Radio by Grace Digital Audio USER GUIDE GDI-IRD4500M BRAVADO-X Internet Radio and Network Media Player 1
Table of Contents Safety Warnings...............................................................................................................................................................................4 Internet Radio and Network Music Player Quickstart Guide...........................................................................................5 What you need before you can use your Internet radio.............................................................................................
Table of Contents Browsing the list of tracks currently (queued up) for playback................................................................................28 Removing tracks from the list (queue)..............................................................................................................................28 Playing tracks in random order............................................................................................................................................
Safety Warnings Please read before installation. If this Internet radio has been moved from a cold place to a warm place, DO NOT plug it in for 2-3 hours (e.g. from a cold car boot to a warm room). There is a possibility that moisture may have condensed in the Internet radio, this can cause damage to your Internet radio. To avoid damage please unpack your Internet radio and allow it to stand at room temperature for 2-3 hours before use.
INTERNET RADIO QUICKSTART GUIDE What You Need Before You Can Use Your Internet Radio and Network Streamer Before you can use your Internet radio, you need the following: • A broadband Internet connection. • A wireless access point (Wi-Fi) connected to your broadband Internet, preferably via a router.
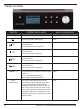
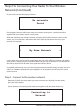
Radio Controls 6 CONTROL INTERNET RADIO MODE MEDIA PLAYER MODE STANDBY/ON Press to turn on/off the Internet Radio Same Go back to previous menu page Same Press and hold for 2 seconds to store Preset station P1 Press to listen to Preset station P1 Play/Pause / P1 Press and hold for 2 seconds to store Preset station P2 Press to listen Preset station P2 Stop / P2 Press and hold for 2 seconds to store Preset station P3 Press to listen Preset station P3 Previous Track / P3 Press and hold for 2
JACKS DESCRIPTION ON / OFF SWITCH Master ON / OFF control for power. IMPORTANT: Switch MUIST be ON for the power / standby switch on the front panel to operate the unit. DC 12V Connection To supply power to the unit, connect the power adaoter to the DC connection and a wall electrical power outlet Headphone Jack The headphone jack is a stereo headphone jack.
Remote Control CONTROL MEDIA PLAYER MODE Press STANDBY power key to turn off the Internet Radio (Master power is on the back unit) Same THUMBS UP THUMBS DOWN Press for Pandora Thumbs UP/DOWN selection no function Arrow Keys Press Arrow Keys to navigate throughout various menus and selections Same Press to return to previous menu page Same Push OK to select menu items, stations etc.
Steps For Connecting Your Radio To Your Wireless Network Step 1 - Power up the radio First, connect to the AC Power. The radio can be switched on or off with the STANDBY/ON button.
Steps For Connecting Your Radio To Your Wireless Network (Continued) If it can’t find one then the display will show: No networks Found If this happens then you will have to setup your wireless access point - see the instructions supplied with your wireless router / access point.
Steps For Connecting Your Radio To Your Wireless Network (Continued) Then: Network OK If the screen displays either: Enter WEP key Or: Enter WPA key Then your network is using one of the encryption systems: Wired Equivalent Privacy (WEP) or Wi-Fi Protected Access (WPA). You therefore need to enter the correct WEP or WPA code into the radio to get it to communicate with your network.
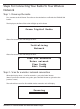
Choosing A Radio Station To Listen To 1. Press the ‘Select’ button. (Note: if you make a mistake at any point, press the ‘Back’ button to go back to the previous screen.) Internet Radio Personal Radio My Stuff 2. If the screen does not show < Internet radio > as shown above, turn the knob until it does. Please note that the ‘My Stuff’ folder will only show up after you register your radio onto our web site. 3. Press the ‘Select’ button, to choose . 4.
4. Press the ‘Select’ button. 5. Turn the knob until the display shows the station you want. 6. Press the ‘Select’ button and wait until the radio connects to that station. Note that some radio stations do not broadcast 24 hours per day, and some stations are not always on-line. If this station has on-demand content (that is, it gives the option of listening to programs which have already been broadcast), see “Stations which enable you to choose what you listen to”. 1.
Changing The Volume When a radio station is playing, you can increase the volume simply by turning the Volume knob, clock wise. Storing A Radio Station In A Preset (Radio) When a station is playing, hold down one of the preset buttons (1-5) until the screen shows. Assigned to Preset # * Where “#” is the number of the preset button you held down. Storing A Radio Station In A Preset (Remote control) 1. When a station is playing, press the and hold one of the numbers (1-10) on the remote control. 2.
Requesting A Station That Is Currently Unavailable If you want to listen to a particular radio station which is currently not available online, you can visit the Grace Digital Audio web site at http://grace.reciva.com/ and enter in a request to add the station to the list. Please note that some radio stations do not pass the audio stream quality test so we are not able to add every request. Typically we can add a station within 10 business days if the station provides us a quality stream.
Stations Which Enable You To Choose What You Listen To (Continued) 3. When you have chosen the program you want to listen to, either it will just start playing, or the display may show a list of days for you to choose from - use the knob to set the day the program was broadcast, then press the ‘Select’ button. 4. After you have chosen the day, you may be able to choose the Start Time. Set the Start Time using the knob and press the ‘Select’ button. 5.
Setting The Clock (Continued) 5. Turn the knob until the display says . < Set Time/Date Set Alarm DST > 6. Press the ‘Select’ button. Pacific Central Eastern 7. Turn the knob until the correct time zone is seen on the display. Push the ‘Select’ button to set your time zone. Then turn the Menu knob until the hour setting is correct, then press the ‘Select’ button. Set Time 1:30 PM 8. Turn the knob until the minute setting is correct, then press the ‘Select’ button.
Setting The Alarm 1. Press the ‘Select’ button. (Note: if you make a mistake at any point, press the BACK button to go back to the previous screen.) 2. Turn the knob until the display shows . < Stations Alarm Clock Media Player > 3. Press the ‘Select’ button. 4. Turn the knob until the display shows . < Set Time Set Alarm > 5. Press the ‘Select’ button. Disable all 1 OFF 2 OFF 3 OFF 4 OFF 5 OFF 6.
Setting The Alarm (Continued) 7. If you choose “Yes” then the display enables you to set the time for the alarm. Set Alarm 15:06 8. After selecting < 1 Off 12:00 AM> you can choose the time to set the Alarm. Set Alarm 12:00 AM 9. Turn the knob until the minute setting is correct, then press the ‘Select’ button. Alarm Set: 07:45 10. Turn knob to choose how often you want the Alarm to alarm 11. Turn knob to use either the buzzer or the current radio station that is playing to turn on.
Setting The Sleep Timer 1. Choose Alarm Clock 2. Choose Sleep Timer 3. Then scroll the Select knob form between 30 seconds and 99 hours. When the desired time is reached, Press the select knob. The radio will stay on until the timer is reaches zero. CONFIGURING ‘MY STUFF’ Registering An Account On Grace Digital Audio’s Website 1. Open the website, http://grace.reciva.com from your internet browser. 2. Click on the ‘Register’ link and follow the on-screen instructions to register an account.
Configuring ‘My Stations’ 1. It is possible to search for radio stations that are available in Grace Digital Audio’s stations’ database from Grace Digital Audio’s website. Whenever stations are searched for on the website, they will be displayed in a list of search results together with a link to ‘Add to My Stations’. 2. Clicking on the ‘Add to My Stations’ link, will add the station to your account’s ‘My Stations’ list.
Configuring ‘My Pandora’ 1. In order to use the Pandora feature on the Grace Digital Internet radio you must 1st have an active Pandora account. You can create a Pandora account at www.pandora.com or on Grace’s web site. 2. Grace Digital is not affiliated in any way with Pandora nor do we guarantee any of Pandora’s services or streams. Please see Pandora’s web site for information on how to update and activate your Pandora services.
6. Select ‘Stations’. < Stations Search > Accessing Pandora Feedback Menu 1. While listening to one of your Pandora radio stations choose the ‘Retrieve’ button on the internet radio. The ‘Retrieve’ button will allow you to perform the similar choices as you do with your regular Pandora on line account. Choosing the reply button will allow you to thumbs up / down a song, sleep up to 6 songs an hour, book mark songs and artist etc.
MEDIA PLAYER QUICKSTART GUIDE The Media Player allows you to play unprotected audio files (AAC, AIFF, MP3, RM, WAV, WMA) and play lists (M3U) stored on a networked PC or Apple. It has been verified to work with Windows 2000 and Windows XP, and Apple OSX. Set Up Your Windows PC To Allow The Radio To Access Your Audio Files Via Windows Shares Windows XP 1.
Apple OSX 1. The MAC will require Windows File Sharing. MAC OS 9 and earlier versions of the OS will need extra software to use Windows File Sharing. MAC OS X 10.2 and later versions have Windows File Sharing built into the OS. Please ensure that your PC is available on the network for your Internet radio. Your radio will also need to be able to access directories that require a user name and password. 2. Setup Windows File Sharing on the MAC: From the ‘Dock’, click ‘System Preferences’.
Locate The Shared Audio Files Using The Radio 1. Power up the radio. 2. Wait for ‘Stations’ to be displayed on the radio, or press the BACK button repeatedly until ‘Stations’ is displayed. 3. Turn the knob until the radio display shows ‘Media Player’. 4. Press the SELECT button and turn the knob until ‘Windows Shares’ is displayed. 5. Press the SELECT button, turn the knob until ‘Scan for PCs’ is displayed and press SELECT again. 6. The radio will now display ‘Finding PCs’.
5. Turn the knob until the required album name is displayed. 6. Press the SELECT button. ‘[Add to Queue]’ will be displayed. 7. Turn the knob until the required track is displayed. 8. Press the SELECT button. The track will begin playing. Listening To A Complete Shared Album 1. Turn the knob until ‘By Artist’ is displayed. 2. Press the SELECT button. 3. Turn the knob until the required artist is displayed. 4. Press the SELECT button. 5. Turn the knob until the required album name is displayed. 6.
Controlling Playback 1. Use the STOP button to stop playback. 2. Use the PLAY/PAUSE button to either pause a currently playing track or to restart a currently paused track or to restart a stopped track. 3. Use the SKIP TO PREVIOUS TRACK button to start playback of the previous track in the queue. 4. Use the SKIP TO NEXT TRACK button to start playback of the next track in the queue. Browsing The List Of Tracks Currently Arranged (Queued Up) For Playback 1. Press the BROWSE button.
Playing Tracks In Random Order 1. Select the individual tracks as described previously. 2. Navigate to top-level menu item ‘Media Player’ using the SELECT and BACK buttons. 3. Press the SELECT button. 4. Turn the knob until ‘Playback Mode’ is displayed. 5. Press the SELECT button. 6. Turn the knob until ‘Shuffle’ is displayed. 7. Press the SELECT button. 8. Turn the knob to select YES/NO to confirm that shuffle mode should be enabled. Playing Tracks In The List (Queue) Repeatedly 1.
Set Up A Windows PC To Allow The Radio To Access Your Audio Files Via A UPnP Server 1. If your PC is running Microsoft Windows XP or Windows Vista, then you can use Windows Media Player 11 (WMP11) to act as your UPnP (Universal Plug and Play) media server 1.0. Windows Media Player 11 may be downloaded from Microsoft’s website and installed by following the instructions detailed in its installation wizard. 2.
Selecting ‘Media Sharing…’ for Windows Media Player 11: 5. From the ‘Media Sharing’ window, the radio will be listed as an unknown device. Click on the unknown device listed, then click the ‘Allow’ button and then click ‘OK’.
Locating And Playing Media Files Using The Radio And UPnP 1. Once the UPnP server is configured to share media files with the Internet radio, you can play the files by doing the following on the radio. 2. Keep pressing BACK to get to the radio’s top-level menu and then turn the knob to select ‘Media Player’. 3. Press SELECT and then turn the knob to highlight ‘UPnP Servers’. 4. Press SELECT and the radio will scan for all available UPnP servers.
Browsing The List Of Tracks Currently Arranged (Queued Up) For Playback 1. Press the BROWSE button. The currently playing track name will be displayed. 2. Turn the knob to see which tracks are queued up for playback. 3. If you want to jump to a particular place in the queue then press the SELECT button when the required track is displayed. 4. It is important to note here that media files scanned from the radio’s ‘Windows Shares’ function can also be added to the radio’s queue.
Controlling Playback 1. Use the STOP button to stop playback. 2. Use the PLAY/PAUSE button to either pause a currently playing track or to restart a currently paused track or to restart a stopped track. 3. Use the SKIP TO PREVIOUS TRACK button to start playback of the previous track in the queue. 4. Use the SKIP TO NEXT TRACK button to start playback of the next track in the queue. Removing Tracks From The List (Queue) 1. Press the BROWSE button. The currently playing track name will be displayed. 2.
Playing Tracks In Random Order 1. Select the individual tracks as described previously. 2. Navigate to top-level menu item ‘Media Player’ using the ‘Select’ and ‘Back’ buttons. 3. Press the ‘Select’ button. 4. Turn the knob until ‘Playback Mode’ is displayed. 5. Press the ‘Select’ button. 6. Turn the knob until ‘Shuffle’ is displayed. 7. Press the ‘Select’ button. 8. Turn the knob to select YES/NO to confirm that shuffle mode should be enabled. Playing Tracks In The List (Queue) Repeatedly 1.
The Media Player allows you to play unprotected audio files (AAC, AIFF, MP3, RM, WAV, WMA) and play lists (M3U) stored on a networked PC. It has been verified to work on Windows 2000 and Windows XP. SETTINGS MENU Choosing The Option You Want From The Settings Menu 1. Press the ‘Select’ button. (Note: if you make a mistake at any point, press the ‘Back’ button to go back to the previous screen.) 2. Turn the knob until ‘Settings’ is displayed 3. Press the ‘Select’ button. 4.
Use this option to download new firmware for the radio from the Grace Digital Audio portal on the Internet. If there is new firmware available, then the radio will prompt you if you want to download it or not. Note, at this stage, you can press the radio’s ‘Back’ button to cancel the radio beginning a firmware upgrade. A Firmware upgrade may take several minutes, so do not switch off the power to the radio until the operation is complete otherwise the radio may become permanently damaged.
Selecting this option will alter the Internet radio’s backlight brightness. 1. After selecting the ‘Backlight’ menu item, the radio will display its list of three menu modes: ‘Inactive’, ‘Active’ and ‘Standby’. These three states are explained below: • The radio gets into its ‘inactive’ state when there is no button pressed for 30 seconds. • The ‘active’ state is when there is user activity. • ‘Standby’ is the state when the radio has been turned off. 2.
TROUBLESHOOTING If you experience any trouble with your wireless Internet radio, then you may find it useful to visit the help section on: webpage: http://www.gracesupport.com/ If you have trouble connecting the radio to your wireless network, these steps may help to resolve the problem: 1. Confirm that a Wi-Fi connected PC can access the Internet (i.e. can browse the web) using the same network. 2. Check that a DHCP server is available, or that you have configured a static IP address on the radio.
Specifications • • • • • • Power Requirements - Mains AC 100-240V, 50/60Hz / 12V 1.5A Power Consumption: 18W Speaker Output (RMS) Level: 16W (8W x 2) 8Ω 3” internal speakers / 24W (6Ω) external speakers Frequency Response 80Hz - 15 KHz ± 3dB internal speakers / 50Hz-20KHz ± 3dB external Headphone Speakers Level: 15mW Network WiFi 802.11n or optional USB Ethernet adapter This Product is intended for North American markets.
APPENDIX Step 1: Set Up Media Sharing In Windows Media Player 11 After you download and install Windows Media Player 11 for Windows XP and connect your radio to your network, you need to set up media sharing so that you can share music with your radio. The following steps describe how to set up media sharing in Windows Media Player 11. 1. In Windows Media Player 11, click the small arrow below the Library tab, and then click Media Sharing. 2.
Step 1: Set Up Media Sharing In Windows Media Player 11 (Continued) 3. In the list below the Share my media to: check box, click your Radio*, click Allow, the selected device will now show a green tick and then click OK. • If your device does not appear in the list of devices perform the following steps; 1. From the “Media Player” menu of your internet radio select “UPnP Servers” 2. A list of available computers will appear. 3. Select the required computer. 4. The display may show “Access Denied (801)” 5.
Step 2: Play Music On The Internet Radio. After installing and configuring your radio and Windows Media Player 11, you are now ready to play music wirelessly. The following steps describe how to play music using the Radio. 1. Using the control, to select “UPnP Servers” from the “Media Player” menu. 2. Select the computer you wish to play the music files from. 3.
CONTACT For fastest response time please send us an email with any questions to: gracesupport.com or refer to the User Forum at: http://www.GraceDigitalAudio.com/forum/ Monday - Thursday Friday 9:00am to 4:00PM (PST) 9:00am to 12:00 PM (PST) PROPOSITION 65 This product may contain chemicals listed in Proposition 65 (http://www.oehha.ca.gov/prop65/prop65_list/Newlist.html) that may be known to cause cancer, birth defects or other reproductive harm.
BRAVADO-X Internet Radio and Network Media Player 45
Grace Digital Inc.