TUNER SERIES Internet Radio Tuner by Grace Digital User’s Guide TUNER & TUNER PRO Model no.
User’s Guide Table of Contents Important Safety Instructions and Warnings ................................................................ 4 QUICKSTART GUIDE (Wireless Connection) ............................................................. 7 Contents ................................................................................................................. 9 Tuner controls & connections ..................................................................................
Set up a Windows PC to allow the tuner to access your audio files via a UPnP server ......................................................................................................................... 29 Locating and playing media files using the tuner and UPnP ..................................... 31 Browsing the list of tracks currently arranged (queued up) for playback Arranging (Queuing up) UPnP tracks for playback later ...........................................
Important Safety Instructions and Warnings Please read before installation If this Internet tuner has been moved from a cold place to a warm place, DO NOT plug it in for 23 hours (e.g. from a cold car boot to a warm room). There is a possibility that moisture may have condensed in the Internet tuner, this can cause damage to your Internet tuner. To avoid damage please unpack your Internet tuner and allow it to stand at room temperature for 2-3 hours before use.
WARNING: To reduce the risk of fire or electrical shock, do not expose the product to rain or moisture. The product shall not be exposed to any dripping or splashing. Objects filled with liquids, such as vases, should not be placed on the product. No open flame sources, such as lighted candles, should be placed on the product. Keep the remote control battery away from children. It may cause a fire or chemical bum if mishandled.
ADVISORY This Product is intended for North American markets. The GRACE Wireless Internet Tuner Series TUNER PRO GDI-IRTP800 & TUNER GDI-IRDT200 are in compliance with the essential requirements and other relevant provisions of Directive 1999/5/EC ADVISORY FCC Compliance and Advisory Statement: This device complies with Part 15 of the FCC Rules.
QUICKSTART GUIDE - 1st time WIRELESS Set Up A broadband internet connection is required. You can connect to your broadband internet with: 1.) Wireless (Wi-Fi) modem or router connected to your broadband (cable or DSL) internet 2.) Wired LAN line connected to your broadband (cable or DSL) internet NOTE: IF your wireless (Wi-Fi) network is password (WEP or WPA) protected, please obtain your password before proceeding to Step 1. All passwords are UPPER and lower case sensitive.
the 1st letter or number in your password is located and positioned in the center of the tuner’s display. Press the dial inward to select the 1st letter. Continue this process until the final letter or number is selected. Once your password is entered, scroll, located and select ‘END’. NOTE: If you make a mistake at anytime, press the ‘back’ button to erase the letter(s) or number(s) and select then select the correct entry.
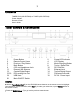
Contents TUNER PRO (GDI-IRTP800) or TUNER (GDI-IRDT200) Power Adapter Remote Control User’s Guide Tuner controls & connections 1. 3. 5. 7. 9. 11. 13. 15-16. 18. 20. Power Button Remote Control Lens Previous / Play Button Back Button 6.35 mm Headphone Jack External Wifi Antenna Coaxial DigitalOutput RCA analog Line Out USB Host Main ON/OFF Switch 2. 4. 6. 8. 10. 12. 14. 17. 19.
Tuner remote control functions and controls REMOTE CONTROL 1. MUTE: < Press to mute the voice of Earphone only> 2. POWER: 3. 0--9: 4. Back: 5. Select: . Under FM mode, long press this button to start auto scanning mode of the FM stations 6.
Connect Your Tuner to Your Network Getting Started Step 1 - Power up the tuner Power your tuner by connecting to the Power Adapter with the socket labelled 5V 1.2A DC at the back of your TUNER. Turn the main power switch ON at the rear of the cabinet. CAUTION: NOTE: Use only the power adapter supplied with this tuner. Connecting a power adapter other than the power adapter supplied is hazardous and may cause permanent damage to the unit, shock or fire.
Step 2 - Scan for a wireless network connection When the display shows , press the ‘Tuner/Select’ button.
Step 3 - Connect to the wireless network When the ESSID for the router you want to connect is displayed on the screen, press OK. IF your network is not configured to require an encryption code, the screen should display: Connecting to Network then: Network OK IF the screen displays either WEP or WPA, a password is required: Enter WEP key OR Enter WPA key HINT: The password / encryption code (WEP or WPA code ) would have been set up by the person who set up and configured your network.
After approximately 3 seconds, the display goes into the password entry mode: █ To enter the password, use the Tuner/Select DIAL or the UP/DOWN buttons on the remote to select each letter/number/symbol of the password in turn, pressing OK after each letter. NOTE: HINT: WEP and WPA passwords are upper and lower case sensitive and MUST be entered exactly Use the ’Back’ button to erase incorrect characters as you may have entered.
Wired network connection & tuner settings Wired connection, settings & network configurations The ‘Settings’ section on your Tuner offers numerous sub-menus that allow you to set and modify Network configurations and other features and functions for your Tuner. In the main menu, you will find from where you can modify basic configurations and settings.
IF Wired Only is selected, your Tuner will only connect through a Wired connection. IF Wireless Only is selected, your Tuner will only connect through Wireless Wi-Fi connection. Configuring the radio to only use a Wired Ethernet connection Selecting ‘Wired Only’ will cause the radio to reboot and then only use its Ethernet connection to communicate with the network. The radio will also disable its wireless network capabilities.
Listening to Your Internet Radio Tuner Settings & Network Configurations Changing the volume – headphone connection The volume control on the unit is just for adjusting the volume for the headphone. You can change the volume by turning the Tuner/Select Dial clockwise to increase the volume and counter-clockwise to decrease the volume. The display will show the volume bar. You cannot change the volume when you are in a menu or when the radio is connecting to a station.
allows you to choose stations starting with the geographical area allows you to choose stations according to their content, for example Classic Rock, Sport, News, etc. If you are an active Sirius subscriber with a package that includes the ability to listen to Sirius internet tuner on a non computer based product you will be able to listen to those stations on the Grace Digital tuner.
If this station has on-demand content (gives the option of listening to programmes which have already been broadcast), see “Stations which enable you to choose what you listen to”. Choosing a Pandora tuner station (Personal Tuner) This section allows for the new Grace Digital Personal tuner services. The current service is Pandora and My Aupeo. Prior to this feature working you must first register your tuner on the Grace web site. Please see registering your tuner.
1. When a station is playing, press the and hold one of the numbers (1-10) on the remote control. 2. Select a number to assign the station to (1-10). * Please note presets 1-5 are the same for the remote & tuner and can be stored using either the tuner or remote. Playing a preset tuner station When your tuner is powered on and connected to your Wi-Fi network, briefly press the preset button (1-5) on the tuner, or 1-10 on the remote control, for the station you want to listen to.
If you choose more screens are displayed and you can choose what you want to listen. What is displayed will depend on the station you have chosen - the following steps are only a guide. 2. When you choose , the display shows the names of the programs. Turn the Dial to choose the program you want, then press the ‘Select’ button. 3.
5. Turn the Dial until the display says < Set Time/Date Set Alarm DST > 6. Press the ‘Select’ button. Pacific Central Eastern 7. Turn the Dial until the correct time zone is seen on the display. Push the ‘Select’ button to set your time zone. Then turn the Menu Dial until the hour setting is correct, then press the ‘Select’ button. Set Time 1:30 PM 8. Turn the Dial until the minute setting is correct, then press the ‘Select’ button.
Setting the alarm 1. Press the ‘Select’ button. NOTE: IF you make a mistake at any point, press the BACK button to go back to the previous screen 2. Turn the Dial until the display shows < FM Alarm Clock Settings > 3. Press the ‘Select’ button. 4. Turn the Dial until the display shows < Set Alarms Sleep Timer > 5. Press the ‘Select’ button. Disable all 1 OFF 2 OFF 3 OFF 4 OFF 5 OFF 6.
7. If you choose “Yes” then the display enables you to set the time for the alarm. Enable Alarm Disable Alarm 8. After selecting < Modify Alarm> you can choose the time to set the Alarm. Set Alarm 12:00 AM 9. Turn the Dial until the minute setting is correct, then press the ‘Select’ button. Alarm Set: 07:45 10. Turn Dial to choose how often you want the Alarm to alarm 11. Turn Dial to use either the buzzer or the current tuner station that is playing to turn on.
Setting the sleep timer 1. Choose Alarm Clock 2. Choose Sleep Timer 3. Then scroll the Select Dial form between 30 seconds and 99 hours. When the desired time is reached, Press the select Dial. The tuner will stay on until the timer is reaches zero. Configuring ‘My Stuff’ Registering your Tuner / creating an account 1. Your tuner must be connected to your Wi-Fi internet connection prior to registering your tuner and creating an account. Go to the main menu of your tuner.
* ‘manage my stuff’: This is the area to add your personal streams and to save addition stations. * ‘manage my tuners’: This is the area to delete your tuner from your account or to add additional tuners. Configuring “My Profile 1. Once logged into you Grace Digital’s account, you can edit your account’s details from your ‘My Profile’ section. 2. Click on the ‘My Profile’ link to view your account’s current information.
item: ‘Stations > My Stuff > My Streams’. Please note, the streams will only be available to your tuner once your tuner has downloaded a new stations’ list. To cause the tuner to download a new stations’ list, please remove and reconnect the power to your tuner. Configuring ‘My Podcast’ 1. It is possible to add audio podcasts (RSS feeds) to your Grace Digital account that can be accessed on your Internet tuner. To add a podcast, simply login to your account and then click on the ‘My Podcasts’ link. 2.
4. After you have successfully logged into http://myradio.gracedigital.com and your tuner is registered, you can choose 'extra features'. You will then be prompted to add your Pandora ‘user name’ and ‘password’. After you have done this please unplug your tuner from power and wait 15 minutes. Plug the tuner back in and turn the tuner on to listen to your Pandora stations on your Grace digital tuner. 5. You can then listen to your Pandora music section via the following menu choices.
Set up a Windows PC to allow the tuner to access your audio files via a UPnP server 1. If your PC is running Microsoft Windows XP or Windows Vista, then you can use Windows Media Player 11 (WMP11) to act as your UPnP (Universal Plug and Play) media server 1.0. Windows Media Player 11 may be downloaded from Microsoft’s website and installed by following the instructions detailed in its installation wizard. 2.
5. From the ‘Media Sharing’ window, the tuner will be listed as an unknown device. Click on the unknown device listed, then click the ‘Allow’ button and then click ‘OK’.
Locating and playing media files using the tuner and UPnP 1. Once the UPnP server is configured to share media files with the Internet tuner, you can play the files by doing the following on the tuner. 2. Keep pressing BACK to get to the tuner’s top-level menu and then turn the Dial to select ‘Media Player’. 3. Press SELECT and then turn the Dial to highlight ‘UPnP Servers’. 4. Press SELECT and the tuner will scan for all available UPnP servers.
Arranging (queuing up) UPnP tracks for playback later 1. Highlight the required track. 2. Press the SELECT button. ‘Track Added To Queue’ will be displayed. Arranging (Queuing Up) albums for playback later 1. Highlight the required album. 2. Press the SELECT button. 3. Turn the Dial until ‘[Add To Queue]’ is displayed. 4. Press the SELECT button. ‘Tracks Added to Queue’ will be displayed. Controlling playback 1. Use the STOP button to stop playback. 2.
4. Turn the Dial to highlight ‘Yes’ or ‘No’. 5. Press SELECT to confirm whether you actually want to delete the track from the queue. 6. If ‘Yes’ was selected then ‘Removed From Queue’ will be displayed. 7. To remove all tracks from the queue, keep pressing BACK until the ‘Media Player’ menu item is selected, press SELECT and then turn the Dial to select ‘Clear Queue’ and press SELECT again. Playing tracks in random order 1. Select the individual tracks as described previously. 2.
7. Press the ‘Select’ button. 8. Turn the Dial to select YES/NO to confirm that repeat mode should be enabled. The Media Player allows you to play unprotected audio files (AAC, AIFF, MP3, RM, WAV, WMA) and play lists (M3U) stored on a networked PC. Verified to work on Windows 2000 and Windows XP. Settings Menu Choosing desired option from the Configure menu 1. Press the ‘Select’ button. (Note: if you make a mistake at any point, press the ‘Back’ button to go back to the previous screen.) 2.
should accept to upgrade however you can press the Tuner’s ‘Back’ button to cancel the Tuner from beginning the firmware upgrade. A Firmware upgrade may take several minutes. IMPORTANT do NOT interrupt the upgrade once started. Do NOT switch off the power to the Tuner until the operation is complete or permanently damage may result. Allows you to change the display language. Puts all the settings back to their defaults as they were when the unit left the factory.
• The ‘active’ state is when there is user activity. • ‘Standby’ is the state when the tuner has been turned off. 2. Rotate the Dial to highlight the desired menu mode and press SELECT. 3. The tuner will now display the current backlight value for this menu mode. You can alter this value by rotating the Dial to increase or decrease it. ____________________________________________________________ This menu allows you to change the name of your device.
Troubleshooting Please read the User’s Guide carefully to ensure proper use of your system and to enjoy your TUNER /TUNER PRO’s basic and advanced features. Please keep this User’s Guide for future reference. If you experience any trouble with your internet radio TUNER / TUNER PRO, then you may find it useful to visit the help section on our webpage: http://myradio.gracedigital.com , or http://www.gracesupport.
. Specifications Internet Tuner / Media Player Support Wireless 802.11b/g/n Wi-Fi or Wired Connection 3 line LCD with blue color backlight, 132*48 dots display 10 Station presets on the unit Clock alarm function Supported audio formats: AAC (HE-ACC), ADTS, AIFF, CAF, FLAC, MP3, Ogg Vorbis, WAV, WMA, & Apple Lossless Supported playlist formats: ASX, M3U, PLS Supported streaming protocols: HTTP, HTTPS, MMS, RTPS, Shoutcast Contol4 system compatible (TUNER PRO) 6.
This product includes technology owned by Microsoft Corporation and under a license from Microsoft Licensing GP. Use or distribution of such technology outside of this product is prohibited without a license from Microsoft Corporation and/or Microsoft Licensing, GP as applicable. Your Internet Tuner is guaranteed against original defects in materials, manufacture and workmanship for one year from the date of purchase.
(a) damage or failure caused by or attributed to acts of God, abuse, accident, misuse, improper installation or improper maintenance, alteration, lightning or excessive voltage or current; (b) any repairs other than those provided by a TUNER / TUNER PRO authorized service facility; (c) consumables such as fuses or batteries; (d) cosmetic damage; (e) transportation, shipping or insurance costs; (f) costs of product removal, installation, set-up, service adjustment or re-installation.
©2014 Grace Digital Inc.