Contents Important Safety Instructions Page 2 Unit Diagram and Component Names / Functions Page 3 Basic Operation Page 3 Cassette Tape Use Page 4 Listening to a Tape Page 5 Recording to a Tape Page 6 Recording to a PC Page 8 Audacity Software Introduction Page 8 Audacity Software Installation
TO PREVENT FIRE OR OTHER HAZARD, DO NOT EXPOSE THIS APPLIANCE TO SUNLIGHT, RAIN OR MOISTURE. IMPORTANT SAFETY INSTRUCTIONS 1) Read these instructions. 2) Keep these instructions. 3) Head all warnings. 4) Follow all instructions. 5) Do not use this apparatus near water. 6) Clean only with a dry cloth. 7) Do not block any ventilation opening(s), install in accordance with the manufacturer's instructions.
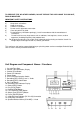
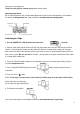
20. Record to [REC INPUT] Connection 21. Play to [PLAY OUTPUT] Connection Basic Operation 1. Connect the DC adapter to the power outlet and plug the other end to the DC jack connection on the back of the unit. NOTE: Before plug the DC jack on the back of the unit; please make sure the “POWER” button is shut off. 2. Press the POWER button to turn the unit on. Cassette Tape Use Tape Handling: Do not store tapes in the following places: 1.
metal parts in the tape path. The pinch roller may be cleaned using rubber cleaning fluid. Demagnetizing Heads: Be sure that the power is off, and then demagnetize the heads using a demagnetizer (not included). For details of demagnetizer use, read instructions included with your demagnetizer. Listening to a Tape 1. Use the CASSETTE / LINE IN switch and select the CASSETTE position. 2.
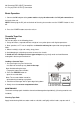
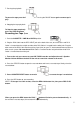
7. Pausing the playback. To pause the tape press the PAUSE button. Pressing the PAUSE button again resumes tape’s play. 8. Stopping the tape playback. To Stop the tape completely press the STOP/EJ button. Recording to a Tape (from audio source) 1. Push the CASSETTE / LINE IN to LINE IN position. 2. Plug the RCA Cable into the REC INPUT jack at the back of the unit, be sure that the red RCA Cable is inserted into the red jack and the white RCA Cable is inserted into the white jack.
. To adjust the recording level, adjust the REC LEVEL knob. Ideal REC level is typically 0 dB. You can view the REC level through the level Indicator. 8. Fast forward and rewind. Press the fast forward or rewind button to advance and rewind the tape, respectively. 9. Pausing the playback. You may pause your tape and pause your recording by pressing the PAUSE button. Pressing the PAUSE button again will resume playing the tape. 10. Stopping the tape playback.
Recording to a PC (from a tape) Audacity Software Introduction **The provided Audacity CD disc should contain the following software: (1)Audacity-src-1.2.6--------- for Macintosh (2)Lame_enc.dll--------------- (to convert recorded music files to MP3 format) (3)AUTORUN (4)Audacity Set Up (5)Audacity. dmg--------------- for Macintosh (6)LameLib-Carbon-3.91----- for Macintosh The software is compatible with Window 98, 2000, ME, XP, VISTA and Macintosh.
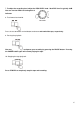
Connect the USB cable to the USB connection at the back of the unit (GDI-TAPE2USB) and into the USB connection on your computer. Press the STOP/EJ button to open the cassette door and insert a cassette tape compartment door. Gently close the cassette tape compartment door. Press the Power button to turn on the unit. 1. Please insert the Audacity software disk that comes with your unit. Go to My Computer and double click the CD ROM Drive. 2. Locate the Audacity Setup.
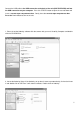
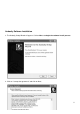
Audacity Software Installation 3. The Audacity Setup Wizard will appear. Click on Next > to begin the software install process. 4. Click on “I accept the agreement” and click on Next.
5. Continue to click on the Next> buttons.
6. Click on the Install button to start installation.
7. Click on Finish to complete installation.
8. You can now open the Audacity software and start recording your files. NOTE: Once you set up Audacity, you should not need to re-set nor re-install the software with each use. For additional information regarding Audacity features & applications, please visit the Audacity website at: http://audacity.sourceforge.net Audacity Interface Audacity Interface---Settings and controls.
Audacity Control Buttons Use the control buttons at the top of the screen to do the following functions: skip to beginning and skip to end of your recording, play, record, pause, stop and end your recording session. Use the File, Edit, View, Project, Generate, Effect and Analyze menus to save, export and edit the music you recorded to your PC/Mac. 1. Click the ( ) button to skip to start; 2. Adjust the output volume. 3. Click the ( ) button to play; 4. Click the ( ) button to record; 5.
Audacity Preferences Click the “Edit” on the Audacity interface, select “Preferences”. The screen will open up Audacity Preferences. You can see the Audio I/O, Quality, File Formats, Spectrograms, Directories, Interface, Keyboard and Mouse in the Audacity preference interface.
Select the recording device: AK5371 Click the “Audio I/O” at the Audacity Preferences interface. Click the “Device” and select “Ak5371”. Click the “Channels” and select 2 (stereo). Click the “OK”. Note: If you couldn't find the "AK5371" from the Device list, close the Audacity Software and reopen. the software and try again 4. Adjust the output and input volume. *Adjust the REC level knob to adjust record level (dB) when recording. You can view the REC level through the level indicator.
NOTE: most recordings should be made as close to 0 dB level as possible. *Rotate the VOLUME knob in the back of the unit to monitor the sound of the playing music The Speaker Monitor VOLUME knob is located at the back of the unit Preparing to Export and Save for MP3 Formats Prepare for MP3 Export--- Additional software “lame_enc.dll” is required and must be installed 1. Please make sure that the Audacity disc is still inserted in your computer. 2.
4. A dialog box will appear. Click “Yes”. 5. Another box appears to locate the “CD ROM”. You will find the “lame_enc.dll” software. Click the software then click Open.
6. Click on the OK Button. Once the lame_enc.dll (MP3) software set up is complete, you can proceed with the recording and exporting to MP3 format.
Exporting and Saving Files (to WAV, Ogg, or MP3 formats after your recording is completed) When the song(s) finished, click the ( ) ) on the screen. Then press the “STOP” button on the unit to stop and end the recording. You should now have a music download on your computer. BUT, the music download should be converted to a WAV, Ogg, or MP3 format before exporting. Before exporting you should be able to play back the recording through your computer.
Follow the same steps as above for “Export as MP3”. 2. Once you have chosen to which file format your recording should be exported, the interface below appears. Here you may enter the file name and the location where you want to save and the file for use and reference. i.e. Select for instance your “desktop” and then click “Save”.
Follow the same steps as above for “Save as MP3”. After you have finished downloading, you may play back the songs through your computer. In Stop Mode, simply click the _ _button. NOTE: If do not have the fluctuant wave on the interface when recording, adjust the recording volume as follows: Click the “Start” in the left corner of the computer, Select “Programs”, “Accessories”, “Entertainment”, “Sound Recorder” to enter Sound Recorder interface.
Select Edit and click “Audio Properties” in the “Audio Properties” interface; * Select Edit and click “Audio Properties in the bottom of the menu to enter Audio Properties interface: 23
Audio Properties Interface Select sound recording default device and click Ak5371, then click the Volume to enter Wave In interface. Wave In Interface Adjust the recording volume from the middle or higher. The fluctuant wave will show on the interface when recording.
In case of trouble with the unit, please look through this chart and see if you can solve the problem by yourself before calling your dealer. Problem Cause Solution Power does not come Unit is unplugged. Connect the unit to the AC on when the power adapter power supply. THE WHOLE UNIT switch is pressed. The sound is noisy. The unit is too close to a TV set Turn off the TV or other or another similar appliance. appliance, and relocate the_unit.
26
27