IMPORTANT SAFETY INSTRUCTION PLEASE READ CAREFULLY ALL THE FOLLOWING IMPORTANT SAFEGUARDS THAT ARE APPLICABLE TO YOUR EQUIPMENT Read Instructions - All the safety and operating instructions should be read before the product is operated. Retain instructions - The safety and operating instructions should be retained for future reference . Heed Warnings - All warnings on the product and in the operating Instructions should be adhered to .
2
Table of Contents Preparation for use Unpacking&Set up Power Source .................... .................... 4 5 Location of Controls & Indicators .................... 6-7 Operation Instruction .................... 8-9 ....................
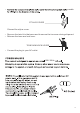
PREPARATION FOR USE UNPACKING AND SET UP IMPORTANT : Raising And Lowering The Lid To open the lid, raise it as far as it will go until the lid support bracket locks in the open position . To close the lid, lift it upward slightly until the lid support bracket unlocks, and then gently lower the lid. TO AVOID DAMAGING THE CABINET OR THE LID, NEVER FORCE THE LID CLOSED. ALWAYS RAISE THE LID TO RELEASE THE LID SUPPORT BRACKET. Raise the lid The phonograph has been secured for shipment with a TRANSIT SCREW.
needle STYLUS COVER Discard the stylus cover. Remove the twist -tie that was used to secure the tone arm during shipment. Release the tone arm lock lever. TONE ARM LOCK LEVER Connect the plug to your AC outlet.
1 VO 23 12 LUME TU AUX NI NG POWER R RECORD AM/FM EC LEV Mo.
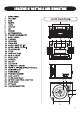
LOCATION OF CONTROLS AND INDICATORS 36 37 38 39 40 41 42 43 44 45 46 47 48 49 50 51 52 53 54 55 56 LINE OUT JACK FM ANTENA WIRE AC POWER CORD OP/CLOSE CD PHONO AM/FM TAPE AUX AUTO MANUAL INCREMENT TRACK REC LEVEL “+” “-” VOLUME “+” “-” FINALIZE REPEAT PROGRAM REW/FF PLAY/PAUSE ERASE STOP REC Unit Controls LINE OUT L 36 R 38 37 OP/CLOSE 40 FUNTION 39 CD PHONO 41 43 42 AUX TAPE AM/FM 47 AUTO 45 46 44 MAN UA L + + INCREMENT REC LEVEL VOLUME TRACK _ _ 48 50 49 FINA LIZE REPEAT
OPERATION INSTRUCTION General Turntable operation 1 Make sure the unit is plugged in correctly to an AC outlet. 1 Press the PHONO( 6/41 )to set the unit to phono mode. 2 Press the POWER( 22 ) to turn on the main power. Then you can press any button you want. 2 Make sure that you have removed the stylus cover from the stylus and have released the Tone Arm Lock that secured the tone arm to the tone arm rest. Radio Operation 1 Press the AM/FM button( 4/42 )to set the unit to tuner mode.
OPERATION OPERATION OPERATION INSTRUCTIONS CASSETTE OPERATION PLAYING CASSETTE 1 Press the TAPE( 5/43 ) button to set the unit to tape mode. Note : Before inserting a tape in the player be sure that there is no excess slack in the cassette that could jammed in the mechanism. 2 Insert your cassette into the slot,as shown in the illustration, with the side you wish to play facing 'up' and the open end on the right sde. 3 Cassette playback begins as soon as the tape is inserted.
CD RECORDING INSTRUCTIONS Preparation This unit is designed to record CD-R and CD-RW discs bearing the identification logo “Compact Disc Recordable” or “CDRewritable”,If CD’s do not confirm to this standard, they may not record properly. Recording Records to CD 1 Load a compatible blank CD-R or CD-RW into the unit. 2 Press the PHONO button (6/41) to set the unit to Phono mode. 3 Set the SPEED CONTROL SWITCH (32) to the correct speed (33 ,45 or 78 rpm) for the selected record.
11
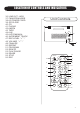
AUDIO CONNECTION AUDIO CONNECTION Audio output 1 AUX IN Press the AUX (3) button to set the unit to Audio connection mode. Using the Aux in allows you to hook up additional external audio components and listen to them through your unit.Any component with an audio output such as a Tuner ,can be connected by using the correct cables(not included).This unit uses standard 3.5mm cables.For more information on hooking up the external component, see the owner's manual for that component.
/ 13
WARRANTY & CUSTOMER SUPPORT Congratulations on the purchase of your new Grace product. All Grace Digital products purchased directly from Grace Digital or from a Grace Digital authorized dealer are supported by a 1 year limited warranty. Grace Digital Inc. guarantees this item for a period of 1 year from the original date of purchase. The product is guaranteed against original defects in materials, manufacture and workmanship for 1 year from the date of purchase.
Troubleshooting Guide In case of trouble with the unit, please look through this chart and see if you can solve the problem by yourself before calling your dealer. CD PLAYER TUNER UNIT TAPE DECK THE WHOLE UNIT Problem Power dose not come on when the power switch is pressed. Cause Solution Unit is unplugged. Connect the unit to the AC power supply. The volume is turned No sound comes out down (to MIN). of the speakers. The input selector does not match the playback source. Adjust the volume.