Operation / Fonctionnement / Bediening RTX 1500 Electric Texture Sprayer Pulvérisateur électrique à produit texturé RTX 1500 RTX 1500 Elektrisch spuitapparaat voor structuurmateriaal 310624E - For Water-Based Materials Only - Pour produits à base aqueuse uniquement - Alleen voor materialen op waterbasis (Consult your Material Supplier for Warnings and Application Requirements) (Consultez votre fournisseur de produit concernant les mises en garde et spécifications d’application) (Neem contact op met uw ma
Notes / Remarques / Aantekeningen Notes / Remarques / Aantekeningen 2 310624E
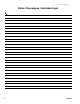
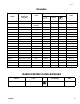
Models Models Manual Model Electric Requirements Country Languages 287328* Operation Gun 248201 120V, 60 Hz, 15 A N. America 310624 310694 310616 English 248536 110V, 60 Hz, 15A United Kingdom 310624 310694 310616 English 248370 / 248315 230V. 50 Hz,10 A Europe 310624 310616 French 248370 230V. 50 Hz, 10 A Europe 310624 248370 230V. 50 Hz, 10 A Europe 310625 248370 / 248315 230V. 50 Hz, 10 A Europe 310625 Italian 248370 230V.
Modèles Modèles Manuel Modèle Pays Spécification électrique Langues 287328* Fonctionnement Pistolet 248201 120V, 60 Hz, 15 A Amérique du Nord 310624 310694 310616 Anglais 248536 110V, 60 Hz, 15A Royaume Uni 310624 310694 310616 Anglais 248370 / 248315 230V. 50 Hz,10 A Europe 310624 310616 Français 248370 230V. 50 Hz, 10 A Europe 310624 248370 230V. 50 Hz, 10 A Europe 310625 248370 / 248315 230V. 50 Hz, 10 A Europe 310625 Italien 248370 230V.
Modellen Modellen Handleiding Model Elektrische vereisten Land Talen 287328* Bediening Pistool 248201 120 V, 60 Hz, 15 A Noord-Amerika 310624 310694 310616 Engels 248536 110V, 60 Hz, 15A Verenigd Koninkrijk 310624 310694 310616 Engels 248370 / 248315 230 V, 50 Hz,10 A Europa 310624 310616 Frans 248370 230 V, 50 Hz, 10 A Europa 310624 248370 230 V, 50 Hz, 10 A Europa 310625 248370 / 248315 230 V, 50 Hz, 10 A Europa 310625 Italiaans 248370 230 V, 50 Hz, 10 A Europa 31
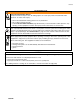
WARNINGS The following are general Warnings related to the safe setup, use, maintenance and repair of this equipment. Additional, more specific warnings may be found throughout the text of this manual where applicable. Warning WARNING This symbol alerts you to the possibility of serious injury or death if you do not follow the instructions. Caution CAUTION Alerts you to the possibility of damage or destruction of equipment if you do not follow the instructions.
WARNINGS WARNINGS Pressurized Equipment Hazard Compressed air can inject in skin. Air tubing rupture can cause injury if disconnected while under pressure. To reduce risk of injury: • Never exceed maximum working pressure of any attachment. • Do not direct airstream at body. • Follow Pressure Relief Procedure, page 16 whenever you are instructed to relieve pressure, stop spraying, service equipment, install or clean spray nozzle or disconnect or connect hose.
MISES EN GARDE Les mises en gardes suivantes sont des mises en garde de sécurité générales relatives à la configuration, utilisation, maintenance et réparation de ce matériel. Des mises en garde particulières figurent aux endroits concernés. Mise en garde MISE EN GARDE Ce symbole vous avertit des risques de blessure grave ou de mort en cas de non-respect des consignes. Attention ATTENTION Vous avertit du risque de dommage ou de destruction de l’appareil en cas de non-respect des instructions.
MISES EN GARDE MISES EN GARDE Danger des équipements sous pression De l’air comprimé peut être injecté sous la peau. Une rupture de tuyau d’air comprimé peut infliger des blessures. Pour réduire les risques de blessure: • Ne jamais dépasser la pression de service maximum de tout organe. • Ne pas diriger un jet d’air sur quelqu’un.
WAARSCHUWINGEN Hieronder staan algemene waarschuwingen die te maken hebben met de veilig(e) installatie, gebruik, onderhoud en reparatie van deze apparatuur. Daarnaast zijn er meer specifieke waarschuwingen te vinden in de tekst, waar van toepassing. Waarschuwing WAARSCHUWING Dit symbool waarschuwt u voor de mogelijkheid van zwaar letsel of de dood als u de aanwijzingen niet opvolgt.
WAARSCHUWINGEN WAARSCHUWINGEN Gevaar van apparatuur onder druk Perslucht kan in de huid doordringen. Als een luchtbuis scheurt, dan kan deze letsel veroorzaken als hij wordt afgekoppeld terwijl hij nog onder druk staat. Zo vermindert u het risico op letsel: • Nooit de maximum werkdruk van enig aanbouwdeel overschrijden. • De luchtstroom niet op het lichaam richten. • Volg altijd de drukontlastingsprocedure op blz.
Component Identification / Identification des composants / De onderdelen Component Identification / Identification des composants / De onderdelen B C R P K A E F ti4500a S W H D M U V L T 12 310624E
Component Identification / Identification des composants / De onderdelen Component Identification / Identification des composants / De onderdelen English Français Nederlands A Main Power Switch Interrupteur principal Netschakelaar B Nozzle Storage Rangement de l’embout Opslag spuitmond C Hopper Trémie Vultrechter D Hopper Connect/Disconnect Raccord de connexion Koppeling/ontkoppeling vultrechter E Graco RotoFlex™ HD Pump Pompe HD Graco RotoFlex™ Graco RotoFlex™ HD pomp F Material Ou
System Priming / Amorçage / Het systeem vullen (inspuiten) System Priming / Amorçage / Het systeem vullen (inspuiten) English Français Nederlands FUNCTION FONCTION FUNCTIE The RTX 1500 Electric Texture Sprayer is equipped with an automatic material pressure and flow device. When the operator releases the gun trigger, the pump pressure and flow, stops. When the operator squeezes the gun trigger, pump pressure and flow starts. Triggering system will deliver a ‘Soft Start’ of material flow.
System Priming / Amorçage / Het systeem vullen (inspuiten) Alternate Method - Using Prime Switch (P): Autre méthode – Utilisation du bouton d’amorçage (P): Alternatieve methode – de inspuitschakelaar gebruiken (P): (If air flow with material through gun is not desired) (Si l’on ne souhaite pas un flux d’air et de produit dans le pistolet) (Als een luchtstroom met materiaal door het pistool niet gewenst is) P aa K ti4364a ti4653a A ti4005a ti4655a ti4656a 1 Turn sprayer main power (A) ON.
Preparation / Préparation / Voorbereiding Preparation / Préparation / Voorbereiding Pressure Relief Procedure / Procédure de décompression / Drukontlastingsprocedure K ti429 C A ti4296a ti4294a ti4303a 1 Turn sprayer main power (A) OFF. 2 Unplug sprayer. 3 Turn fluid flow regulator (K) all the way down. 4 Aim gun into hopper (C) or bucket and squeeze gun trigger until all air and material pressure is relieved. 1 Mettre le bouton de commande du pulvérisateur (A) sur ARRÊT.
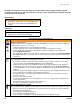
Preparation / Préparation / Voorbereiding Grounding / Mise à la masse / Aarding The sprayer must be grounded. Grounding reduces the risk of electrical shock by providing an escape wire for the electrical current. Le pulvérisateur doit être raccordé à la terre. La mise à la terre réduit les risques de décharge électrique grâce à un fil permettant au courant de s’échapper. Het spuitapparaat moet worden geaard.
Preparation / Préparation / Voorbereiding Ground ti4295a Extension Cords • Use only an extension cord with an undamaged 3-prong plug. • • For best results use the hardwired, 25 ft power cord only. If extension cord is necessary, use a 3-wire, 12 AWG Auxiliary Air Compressor CAUTION • Attaching auxiliary air to sprayer without using the Auxiliary Air Hookup Kit 287328 will damage sprayer. See manual 310694. Use Auxiliary Air Hookup Kit 287328 when additional atomization air is necessary. (2.
Preparation / Préparation / Voorbereiding ti4501a ti4502a Generators Hose Lengths • • 7500 W (7.5 KW) minimum The system comes with a twin line hose set consisting of a 1 in. ID x 25 ft (25 mm x 7.6 m) material hose and a 3/8 in- ID air hose. • If longer hose lengths are desired, connect additional hose sections together to a maximum of 100 ft.
Preparation / Préparation / Voorbereiding Setup / Installation / Opstellen IMPORTANT / IMPORTANT / BELANGRIJK English • Français Do not allow material to dry inside pump, hoses, gun or spray system. • Nederlands Eviter que le produit ne sèche à • l’intérieur de la pompe, des flexibles, du pistolet ou de l’appareil. Laat materiaal niet opdrogen in de pomp, de slangen, het pistool of het spuitsysteem. WARNING / MISE EN GARDE / WAARSCHUWING Read warnings, page 6. Lire les mises en garde, page 8.
Preparation / Préparation / Voorbereiding Removing and Installing Hopper Démontage et remontage de la trémie De vultrechter verwijderen en installeren C C D D ti4504a ti4503a Removing Hopper (C) 1 To remove hopper (C), loosen fitting (D). Fittings are handtightened and should not require tools to loosen. Installing Hopper (C) 2 Lift hopper (C) straight up, off of unit. Démontage de la trémie (C) 1 Pour démonter la trémie (C), desserrer le raccord (D).
Preparation / Préparation / Voorbereiding Wetting Hose / Mouillage du flexible / De slang bevochtigen WARNING / MISE EN GARDE / WAARSCHUWING Read warnings, page 6. Lire les mises en garde, page 8. Lees de waarschuwingen op blz. 10. aa WATER ti4654a ti4000a ti4505a Wet inside of hose before each use to flush out sediment and prevent texture material from packing out hose. 1 Pour one (1) gallon (3.8 liters) of clean water into hopper. 2 Open gun air valve (aa). Follow System Priming, page 14.
Preparation / Préparation / Voorbereiding ti4290a WASTE 4 Trigger gun into waste pail until hopper no longer contains water and all water is removed from hose and pump system. 4 Actionner le pistolet en le tenant dans un récipient à déchets jusqu’à ce que la trémie soit vide et que toute l’eau ait été chassée du flexible et de la pompe. 4 Spuit met het pistool in een afvalemmer tot de vultrechter geen water meer bevat en al het water is verwijderd uit de slang en het pompsysteem.
Preparation / Préparation / Voorbereiding Mixing Material / Mélange / Materiaal mengen WARNING / MISE EN GARDE / WAARSCHUWING Read warnings, page 6. Lire les mises en garde, page 8. Lees de waarschuwingen op blz. 10. ti3906a WATER NOTE: For optimal performance, thin material as described in steps 3-5. • 24 Use water-based materials only. 1 Mix material in a separate container. For best results do not use partial bags. 2 Agitate to a smooth, lump-free consistency.
Preparation / Préparation / Voorbereiding 3 To achieve a consistent density between batches, after texture material is thoroughly mixed, gently set ball end of Material Thickness Gauge on surface of mixture. NOTE: For an accurate test, be sure gauge is completely dry and clean every time it is used. 3 Pour obtenir toujours la même densité à chaque dose, déposer l’extrémité sphérique de la jauge de consistance à la surface du mélange après avoir soigneusement mélangé le produit.
Startup / Démarrage / Opstarten Startup / Démarrage / Opstarten WARNING / MISE EN GARDE / WAARSCHUWING Read warnings, page 6. Lire les mises en garde, page 8. Lees de waarschuwingen op blz. 10. aa L ti4009a ti4302a ti4000a C CAUTION 1 Fill hopper (C) with prepared texture material. 2 Install nozzle. See Nozzle Selection Chart, page 28. 3 Open gun air valve (aa).
Startup / Démarrage / Opstarten K aa ti4303a ti4290a ti4657a WASTE ti4000a 4 Inspect 25 ft. material hose for kinks which could restrict fluid flow. 5 Follow System Priming, page 14. 4 Examiner le flexible de 25 ft. et éviter les nœuds qui pourraient réduire le débit du produit. 5 Suivre la procédure d’amorçage, page 14. 4 Kijk de 25-ft lange materiaalslang na op knikken die de doorstroming van het materiaal zouden kunnen beperken. 5 Volg de inspuitprocedure voor het systeem, zie blz. 14.
Spray Techniques / Techniques de pulvérisation / Spuittechnieken Spray Techniques / Techniques de pulvérisation / Spuittechnieken Nozzle Selection / Sélection des buses / Keuze van de spuitmond English Français Application Nozzle No.
Spray Techniques / Techniques de pulvérisation / Spuittechnieken System Adjustment / Réglage de l’appareil / Het systeem afstellen WARNING / MISE EN GARDE / WAARSCHUWING Read warnings, page 6. Lire les mises en garde, page 8. Lees de waarschuwingen op blz. 10. cc K aa aa ti4303a ti3999a K ti4004a cc aa ti4000a ti4303a ti3999a Fluid flow is controlled with the fluid flow regulator knob (K) and displayed on the gauge. 1 Open air valve (aa). 2 Test spray pattern on cardboard.
Spray Techniques / Techniques de pulvérisation / Spuittechnieken K aa CLOSED OPEN ti4304a ti4655a 4 To select correct nozzle for your applications, consider size of aggregate in material and coarseness of spray pattern. Remember the larger the nozzle, the larger the pattern. See Nozzle Selection, page 28. 5 Pour choisir la buse correspondant à vos applications, tenez compte de la texture du produit et de la finesse de la pulvérisation.
Spray Techniques / Techniques de pulvérisation / Spuittechnieken dd ti4006a Preventing Material Surge at Gun Trigger For Continuous Spraying • • • Allow system to release pressure before triggering gun. When you stop spraying, always depress trigger fully to allow system to build pressure. Empêcher une projection brutale au moment d’actionner le pistolet • • Engage trigger lock (dd) to hold trigger open and reduce fatigue.
Shutdown and Cleanup / Arrêt et nettoyage / Uitzetten en reinigen Shutdown and Cleanup / Arrêt et nettoyage / Uitzetten en reinigen CAUTION / ATTENTION / VOORZICHTIG English Français • • Before removing material hose relieve pressure following procedure on page 16 and remove material from hose. • To keep sprayer in good operating condition, • always clean it thoroughly and prepare it properly for storage. • If water freezes in sprayer, damage may occur.
Shutdown and Cleanup / Arrêt et nettoyage / Uitzetten en reinigen WARNING / MISE EN GARDE / WAARSCHUWING Read warnings, page 6. Lire les mises en garde, page 8. Lees de waarschuwingen op blz. 10. aa water L ti4301a ti4290a ti4009a ti4000a WASTE When you have finished spraying: 1 Drain remaining material into bucket until most of texture material is out of hopper. 2 Fill hopper with clean water. 3 Remove nozzle (L) from gun and allow water to flow through and out of gun. Flush until gun is clean.
Shutdown and Cleanup / Arrêt et nettoyage / Uitzetten en reinigen ti4740a ti4739a ti4741a ti4012a 5 Disconnect air line and material hose from gun. 6 Disconnect material hose from sprayer. 7 Insert sponge ball in material hose. 8 Reconnect material hose to sprayer. 5 Débrancher la tuyauterie d’air et le flexible de produit du pistolet. 6 Débrancher le flexible de produit du pulvérisateur. 7 Introduire la bille en mousse dans le flexible de produit.
Shutdown and Cleanup / Arrêt et nettoyage / Uitzetten en reinigen water ti4301a OIL ti4653a ti4652a ti4010a 9 Pour a couple gallons of clean water to hopper. 10 Place end of material hose in waste bucket. 11 Turn sprayer main power (A) ON. 12 Circulate water through sprayer until ball comes out of hose. 13 Retrieve and clean ball with clear water. 14 Finish cleaning all components. A soft brush may be used to help loosen any dried on material from surface.
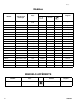
Maintenance / Maintenance / Onderhoud Maintenance / Maintenance / Onderhoud English Français Component Task Frequency Composant Tâche Fréquence Hoses Check for wear and/or damage Daily Flexibles Examiner les traces d’usure et/ou les dommages Entretien quotidien Drain system of all water After each use Purger l’appareil de l’eau résiduelle Après chaque utilisation Air and Material Hose Connections Add a few drops of light oil After each days use Branchements des flexibles d’air et de pr
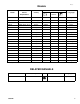
Technical Data Technical Data Maximum working fluid pressure Maximum working air pressure Material pressure operating range Motor/Compressor specifications Air delivery Capacitor start Power cord Hopper capacity Maximum deliver with texture material Dimensions Length Width Height Weight With hoses or gun Without hoses and gun Wetted parts Sound data Sound pressure level* Sound power level# Generator (minimum size requirement) Maximum external working air pressure (must use External Air Hookup Kit 287328 ON
Caractéristiques Techniques Caractéristiques Techniques Pression maximum de service produit Pression d’air de service maximum Plage de pression de service produit.
Technische gegevens Technische gegevens Maximum werkdruk materiaal Maximum werkdruk lucht Bedrijfsbereik materiaaldruk Motor/compressorspecificaties Luchtafgifte Condensatorstart Voedingskabel Inhoud vultrechter Maximum afgiftecapaciteit met structuurmateriaal Afmetingen Lengte Breedte Hoogte Gewicht Met slangen en pistool Zonder slangen en pistool Bevochtigde delen Geluidsgegevens Geluidsdrukniveau* Niveau geluidsvermogen# Generator (minimum vereiste) Maximale externe bedrijfsluchtdruk (ALLEEN gebruiken m
Notes / Remarques / Aantekeningen Notes / Remarques / Aantekeningen 40
Warranty / Garantie / Garantie Warranty / Garantie / Garantie Graco warrants all equipment referenced in this document which is manufactured by Graco and bearing its name to be free from defects in material and workmanship on the date of sale to the original purchaser for use. With the exception of any special, extended, or limited warranty published by Graco, Graco will, for a period of twelve months from the date of sale, repair or replace any part of the equipment determined by Graco to be defective.
Warranty / Garantie / Garantie TO PLACE AN ORDER, contact your Graco distributor, or call 1-800-690-2894 to identify the nearest distributor. All written and visual data contained in this document reflects the latest product information available at the time of publication. Graco reserves the right to make changes at any time without notice. This manuals contains English, French, and Dutch. MM 310624 Graco Headquarters: Minneapolis International Offices: Belgium, China, Japan, Korea GRACO INC. P.O.