OPERATION – UTILIZAÇÃO – FONCTIONNEMENT – FUNCIONAMIENTO GMax Sprayers 309408 3300 psi (228 bar, 22.8 MPa) Maximum Working Pressure Pressão máxima de trabalho de 3300 psi (228 bar, 22.8 MPa) Paression maximale de service 3300 lb/po 2 (228 bar, 22.8 MPa) Presión máxima de operación 3300 psi (228 bar, 22.8 MPa) GMax 3900 233700 – 233703 GMax 5900, GMax 5900HD 233705 – 233708, 233716, 233717 GMax 7900, GMax 7900 Roof Rig 233718 – 233721, 233740 All models not available in all countries.
WARNING Fire and explosion hazard: Solvent and paint fumes can ignite or explode. To help prevent a fire and explosion: Use only in an extremely well ventilated area. Eliminate all ignition sources; such as pilot lights, cigarettes and plastic drop cloths (static arc hazard). Do not plug or unplug power cords or turn lights on or off in spray area. Ground Sprayer, object being sprayed, paint and solvent pails. Hold gun firmly to side of grounded pail when triggering into pail.
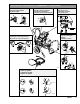
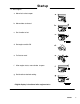
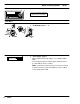
CONTROLS / CONTROLES / COMMANDES / CONTROLES On/Off Switch Aan/Uit Schakelaar Interrupteur Marche/Arrêt Ein-Aus-Schalter On/Off Switch Interruptor de ligar e desligar Interrupteur marche/arrêt Interruptor de encendido/apagado Engine Controls Controles do motor Commandes de moteur Controles del motor Drain Valve Válvula de drenagem Vidange Válvula de vaciado Pressure Control / Controle da pressão / Système de contrôle de la pression / Dispositivo de control de la presión 8695A Trigger Lock Fecho do gat
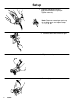
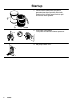
Setup 1. Connect appropriate Graco high-pressure hose to sprayer. Tighten securely. Note: Remove second gun port cap for multiple guns and repeat steps 1 – 4, 7, 8, 10 2. Connect other end of hose to gun. 3. Tighten securely. 4. Remove tip guard.
Setup 5. Install clean inlet strainer. 6. Fill throat packing nut with TSL to prevent premature packing wear. Do this each time you spray and store. Approximate Fill Level 7. Check engine oil level. Add SAE 10W–30 (summer) or 5W–20 (winter), if necessary. (cold) 8. Fill fuel tank. 9. Ground sprayer with grounding clamp.
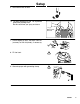
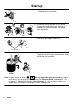
Startup 1. Place suction tube and drain tube in grounded metal pail partially filled with flushing fluid. Attach ground wire to pail and to true earth ground. PAINT FLUSH 2. Turn prime valve down. Turn pressure control to lowest pressure. 3. Set pump switch OFF.
Startup 4. Start engine a. Move fuel valve to open a. b. Move choke to closed b. c. Set throttle to fast c. d. Set engine switch ON d. e. Pull starter cord e. f. After engine starts, move choke to open g. Set throttle to desired setting f. g.
Startup 5. Set pump switch ON. – Pump/clutch is now active – 6. Increase pressure enough to start pump stroking and allow fluid to circulate for 15 seconds; turn pressure down, turn prime valve horizontal. 15 SEC 7. Take spray gun trigger safety OFF. ti2870a safety OFF 8. Hold gun against grounded metal flushing pail. Trigger gun and increase fluid pressure slowly until pump runs smoothly. FLUSH Note: Inspect fittings for leaks.
Startup 9. Place siphon tube in paint pail. PAINT 10. Trigger gun again into flushing fluid pail until paint appears. Assemble tip and guard, page 9. FLUSH SwitchTip and Guard Assembly 1. Engage trigger safety. safety ON 2. Insert SwitchTip . Insert seat and OneSeal . ti2871a seat SwitchTip OneSeal 3. Screw assembly onto gun. Hand tighten.
Digital Tracking System (DTS) Operation Close cover when spraying to protect from overspray Main Menu 1. Do Startup steps 1. – 3. PAINT FLUSH 2. Start engine, page 7. Sprayer Model momentarily displays, e. g., G5900 = GMax 5900 Pressure display appears. Dashes appear when pressure is less than 200 psi (14 bar, 1.4 MPa). Note: Information other than pressure can not be accessed if system pressure is greater than 200 psi (14 bar, 1.4 MPa). or if the pump switch is ON.
Digital Tracking System (DTS) 3. Short press DTS button to move to Job Gallons (or Liters x 10). Note: JOB displays briefly, then the number of gallons sprayed above 1000 psi (70 bar, 7 MPa). 4. Press and hold to reset to zero, or short press DTS button to move to Lifetime Gallons (or Liters x 10). Note: LIFE displays briefly, then the number of gallons sprayed above 1000 psi (70 bar, 7 MPa). 5. Short press DTS button to move to AutoClean Timer operation (Manual 309278).
WatchDog Pump Protection System Pump stops automatically when material pail is empty. To Activate: 1. Do Startup. Increase pressure to more than 2000 psi (140 bar, 14 MPa). Note: Instructions to automatically activate the WatchDog pump protection system every time you spray are on page 14. 2. Press and hold DTS button, release when ON is displayed. Note: GAL (or LITER) flashes while pump protection system is active.
Secondary Menu – Stored Data and WatchDog Pump Protection Modes 1. Do Startup steps 1. – 3. Pressure must be at zero. PAINT FLUSH 2. Start engine, page 7. Pressure display appears. 3. Simultaneously press DTS button and set pump on/off switch on. Sprayer model momentarily displays, e.g., G5900 = GMAX 5900. Resettable Hour Meter appears.
Secondary Menu – Stored Data and WatchDog Pump Protection Modes 4. Press and hold to reset to zero, or 5. Short press DTS button to move to Lifetime Hour Meter. 6. Short press DTS button to move to TOTAL Gallons (all pressures). 7. Press DTS button to move to stored error code. Press and hold DTS button to clear error code to E=00. See Manual 309409. 8. Short press DTS button to move to WatchDog pump protection options menu.
Secondary Menu – Stored Data and WatchDog Pump Protection Modes 9. Short press DTS button again to move to WatchDog MAN (manual) mode. 10. Press and hold to switch between MAN (standard) and AUTO mode. In AUTO mode, WatchDog pump protection is active once pressure is over 1500 psi (103 Bar, 10.3 MPa) 11. Short press to return to step 3. 12. Turn pump switch OFF at any time to exit stored data mode.
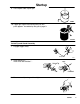
Spray Test Pattern 1. Trigger gun and spray test pattern. Slowly adjust pressure to eliminate heavy edges. Use smaller tip size if pressure adjustment can not eliminate heavy edges. heavy edges 2. Hold gun perpendicular, 10–12 in. (25–30 cm) from surface. Spray back and forth. Use strokes overlapped by 50%. Start gun movement before triggering gun and release trigger before stopping gun movement. Clearing Tip Clogs 1. Release trigger, put trigger safety ON. Rotate SwitchTip.
Cleanup Perform AutoClean procedure (Manual 309278) or follow conventional flushing procedure that follows: Pressure Relief 1. Set pump switch OFF. Turn engine OFF. Pressure Relief 2. Turn pressure to lowest setting. Trigger gun to relieve pressure. PAINT Pressure Relief 3. Turn prime valve down. 4. Remove guard and SwitchTip.
5. Unscrew bowl, remove filter. Assemble without filter. Clean filter. 6. Clean filter, guard and SwitchTip in flushing fluid. FLUSH 7. Remove siphon tube set from paint and place in flushing fluid. Use water for water base paint and mineral spirits for oil base paint.
8. Turn engine ON and start engine. Set pump switch ON. 9. Turn prime valve horizontal. 10. Hold gun against paint pail. Take trigger safety OFF. Trigger gun until flushing fluid appears. Turn pressure control up until motor begins to drive pump. PAINT 11. Move gun to flushing pail, hold gun against pail, trigger gun to thoroughly flush system. Release trigger and put trigger safety ON. FLUSH 12.
13. Raise siphon tube above flushing fluid and run sprayer for 15 to 30 seconds to drain fluid. Turn pump switch OFF. Turn engine OFF. PAINT FLUSH Caution: If flushing with water, do not leave water in sprayer. Flush again with mineral spirits, oil or Pump Armor and leave this protective coating in the sprayer to help prevent freezing or corrosion and increase sprayer life. 14. Make sure plastic center tube is tightened securely. Install filter bowl and filter. Hand tighten filter bowl.
DTS Error Codes 309409 Reference Repair Manual 309409 or 309411 or call your distributor for service Service 309408 21
Graco Warranty Graco warrants all equipment listed in this manual which is manufactured by Graco and bearing its name to be free from defects in material and workmanship on the date of sale by an authorized Graco distributor to the original purchaser for use. With the exception of any special extended or limited warranty published by Graco, Graco will, for a period of twelve months from the date of sale, repair or replace any part of the equipment determined by Graco to be defective.