
Instructions / Assembly
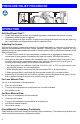
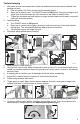


Table Of Contents

3
Texture Spraying
1. Wet inside of hose before each use to flush out sediment and prevent texture material from
packing out hose.
a. Pour one gallon (3.8 liters) of water into the material hopper.
b. Open gun air control valve. Turn ON/OFF switch to ON position. Aim gun into hopper and
trigger gun to circulate water for a few minutes to wet inside of material hose.
c. Trigger gun into waste pail until hopper no longer contains water and all water is removed
from hose and pump system.
2. System priming.
a. Turn ON/OFF switch to ON position.
b. Open gun air control valve slightly, allowing a small amount of air to flow with material
through gun. This automatically delivers material pressure and flow.
c. Aim gun into hopper and trigger the gun.
3. Fill hopper with prepared texture material.
4. Install nozzle or nozzle and disc.
5. Open gun air control valve. Make certain prime valve is closed. To avoid material pack-out in
needle, do not allow material to flow out of gun when air control valve is closed for a sustained
amount of time.
6. If material gets in needle or gun air passages, flush with water immediately.
7. Inspect 25 ft. material hose for kinks which could restrict fluid flow.
8. Follow mixing material instructions.
9. Trigger gun into a pail. When texture material appears at nozzle, move gun to hopper and
circulate until there is a solid stream of texture material.
10. For proper spray pattern and pump and gun adjustments, see Adjusting the System, page 2.
11. To achieve uniform spray pattern, adjust air control valve on gun. If you do not achieve the
desired pattern, change nozzles, see Adjusting the System, page 2.
1a
2a 2b 2c 3
1b 1c
ti28591a
74 5 9
ti28601a
ti28602a
11