
Instructions / Assembly
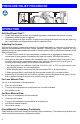
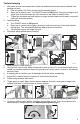

Table Of Contents

3A3482A Copyright 2016, Graco Inc. For patent information, see www.graco.com/patents.
Original Instructions. This manual contains English. MM 3A3482. Revision A, April 2016
Correct material mixture is essential for a successful project.
Drywall Compound
• Mix the material with water in a separate container before pouring it into hopper.
• Dry Mix: Carefully mix material and water according to manufacturer instructions.
• Premix: Follow manufacturers recommendations for mixing.
• Use Material Thickness Gauge to determine if mixture is thin enough to spray. Be sure gauge
is completely dry and clean every time it is used.
• The Material Thickness Gauge will only determine if the material is thin enough to pass through
the pump. For higher speed spraying, your mixture may need to be thinner.
• Agitate to mix, to a smooth, lump-free consistency.
• Check and thin material periodically. Material may thicken as it sits. Agitate periodically.
• After material is thoroughly mixed, gently set ball end of Material Thickness Gauge on surface
of mixture. Best results are obtained when ball sinks completely into the mixture in 6 to 10
seconds. Add more water if the ball does not sink completely into the mixture within 10 seconds
and try test again.
Other Materials
• If mixing is required, mix in a separate container before pouring it into hopper.
• Follow material manufacturers recommendations for thinning and mixing.
• Thickness gauge is not used with materials containing solids.
Once material is mixed pour material into the sprayer hopper.
Step1: Open gun air valve. Step 2: Turn ON/OFF switch to ON position. Step 3: Close gun air valve.
Step 4: Trigger gun into bucket until most of texture mix is pumped out. Step 5: Fill material hopper
with clean water.
Step 6: Spray inside material hopper to circulate water through gun and hose. While circulating water,
use gun to clean material hopper. Step 7: Partially open gun air valve to use air to achieve better
cleaning. Step 8: Spray water into waste bucket to empty material hopper. Step 9: Turn ON/OFF
switch to OFF position. Step 10: Open gun air valve and perform Pressure Relief Procedure.
Step 11: Loosen bottom fitting on hopper. Step 12: Lift hopper straight up, off the unit. Step 13: Plug
opening on bottom of hopper with your hand. Take hopper to cleaning area for cleaning. Step 14: After
cleaning hopper, position it on sprayer handle first. Step 15: Hand tighten fitting. Step 16: Always clean
nozzles with a soft brush after spraying. Nozzles may require replacement depending on abrasiveness
of texture.
MIXING MATERIAL
CLEANUP
1 2 3 4 5
ti28952a
6 7
8 9 10
ti28593a
11
13 1412 15
ti28594a