
Use and Care Manual


SETUP
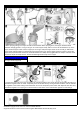
1: When spraying ceilings, the hopper should be tilted forward. When spraying floors, the hopper should be tilted
backward. 2: Apply grease to o-ring on the gun. 3: Loosen hopper clamp, slide it over the rib and toward the top of the
hopper. Position hopper outlet over the hopper port on the gun and push hopper down as far as it will go. Slide down
hopper clamp and hand tighten. 4: Attach tube from hopper barb to gun barb. 5: Apply grease to hopper o-ring. 6: Fill
hopper with prepared texture material. 7: Assemble lid with four clamps. Evenly tighten all four clamps. If there is a leak
from the lid, adjust the clamp tension. The lid should be tightened evenly on the hopper.
NOTICE
Over-tightening the lid may damage
the hopper and/or hopper lid.
OPERATION
1: Connect one end of air hose to the compressor air outlet fitting and the other end to the gun air inlet fitting. 2: Pull up on
material flow regulator knob to unlock. Completely close the air flow valve by turning the knob clockwise; turn the material
flow regulator to the lowest setting counterclockwise. 3: Turn air compressor power switch ON. Adjust air flow valve and
material flow regulator on hopper gun for desired texture. Push down on the material flow regulator to lock settings.
SPRAY PATTERNS (see page 19 of the Operation manual for nozzle & tip recommendations)
Nozzle Pattern
WideTex Pattern
3A5845B Copyright 2018, Graco Inc. Source manual 3A5725.
Original Instructions. This manual contains English. MM 3A5845. Revision B, May 2018