
Replacement Part List
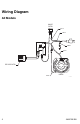
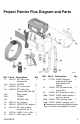
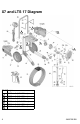
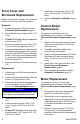
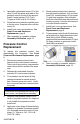
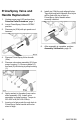
Table Of Contents

3A5572B EN 9
4. Assemble replacement motor (5) to the
drive (2) with the black wire lead on the
pressure control (8) side of the sprayer.
Install 2 motor screws (T-20 Torx).
Torque to 26-32 in-lb (2.9-3.6 N•m).
5. Route the motor leads through the ports
in the fan cover. Snap the cover onto the
motor (5).
6. Install front cover and enclosure. See
Front Cover and Enclosure
Replacement, page 8.
7. After assembly is complete, perform
Assembly Verification, page 13
Pressure Control
Replacement
To replace the pressure control, first
disassemble the enclosure. See Front
Cover and Enclosure Replacement, page
8.
1. Disconnect pressure control wire
harness from control board connector.
Take note of wire routing; new pressure
control wires will be rerouted the same
way.
2. Release tab underneath function
indicator (31) and remove indicator.
3. Turn pressure control knob (8) fully
counterclockwise to expose wrench
flats. Remove pressure control. Verify
the o-ring seal has been removed from
the pump.
4. Examine new pressure control (8) to
verify o-ring seal is in place. If o-ring seal
is not installed on pressure control,
install seal.
5. Apply one or two drops of thread locking
adhesive to threads of pressure control
(8). Assembly pressure control (8) into
pump (1). Torque to 140 - 160 in-lb
(15.8-18.1 N•m).
6. Route pressure control wire harness
through function indicator (31) and front
cover (16). Install indicator (31) on pump
(1) and snap together. Align indicator
and front cover while they are positioned
loosely on pump. Connect wire harness
to control board connector.
7. Install front cover and enclosure. See
Front Cover and Enclosure
Replacement, page 8.
8. Turn pressure control knob (8) clockwise
as far as it will go. Apply pressure control
label (8b) to knob. When properly
positioned the function indicator (31) and
Hi Spray position on pressure control
label (8b) are aligned.
9. After assembly is complete, perform
Assembly Verification, page 13.
NOTICE
Do not pinch wires between enclosure, front
cover, motor, and pump/drive assembly.