Instructions Important Safety Instructions. Read all warnings and instructions in this manual. Save these instructions. Direct Drive Pressure Washer 309286K - For high pressure water cleaning Models: Maximum Working Pressure Operating Pressure Model Horse Power and Motor Brand 6.5 hp Briggs & Stratton 2700 18.6 186 3000 20.6 206 2730B 2730H 6.5 hp Honda 2700 18.6 186 3000 20.6 206 3030 9 hp Honda 3000 20.6 206 3300 22.75 227.5 3340 11 hp Honda 3300 22.75 227.5 3600 24.
Warnings Warnings WARNING FIRE AND EXPLOSION HAZARD Flammable fumes, such as solvent and paint fumes, in work area can ignite or explode. To help prevent fire and explosion: • Use equipment only in well ventilated area. • Do not fill fuel tank while engine is running or hot; shut off engine and let it cool. Fuel is flammable and can ignite or explode if spilled on hot surface.
Warnings WARNING TOXIC FLUID OR FUMES HAZARD Toxic fluids or fumes can cause serious injury or death if splashed in the eyes or on skin, inhaled, or swallowed. • Read MSDS’s to know the specific hazards of the fluids you are using. • Store hazardous fluid in approved containers, and dispose of it according to applicable guidelines.
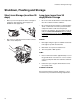
Component Identification Component Identification A D C B M E L K F A J H G Key: A B C D E F G 4 Hose Hose Rack Gun Holder Gun and Wand Tip Storage Engine Oil Fill Water Pump Oil Fill H J K L M Oil Level Site Gage Pressure Unloader Adjustment Knob Garden Hose Connection High Pressure Hose Connection Engine ON/OFF Switch 309286K
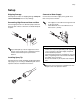
Setup Setup Shipping Damage Connect to Water Supply Check pressure washer for shipping damage. Notify the carrier immediately if there is any damage. Connect hose from water supply to the garden hose inlet on the pressure washer. Connecting High-Pressure Hose and Gun • Connect high-pressure hose between pump outlet and gun inlet. Both of these connections are made with quick couplers. • The supply hose should not be longer than 50 ft (15 m) in length.
Operation Operation Pressure Relief Procedure 4. Turn off water supply and disconnect pressure washer from water. Follow this procedure when you stop spraying and before cleaning, checking, servicing or transporting equipment. ti5425a 1. Engage trigger lock. 5. Unlock trigger lock. Trigger gun to relieve pressure. Engage trigger lock. TI A 2. Turn pressure washer OFF.
Operation Startup • Always engage the gun trigger safety latch when you stop spraying. This reduces the risk of fluid injection or splashing in eyes or on skin if the gun is bumped or triggered accidentally. Be sure latch is pushed fully down or it will not prevent the gun from being triggered. 3. Check oil level in pump. It should be half way up the sight glass, located on the front of the pump. Add pump oil as necessary. The system is equipped with a thermal overload to help prevent severe damage.
Operation 7. Move switch to ON position and set throttle to HALF throttle position. • • OFF ON • ti5434a • • • • CAUTION Do not allow pressure washer to idle for more than 10 minutes. This causes the recirculating water to overheat and can seriously damage the pump. Turn off pressure washer if it will not be spraying at least every 10 minutes. If heated inlet water is used, reduce this time more. Do not operate pressure washer with inlet water screen removed.
Operation 3. Install black (large orifice) chemical tip (Installing and Changing Spray Tips, page 9). The large orifice of the chemical tip causes a drop in pressure that actuates the chemical injector. Changing back to a small orifice spray tip, deactivates the chemical injector and produces high pressure for rinsing. The chemical filter can be left in the chemical container during high pressure spraying. To regulate the flow rate of the chemical, turn the chemical adjustment knob on the injector.
Shutdown, Flushing and Storage Shutdown, Flushing and Storage Short-term Storage (less than 30 days) Long-term (more than 30 days)/Winter Storage • • Do not store unit outside where it can be exposed to rain, dirt or adverse weather conditions. • Do not expose pressure washer to freezing temperatures or allow water to freeze in pressure washer components which could cause the pump to lock-up. If this happens, allow the pump to thaw naturally in a WARM ENVIRONMENT.
Maintenance Chart Maintenance Chart Follow Pressure Relief Procedure, page 6. Interval Daily What to do • Clean water inlet screen and filter. • Check engine and pump oil levels. Fill as necessary. • Check gasoline level. Fill as necessary. After first 5 hours of Change engine break-in oil. Drain oil when warm. Use SAE 30 or10W-30 detergent oil. operation After every 25 hours Clean and remove air cleaner foam. Wash with water and detergent. Dry thoroughly.
Troubleshooting Troubleshooting T Problem Engine will not start or it is hard to start Cause Solution No gasoline in fuel tank or carburetor Fill tank with gasoline, open fuel shutoff valve. Check fuel line and carburetor. Low oil Add oil to proper level. Engine ON/OFF switch in OFF position Turn switch to ON position. Water in fuel or old fuel Drain fuel tank and carburetor. Use new fuel and make sure spark plug is dry. Engine flooded or improperly choked Open choke.
Troubleshooting Problem Cause Packings are failing frequently or pre- Scored, damaged, or worn plungers maturely Abrasive material in fluid being pumped Inlet water temperature too high Solution Install new plungers. Install proper filtration on pump inlet plumbing. Check water temperatures. It should not exceed 160°F (70°C). Pump running too long without spray- Never run pump more than 10 mining utes without spraying.
Pump Service: 2730B/2730H Model Pressure Washers Pump Service: 2730B/2730H Model Pressure Washers Repair kits are available. See the Parts List, page 18 (2730B) or page 20 (2830H). For the best results, use all parts in kits. Servicing Plungers • • The following metric wrenches are needed: 5mm, 13mm, and 22mm. Drain and refill pump after 50 hours of operation. Follow Pressure Relief Procedure, page 6. Valves For a set of six valves, order Valve Assembly Kit 804402. 1.
Pump Service: 2730B/2730H Model Pressure Washers Uneven tightening could cause the manifold to bind or jam. Servicing V-Packings 1. Remove manifold as described in Pumping Section, page 14. 2. Carefully pull packing retainer from manifold. Examine o-ring. Replace o-ring if cut or damaged. 3. Remove V-packing and head ring. Pull out retainer ring. Remove second V-packing and second head ring. 4. Inspect all parts and replace as necessary. 5. Thoroughly clean packing cavities and inspect for damage.
Pump Service: 3030, 3340, and 3540 Model Pressure Washers Pump Service: 3030, 3340, and 3540 Model Pressure Washers Repair kits are available. See the Parts List, page 22. For the best results, use all parts in kits. 3. Carefully examine each plunger for any scoring or cracking. Replace as necessary. Servicing Plungers Follow Pressure Relief Procedure, page 6. • • The following metric wrenches are needed: 6mm, 13mm, and 27mm. Drain and refill pump after 50 hours of operation.
Pump Service: 3030, 3340, and 3540 Model Pressure Washers 8. Install capscrews and washers finger tight. Torque screws to 8.8 ft-lb (12 N◆m) following the tightening pattern in the following figure. 3. Remove V-packing and head ring. Pull out retainer ring. Remove second V-packing and second head ring. 4. Inspect all parts and replace as necessary. 5 1 4 7 5. Thoroughly clean packing cavities and inspect for damage. 8 3 2 6 6. Lightly grease packing cavities.
Parts Parts 244389, Series A - 2730B with Briggs and Stratton 6.
Parts 244389, Series A - 2730B with Briggs and Stratton 6.5 HP Motor Ref. No. 1 2 3 4 5 7 8 9 10 11 12 13 15 16 17 18 19 Part No. Description Qty. 116299 ENGINE, gasoline, 6.
Parts Parts 244390, Series A - 2730H with Honda 6.
Parts 244390, Series A - 2730H with Honda 6.5 HP Motor Ref. No. 1 2 3 4 5 7 8 9 10 11 12 13 15 16 17 18 19 20 Part No. 116298 244749 244767 244784 244783 804511 805535 805536 805537 805538 244768 805634 804275 101242 110837 111040 197428 116411 801546 309286K Description Qty. ENGINE, gasoline, 6.
Parts Parts 244391, Series A - 3030 with Honda 9 HP Motor 244392, Series A - 3340 with Honda 11 HP Motor 244393, Series A - 3340 with Honda 13 HP Motor # TI C ,QWHUQDO UHSODFHPHQW SDUWV # Fastening bolts supplied with pump. Not sold separately.
Sound Data 244391, Series A - 3030 Honda 9 HP Motor† 244392, Series A - 3340 Honda 11 HP Motor★ 244393, Series A - 3540 Honda 13 HP Motor✓ Ref. No. Part No. 1 803900† 803158★ 2 3 4 5 7 114703✓ 244750† 244751★ 244752✓ 244767 12 13 244784 244783 804511† 116478★✓ 805539†★ 805543✓ 805540★ 805544✓ 805541†★ 805545✓ 805542†★ 805546✓ 244768†★ 800708✓ 805634 804275 15 16 17 18 101242 110837 111040 197428 8 9 10 11 Description Qty.
Graco Standard Warranty Graco Standard Warranty Graco warrants all equipment referenced in this document which is manufactured by Graco and bearing its name to be free from defects in material and workmanship on the date of sale to the original purchaser for use. With the exception of any special, extended, or limited warranty published by Graco, Graco will, for a period of twelve months from the date of sale, repair or replace any part of the equipment determined by Graco to be defective.