
User's Manual


308224 17
Flushing
How to Flush the System
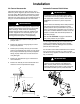
WARNING
If your system is equipped with heaters, always
shut off the main power to the heaters before
flushing. Circulate the fluid through the system for
at least 10 minutes to cool the fluid and the heater.
This reduces the risk of serious injury from burns.
NOTE: For the first time flushing, we recommend
using mineral spirits solvent (also called white spirit) to
flush out the oil. Then flush again using a solvent that
is compatible with the fluid you will be dispensing.
However, be sure the mineral spirits solvent is compat-
ible with the material you will be pumping. If it is not,
check with your fluid supplier to determine an
appropriate solvent for flushing out the light oil.
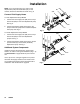
For flushing only . . .
NOTE: The proportioning pump is not operated during
flushing. The solvent from the feed pumps will flush the
proportioning pump displacement pumps.
1. Place each feed pump intake into a separate 5
gallon grounded pail, containing about 3 gallons
(12 liters) of solvent.
To flush or prime . . .
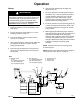
2. Be sure both of the fluid shutoff valves (Q1) are
open. See Fig. 14.
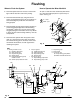
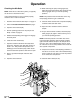
3. Place a container under the drain valves (P1,P2)
of the mixer manifold (N). See Fig. 13.
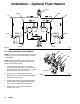
4. Be sure the feed pump air regulators (E1,E2) are
at minimum pressure. See Fig. 14.
5. Open the main master air valve (A5). See Fig. 14.
6. Open the hardener pump master air valve (A1).
See Fig. 14.
7. Slowly increase the air regulator (E1) setting until
the pump is running slowly.
8. Open the hardener side drain valve (P1). Open the
mixer manifold handle (KK). See Fig. 13.
9. When the hardener lines are flushed, close the
mixer manifold handle and close the drain valve
(P1). Close the air valve (A1). See Fig. 14.
10. Repeat Steps 6 to 9 for the resin feed pump. The
resin sides uses these parts: regulator (E2), air
valve (A2), drain valve (P2).
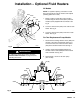
To flush the solvent valves . . .
11. Open the hardener solvent flush valve (N1) on the
mixer manifold (N). See Fig. 13.
a. Be sure the solvent pump air regulator (E4) is
at minimum pressure. See Fig. 14.
b. Open the solvent pump main master air valve
(A6) and then open the pump air valve (A4).
See Fig. 14.
c. Release the dispensing valve safety latch.
Hold the dispensing valve firmly against a
grounded pail and trigger it while slowly
opening the solvent pump air regulator (E4).
Operate the pump slowly until the dispense
line is flushed. Release the dispensing valve
trigger and engage its safety latch. Close the
hardener solvent flush valve (N1).
d. Open the resin solvent flush valve (N2) and
repeat Step c. See Fig. 13.
e. Close the solvent line shutoff valve (Q2). See
Fig. 14.
CAUTION
Always close the solvent line fluid shutoff valve (Q2)
after the flushing procedure has been completed.
This will prevent the other fluids from leaking into the
flushing line.
If this is a first time flush . . .
12. Repeat the flushing procedure using a solvent
compatible with the fluid you are going to
dispense.
When you are done flushing . . .
13. Remove the solvent supply from the feed pumps.
Operate the pumps slowly to push all the solvent
out of the lines, then stop the pumps.
If you are not going to use the system . . .
14. Close all air regulators, master air valves and fluid
shutoff valves. Follow the Pressure Relief Proce-
dure on page 21.
WARNING
Always close the air valve (A4) to the solvent pump
before opening the fluid drain valves (P2) to relieve
system pressure. This will reduce the risk of exces-
sive pressure buildup in the opposite component
hose and fittings.