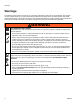
Instructions Single Acting and Double Acting Paint Spray Guns for RoadLazer™ RoadPak™ Line Striping System 308613E ENG - For the application of road marking paints and coatings - For professional use only - Model: 238377 (Single-acting gun) Model: 24G980 (Double-acting gun) Maximum Working Pressure 3000 psi (21 MPa, 210 bar) Important Safety Instructions Read all warnings and instructions in this manual. Save these instructions.
Warnings Warnings The following warnings are for the setup, use, grounding, maintenance, and repair of this equipment. The exclamation point symbol alerts you to a general warning and the hazard symbols refer to procedure-specific risks. When these symbols appear in the body of this manual, refer back to these Warnings. Product-specific hazard symbols and warnings not covered in this section may appear throughout the body of this manual where applicable.
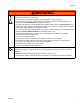
Warnings WARNING WARNING EQUIPMENT MISUSE HAZARD Misuse can cause death or serious injury. • Do not operate the unit when fatigued or under the influence of drugs or alcohol. • Do not exceed the maximum working pressure or temperature rating of the lowest rated system component. See Technical Data in all equipment manuals. • Use fluids and solvents that are compatible with equipment wetted parts. See Technical Data in all equipment manuals. Read fluid and solvent manufacturer’s warnings.
Installation Installation Connect Fluid Lines Accessories are available from Graco. Be sure all accessories are properly sized to withstand the pressures in the system. Mount Valve Mount the valve on a 0.50 in. (12.7 mm) diameter rod on a mounting fixture or a dispensing machine. The paint gun has a clamping set screw (6) for mounting. 6 ti16343a ti16341a Connect the Air Lines Connect a grounded fluid line from the pump to the fluid adapter of the paint spray gun.
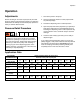
Operation Operation Adjustments 1. Shut off the power to the pump. Set the actuating air to at least 75 psi (5.2 bar) and start the pump. Set the pump speed and pressure to obtain the desired flow rate. Always use the lowest pump speed necessary to achieve desired results. 2. Close the bleed-type master air valve (required with air-powered pumps). 3. Actuate the dispensing valve to relieve pressure. 4.
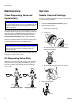
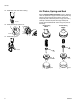
Maintenance Maintenance Service Clean Dispensing Valve and System Daily Needle, Seat and Packings To clean or replace the needle, its seat or packings (16, 17, 18), proceed as follows: NOTICE Be sure that the solvent you use is compatible with the fluid being dispensed to avoid clogging the fluid passages in the valve. An important part of the care and maintenance of your automatic dispensing valve is proper flushing.
Service 4. Use an open-end wrench to remove valve seat from valve housing. 8. Clean all parts. ti16194a 9. Lubricate and install gun needle into valve body. ti16345a 5. Remove gun needle from valve body. ti16349a 10. Install packings (16, 17, 18, 20) on gun needle. 16 18 ti16347a 6. Remove packing nut from the valve body. 17 20 ti16350a 11. Install packing nut and hand-tighten into valve body. ti16346a 7. Remove packings (16, 17, 18, 20) from valve body.
Service 12. Install seat valve into valve housing. ti16352a 13. Install valve body. Tighten nut. Air Piston, Spring and Seal Perform Pressure Relief Procedure, page 5. Remove valve as explained on page 6. Remove air cylinder cap, take out spring and pull out the piston. Clean and inspect all parts. Check the piston o-rings (see note 1) carefully. Lubricate all parts with a light waterproof grease and reassemble with valve using new parts as necessary.
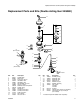
Replacement Parts and Kits (Double Acting Gun 24G980) Replacement Parts and Kits (Double Acting Gun 24G980) 24 8 9 25 11 10 12 6 13 5 15 27 (Not included) 23 14 4 19 3 20 2 26 (Not included) 16 18 17 18 1 ti16354a Ref.
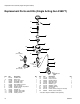
Replacement Parts and Kits (Single Acting Gun 238377) Replacement Parts and Kits (Single Acting Gun 238377) 7 21 22 8 9 11 10 12 13 6 15 5 28 (Not included) 14 4 19 18 3 26 20 16 17 2 (Not included) 1 5953b Ref.
Troubleshooting Troubleshooting Problem Cause Solution Uneven spray pattern Fluid pressure too low Increased pressure to pump, or adjust fluid pressure regulator Spray gun will not stop spraying Fluid pressure too high Reduce pressure to pump, or adjust fluid pressure regulator Fluid needle binding Clean, repair Piston packing binding Repair Obstructed or worn needle seat Clean or replace Pump not operating Refer to separate pump manual Fluid line clogged Clear Fluid valve closed Open
Graco Standard Warranty Graco warrants all equipment referenced in this document which is manufactured by Graco and bearing its name to be free from defects in material and workmanship on the date of sale to the original purchaser for use. With the exception of any special, extended, or limited warranty published by Graco, Graco will, for a period of twelve months from the date of sale, repair or replace any part of the equipment determined by Graco to be defective.