
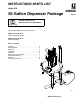
User's Manual


6 308666
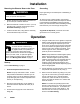
Installation
Mounting the Elevator Base to the Floor
You must mount the elevator base to the floor
before you operate this equipment.
WARNING
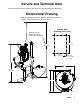
1. Position the elevator where there is at least 9 feet
(2.75 meters) of overhead clearance.
2. Mark and drill holes in the floor for 0.5-in. (13 mm)
mounting bolts. See the mounting layout in the
Dimensional Drawing on page 7.
3. Level the elevator base, using shims if necessary,
and bolt the base firmly to the floor.
Grounding
Proper grounding is an essential part of maintaining a
safe system.
To reduce the risk of static sparking, the mounting
cover and all electrically conductive objects or devices
in the dispensing area must be properly grounded.
Check your local electrical code for detailed grounding
instructions for your area and type of equipment.
To ground the dispenser, connect the end of the
ground wire to a true earth ground.
Operation
WARNING
MOVING PARTS HAZARD
To reduce the risk of serious injury,
including cuts, amputation of fingers by
the agitator blades, and splashing in
the eyes or on the skin, always shut off the
agitator (disconnect the air line from the agitator)
before you raise, check, or repair the agitator.
Never operate the agitator when the elevator is
raised. See Moving Parts Hazard on page 3.
Startup
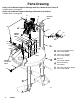
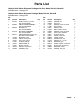
See the Parts Drawing on page 4.
1. Flush the dispenser before first use.
NOTE: The pump was tested in water . To elimi-
nate possible contamination of the fluid you are
pumping, before you use the dispenser, flush the
pump thoroughly with a solvent compatible to the
solvent you are dispensing.
2. Ensure that the needle valve on the agitator is
closed and that the dispenser ball valve (19) is
closed.
3. Connect the air supply line to the male air line
fitting (22).
4. Using the needle valve on the agitator to adjust the
agitator speed, gradually increase the speed until
you can see (through the inspection port in the
drum cover) movement in the surface of the liquid,
but do not increase the agitator speed enough to
create a vortex in the surface of the liquid. If the
surface begins to vortex, decrease the agitator
speed to prevent air entrainment.
NOTE: Always maintain moderate agitator speed,
which is approximately 50 rpm of the agitator
blades. Excessive agitator speed may cause
vibration, foaming of fluid, and increased wear on
parts. Always agitate fluid thoroughly before
supplying it to the dispensing equipment, and
continue agitating fluid while the dispensing equip-
ment is being supplied.
5. Use the regulator (10) and ball valve (19) to control
the pressure and operation of the pump (1).
6. Raise or lower the elevator by pulling out or push-
ing in the air control valve (a push-pull handle) on
the rim of the drum cover. Normal operation
requires only a few seconds for air pressure to
build up and raise the elevator or to exhaust and
lower the elevator.
NOTE: To increase the operating speed of the
elevator, loosen the hex nut on the restrictor valve,
and turn the valve needle out. To decrease the
operating speed, turn the valve needle in. The
restrictor valve is on the top of the elevator, as
shown in the Parts Drawing.