Instructions Low Overspray CleanShot™ Valve Model 287727 For use on the Graco Low Overspray Kit. Includes RAC® 5 321 SwitchTip™ and RAC 5 HandTite™ Guard. 3600 psi (25 MPa, 248 bar) Maximum Working Pressure Important Safety Instructions Read all warnings and instructions in this manual. Save these instructions. WL D Graco Inc. P.O. Box 1441 Minneapolis, MN 55440-1441 Copyright 2005, Graco Inc. is registered to I.S.
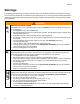
Warnings Warnings The following general warnings are related to the safe setup, use, grounding, maintenance and repair of this equipment. In the text of this manual, the exclamation point symbol alerts you to a warning and the hazard symbol refers to specific risks. Refer back to these General Warning pages. Additional procedure-specific warnings will be included where applicable. WARNING FIRE AND EXPLOSION HAZARD Flammable fumes, such as solvent and paint fumes, in work area can ignite or explode.
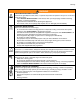
Warnings WARNING PRESSURIZED EQUIPMENT HAZARD Fluid from the gun/dispense valve, leaks, or ruptured components can splash in the eyes or on skin and cause serious injury. • Follow Pressure Relief Procedure in this manual, when you stop spraying and before cleaning, checking, or servicing equipment. • Tighten all fluid connections before operating the equipment. • Check hoses, tubes, and couplings daily. Replace worn or damaged parts immediately.
Pressure Relief Procedure Pressure Relief Procedure WARNING Follow Pressure Relief Procedure when you stop spraying and before cleaning, checking, servicing, or transporting equipment. Read warnings. 1. Engage trigger lock. 2. Close the bleed-type master air valve. 6. Open all fluid drain valves in the system, having a waste container ready to catch drainage. Leave drain valve(s) open until you are ready to spray again. 7.
Installation Installation WARNING To reduce the risk of serious bodily injury from fluid injection or splashing in the eyes or on the skin, stop using the nozzle immediately if it starts to leak or cannot be turned easily. Installing the Tip and Guard (Fig. 1 and Fig. 2) CAUTION To avoid damage to the o-ring in the swivel: • Relieve fluid pressure before rotating the swivel. • Do not soak the entire swivel in solvent. Flush and Spray WL D WL D Fig.
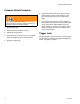
Parts Parts CleanShot Repair Kit 244162 (31) Swivel Repair Kit 244363 (35)† Valve Body Kit 245687 (36)*† A 4ORQUE FT LB B C D E A D C F B G H I 4ORQUE IN LB J 4ORQUE FT LB K TI B * 36 Valve Body Kit must be purchased separately † Series A and B 6 311103C
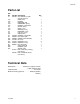
Parts List Parts List Ref. No. 31 31a 31b 31c 31d 31e 31f 31g 31h 31i 31j 31k 33 35 35a 35b 35c 35d 36 36a 36b 36c Part No.
Graco Standard Warranty Graco warrants all equipment referenced in this document which is manufactured by Graco and bearing its name to be free from defects in material and workmanship on the date of sale to the original purchaser for use. With the exception of any special, extended, or limited warranty published by Graco, Graco will, for a period of twelve months from the date of sale, repair or replace any part of the equipment determined by Graco to be defective.