
User's Manual

Troubleshooting
3A0232R 29
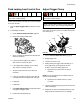
Fluid Leaking from Front of Gun
Perform this procedure to find the source of the leakage
and to stop the leak.
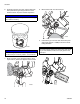
1. Perform Adjust Trigger Clamp to attempt to fix the
leak.
2. If the leakage still exists:
a. Follow Pressure Relief Procedure, page 20.
b. Remove the leaking needle valve.
c. Verify no obstruction between the ball and seat.
Clean as necessary.
d. If the resin side is leaking, use a 9/64 in.
allen-wrench to remove the seat.
e. If the catalyst side is leaking, use a 0.093 in.
allen wrench to remove the seat.
f. Verify the seat surface is free of wear and
scratches.
g. If wear or scratches are found on the seat, dis-
card defective seat and replace with new seat.
h. Install seat.
i. Install valve.
j. See Adjust Trigger Clamp on page 29 to install
and adjust the trigger clamp.
k. Install front head assembly (F).
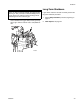
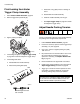
Adjust Trigger Clamp
Perform this procedure if there is fluid leakage from the
front of the gun or if the gun is out of phase. This proce-
dure. See F
IG. 10.
1. Perform Pressure Relief Procedure, page 20.
2. Engage trigger lock.
3. Loosen four screws (113).
4. While pressing the trigger clamp assembly (111)
firmly against the gun body, tighten the four
screws (113) in the following sequence:
a. Tighten the two inside screws to 25 in-lb
(2.8 N•m).
NOTE: Do not overtighten the two outside screws as
this may cause leakage.
b. Tighten the two outside screws to 10 in-lb
(1.1 N•m).
5. Loosen front head locking ring (C) then remove front
head assembly (F).
6. Pressurize the resin and catalyst fluid lines to oper-
ating pressures and verify there is no leakage.
To prevent skin injection, never use a gun that has a
resin and/or catalyst leakage.
ti17903a
To prevent skin injection, never use a gun that has a
resin and/or catalyst leakage.
NOTICE
Failure to perform this procedure correctly and when
required can result in poor mixing and fluid leaking.
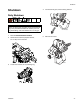
F
IG. 10: External Mix shown
113
111
216
D
115,
215
F