
User's Manual
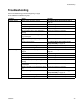

Troubleshooting
30 3A0232R
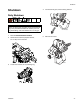
Fluid Leaking from Under
Trigger Clamp Assembly
1. Follow Pressure Relief Procedure, page 20.
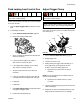
2. Remove trigger clamp assembly (A).
3. Tighten packing nut (906).
4. If the leakage stopped, see Adjust Trigger Clamp
on page 29 to install and adjust the trigger clamp.
5. If the leakage still exists:
a. Disassemble the needle assembly.
b. Discard the packing disk (904).
c. Discard the o-ring (909) if wear or damage is
found.
d. Reassemble the needle assembly.
e. Install the needle assembly into the gun.
f. See Adjust Trigger Clamp on page 29 to install
and adjust the trigger clamp.
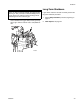
Adjust Needle Packing Tension
If there is a fluid leak at the rear of the needle assembly,
the packings can be tightened to stop the leak.
1. Follow Pressure Relief Procedure, page 20.
2. Loosen four screws (113) then remove trigger clamp
assembly (111). See page 38.
3. Use 7/16 in. wrench to tighten packing nut (906)
1/8th of a turn.
4. Re-pressurize and re-check for leaks in rear of nee-
dle. If leak remains, packings may need to be
replaced. If necessary, see Replace Needle Pack-
ing on page 37.
5. Ensure needle flats are aligned with one another.
6. Install trigger clamp assembly on gun then perform
Adjust Trigger Clamp procedure on page 29.
7. Trigger gun to check for smooth operation of mate-
rial needles. If material needles do not operate
smoothly, packings may need to be replaced.
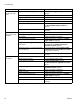
A
ti17903a
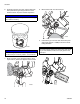
906
901
909
908
907
902
903
904
905
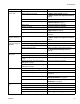
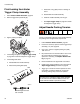
ti16592a
Beveled edge must face
rear of needle
NOTICE
Be careful not to overtighten trigger clamp assembly
as this will cause the material needles to bind and
cause material needles to operate incorrectly.