
User's Manual
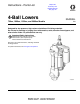


Repair
3A0539L 9
Repair
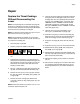
Replace the Throat Packings
Without Disconnecting the
Lower
NOTE: Throat packing kits are available. See page 28.
Kit parts are marked with a symbol, for example (19†).
For best results, install the TSL Pump Repair Kit 24F617
each time the throat packings are changed.
NOTE: To replace the throat packings as part of a com-
plete service of the lower, see page 11.
NOTE: Tool Kit 24F494 is available as an accessory.
The kit includes two wrenches for use with the wet-cup
(41) and throat cartridge (40).
1. Flush the pump, if possible.
2. Stop the pump at the middle of its stroke.
3. Relieve the pressure. See your separate pump man-
ual.
4. Following the instructions in your separate pump
manual, remove the 2-piece shield covering the cou-
pling assembly. Unscrew the coupling nut from the
motor shaft. Lift the motor shaft and remove the
coupling nut and collars.
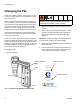
5. See F
IG. 4. Remove the collar (50) and screws (51),
cap (49), and manifold and bottle assembly (48).
6. Remove the wet-cup (41) and o-ring (42). Remove
the TSL pump piston seal (46◆), spring (45◆), and
o-rings (47◆).
7. Remove the throat cartridge (40). Remove the
o-ring (35), glands (19, 26), packings (20, 25), and
spring (43).
NOTE: Inspect the surface of the piston rod (17). If it is
scratched, replace the piston rod.
8. Lubricate the throat packings and glands. Install the
spring (43) and one male gland (19†) in the throat
cartridge (40), then five v-packings with the lips fac-
ing down: one UHMWPE (20†), one leather (25†),
UHMWPE, leather, UHMWPE. Install the female
gland (26†). Install three v-packings with the lips
facing up: UHMWPE, leather, UHMWPE. Install the
other male gland (19†).
9. Lubricate the o-ring (42†) and install it on the
wet-cup (41). Install the wet-cup finger-tight.
10. Install the o-ring (35†) on the throat cartridge (40).
Apply lubricant to the throat cartridge threads then
screw the cartridge into the outlet housing (16).
11. Torque the cartridge (40) to 95-100 ft-lb (129-135
N•m).
12. Torque the wet-cup (41) to 70-75 ft-lb (95-102 N•m).
13. Reassemble the spring (45◆), TSL pump piston
seal (46◆), and o-rings (47◆).
14. Reassemble the manifold and bottle assembly (48),
cap (49), collar (50) and screws (51). Torque the cap
(49) to 25-30 ft-lb (34-40 N•m).
15. Reinstall the coupling nut and collars on the piston
rod (17).
16. Reconnect the coupling nut to the motor shaft. See
your separate pump assembly manual for correct
torque specifications for your model. Reinstall the
shield.