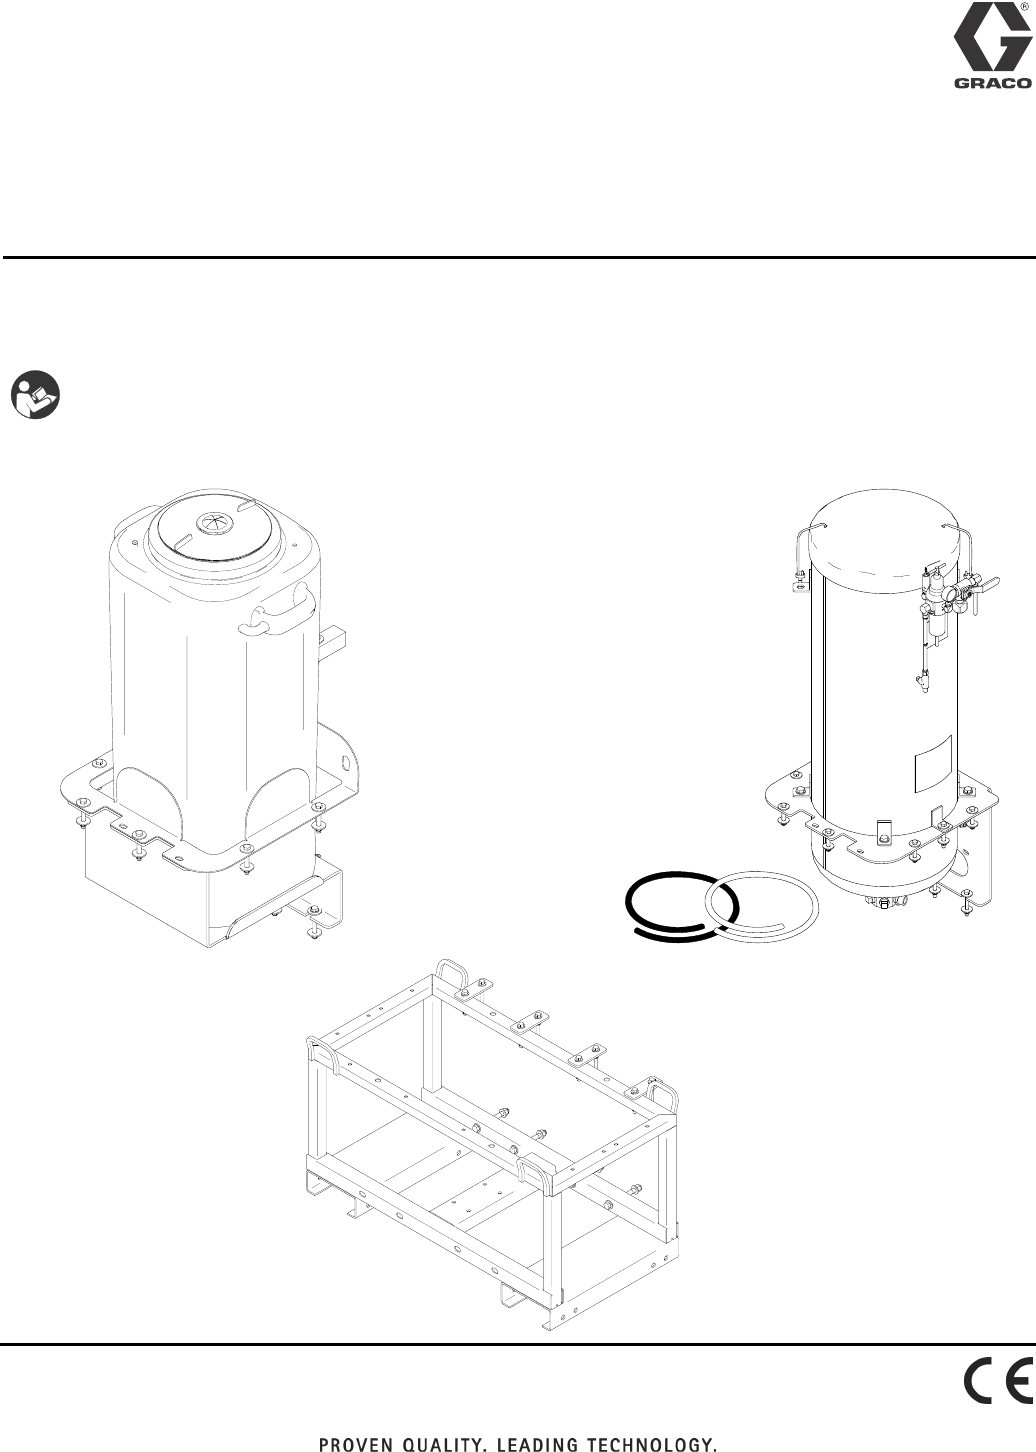
Instructions Bead Tank Kit, Paint Tank Kit, and Accessory Frame Kit For RoadLazer™ RoadPak™ Line Striping System 3A1302D EN Model 24G769 - Paint Tank Kit Model 24G765 - Bead Tank Kit Model 24H585 - Accessory Frame Kit Important Safety Instructions For complete warnings and safety instructions see RoadLazer™ RoadPak™ Line Striper System manual. Save these instructions.
Pressure Relief Procedure Follow the Pressure Relief Procedure whenever you see this symbol. NOTE: If installing to accessory frame kit (24H585) install four bolts (18) and washers (17) to top of bracket (2). Thread nuts (15) onto bolts and torque to 15 ft-lb (20.3 N•m). 4. Use hoist (or other lifting equipment) to lift bead tank (1) and lower it into tank mounting bracket (2). The system pressure must be manually relieved to prevent the system from starting or spraying accidentally.
7. Connect air regulator assembly to bead tank air inlet and tighten swivel (22). If assembling second bead tank to remote location: 10. Tighten air fitting (29) to T-fitting (39). Tighten air fitting (29) to elbow fitting (24). Cut air hose (31) to desired length and connect to air fittings (29). 24 22 29 ti16805a 31 8. Remove plug (40) from T-fitting (39) assembled to air tank on RoadPak unit. 40 39 29 ti17168a ti16808a If assembling second bead tank to RoadPak frame: 9.
Parts Parts 3 4 43 22 21 11 19 37 26 1 25 28 7 6 29 24 40 39 31 12 32 13 6 5 30 41 29 14 42 20 8 10 9 34 2 29 36 41 35 ti16801b 18 17 15 16 17 15 Ref. 1 2 3 4 5 6 7 8 9 10 11 12 13 14 15 16 17 18 19 20 4 Part 24F496 16G777 16G166 119771 100030 100840 113292 191222 104663 111834 113291 100017 109570 801020 101566 116935 108851 104655 191267 Description TANK, bead, 36 gal.
33 Gallon Paint Tank Kit (24G769) 33 Gallon Paint Tank Kit (24G769) If Installing to RoadPak Frame: 5. Insert paint tank (3) into sleeve bracket. 1. Place paint tank bracket (1) into position on frame. 2. Install three bolts (9) and washers (7) on bottom of support bracket (1). Thread nuts (8) onto bolts and torque to 15 ft-lb (20.3 N•m). 9 ti17189a 7 6. Secure paint tank with tie-down straps. 8 ti17195a 3.
33 Gallon Paint Tank Kit (24G769) If Installing to RoadPak Accessory Frame: 5. Secure paint tank with tie-down straps. 1. Place paint tank bracket (1) into position on frame. 2. Install three bolts (9) and washers (7) on bottom of support bracket (1). Thread nuts (8) onto bolts and torque to 15 ft-lb (20.3 N•m). 1 ti17197a 7 6. Insert suction tube (with strainer removed) through top grommet (5). 8 ti17193a 3.
33 Gallon Paint Tank Kit (24G769) Parts 5 16 15 6 14 2 17 7 13 7 8 3 7 12 10 11 8 1 9 7 8 ti17166b Parts List Ref. 1 2 3 5 6 7 8 9 10 11 12 13 14 15 16 17 Part Description 24H831 BRACKET, Roadpak paint tank, painted 24H832 SLEEVE, Roadpak, painted 24J353 TANK, paint, with 8 in.
Accessory Frame Kit 24H585 Accessory Frame Kit 24H585 Installation 1. Load assembled accessory frame to desired location on vehicle. 4. Install four bolts (3) and washers (4) to connect accessory frame (1) and RoadPak frame. Thread nuts (5) to bolts and torque to 27 ft-lb (36.6 N•m). 2. Secure the accessory frame by strapping all four corners down to the vehicle or by bolting the accessory frame to the RoadPak frame. 5 4 ti17187a 3 ti17196a 3.
Accessory Frame Kit 24H585 Parts 6 8 2 1 8 9 5 4 3 ti17164a Parts List Ref. 1 2 3 4 5 6 8 9 Part 24H826 24J016 115211 109570 801020 100454 100023 101566 3A1302D Description FRAME, Roadpak accessory STRAP, frame, painted SCREW, cap, hex HD WASHER, plain NUT, lock, hex SCREW, cap hex HD WASHER, flat NUT, lock Qty.
Graco Standard Warranty Graco warrants all equipment referenced in this document which is manufactured by Graco and bearing its name to be free from defects in material and workmanship on the date of sale to the original purchaser for use. With the exception of any special, extended, or limited warranty published by Graco, Graco will, for a period of twelve months from the date of sale, repair or replace any part of the equipment determined by Graco to be defective.