
Installation Sheet

4
This faucet complies with NSF61/9, ASME/ANSI A112.18.1
and CSA B 125 Standards.
Este grifo se encuentra conforme con losestandares de NSF61/9,
de ASME/ANSI A112.18.1 y de CSA B 125.
Installation Instructions Instrucciones de Instalación
~
ESPANOL
ENGLISH
4
OPERATION DESCRIPTION
DESCRIPCIÓN DEL FUNCIONAMIENTO
LAVATORY FAUCET
GRIFO DE LAVATORIO
IOG 5049.30
~
ESPANOL
ENGLISH
5
CARE AND MAINTENANCE
CUIDADO Y MANTENIMIENTO
Your Graff faucet is designed and engineered in accordance with the
highest quality and performance standards. Be sure not to damage the
finish during installation. Care should be given to the cleaning of this
product. Although its finish is extremely durable, it can be damaged by
harsh abrasives or polish. Never use abrasive cleaners, acids,
solvents, etc. to clean any Graff product. To clean, simply wipe
gently with a damp cloth and blot dry with a soft towel.
Su grifo de la Graff esta diseńado y dirigido acuerdo con los estándares
de funcionamiento y calidad más altos. Este seguro no dańar las
terminaciones del grifo durante la instalación. Cuide el producto mante-
niendolo siempre limpio. Aunque su acabado es extremadamente
durable, puede ser dańado por los abrasivos o pulientes ásperos. Nunca
utilice limpiadores abrasivos, ácidos, solventes, el etc. para
limpiar cualquier producto de la Graff. Para limpiar, simplemente
use un pańo húmedo y seque con una toalla suave.
~
ESPANOL
ENGLISH
WARRANTY
GARANTÍA
Warranty conditions and warranty registration card are outlined on a
separate sheet.
Las condiciones de la garantía y la tarjeta del registro de la garantía se
encuentran en una pagina separada.
All dimensions and drawings are for reference only. For details, please refer to actual products.
Todas las dimensiones y dibujos sirven únicamente de referencia. Para consultar detalles, ver los productos.
3
3
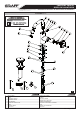
AUTOMATIC DRAIN ASSEMBLY INSTALLATION
INSTALACIÓN DEL JUEGO DE DESAGÜE AUTOMATICO
~
ESPANOL
ENGLISH
FLANGED NUT
DRAIN COLLAR
DRAIN PLUG
DRAIN SWITCH ASSEMBLY
UNDER-BOWL GASKET
COLLAR GASKET
WASHER
WASHER
NUT
TAILPIECE
TUERCA CON BRIDA
ANILLO DE DESAGÜE
TAPA PROTECTORA
JUEGO DE ALTERNADOR DE DESAGÜE
JUNTA INFERIOR
JUNTA SUPERIOR DEL ANILLO
ARANDELA
ARANDELA
TUERCA
PIPA DE DESCARGA
1
2
3
4
5
6
7
8
9
10
6
10
9
1
5
4
8
2
7
3
MIN.1"-MAX.1-9/16"
(MIN.25mm-MAX.40mm)
Ø1-1/4”
Minimum hole in lavatory
Agujero m
nimo en el lavabo
í
(Ø60mm)
Ø1-1/2” (Ø38mm)
Ø2-3/8”
(Ø32mm)
~
ESPANOL
See figs. 4 Ver. fig. 4
ENGLISH
Unscrew the nut (9) and remove the tailpiece (10) with washer (8)
from the assembly.
Remove flanged nut (1) with under-bowl gasket (5) from drain
collar (2).
Insert drain collar (2) with collar gasket (6), drain plug (3) and
drain switch assembly (4) into drain hole of a lavatory.
From underneath the lavatory thread the flanged nut (1) with
under-bowl gasket (5) onto drain collar (2). Hand tighten only.
Connect the tail piece (10) and the washer (8) with drain collar (2)
by tightening the nut (9).
Insert trap nut and gasket onto tailpiece (10) and carefully slide trap
over tailpiece.
Tighten trap nuts.
1.
2.
3.
4.
5.
6.
7.
Desenroscar la tuerca (9) y quitar el pipa de descarga (10) con la
arandela (8) del conjunto.
Quitar la tuerca con brida (1) con la junta inferior (5) del anillo de
desagüe (2).
Colocar el anillo de desagüe (2) con la junta del anillo (6), tapa
protectora (3) y el juego de alternador de desagüe (4) en el agujero
de desagüe del lavabo.
Por la parte de abajo del lavabo colocar el tuerca con brida (1) con la
junta inferior (5) en el anillo de desagüe (2). Apretar únicamente a
mano.
Conectar el pipa de descarga (10) y la arandela (8)
con el anillo de
desagüe (2) ajustando la tuerca (9).
Colocar la tuerca del sifón y la junta sobre el pipa de descarga (10)
y con cuidado deslizar el sifón sobre el pipa de descarga.
Apretar las tuercas del sifón.
1.
2.
3.
4.
5.
6.
7.
Rev. 3 August 2018
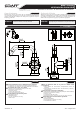
The faucet is operated by turning the handle. Left rotation enables
on-off function and temperature control (no flow control).The tempe-
rature is increased by turning 90° from cold water to full hot.
It is recommended that every 3-6 months (depending on water
quality) you remove the aerator (item 8, fig. 1) from the faucet spout
(7) in order to remove any impurities. For this purpose, use
the special key (D) (supplied).
El grifo se hace funcionar girando la maneta. La acción de rotación
izquierda permite activar y desactivar el control de la temperatura
(sin control de flujo). La temperatura aumenta al girar 90 ° desde
agua fría a completamente caliente.
Una vez a 3-6 meses (dependiendo de la calidad del agua) se
recomienda quitar el difusor (pos. 8 dis. 1) del caño de la batería (7)
con el fin de limpiarlo de todo tipo de ensuciamiento. Para eso
use una llave especial (D) anexa al juego.
1.
2.
1.
2.